 Take a look at some classic cookie molds and design your own relief projects with a purpose
By Mark Weinstein
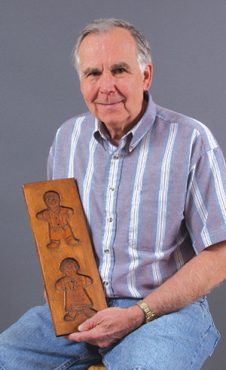
Gene Wilson was a college biology professor vacationing at Colonial Williamsburg in Virginia when he first noticed old world-quality, wood-carved cookie molds in a bakeshop. Shortly after that, he and his wife, June, saw similar cookie molds in European museums. That piqued his interest enough to try to carve one. At the time—more than 30 years ago—he dabbled with carving, making signs with a router.
Using a router and utility knife, Gene relied on his high school and college printing background to reverse-carve a gingerbread boy and girl on pine as a decoration. As Gene made more of these hollowed-out or intaglio carvings as decorations for friends, they asked him about other uses. And presto, he began carving Springerle presses and other molds for cookie baking. Gene did not immediately realize it, but he had found a sweet recipe for carving success.
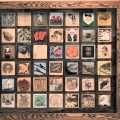
The Wilson children had fun making gingerbread cookies from his molds. Then, a friend made cookies from his molds and sold them. Gene joined the Belleville Area Holzschnitzers (Woodcarving) Club, and soon, with his wife, began selling molds at fairs and events. Photocopying several molds, Gene created his first catalog in the mid-1970s for mail order sales. Gene’s molds helped pay for his two children’s college educations. These days, his business also has a website, www.CookieMold.com.
The hub of Gene’s creativity is in an area of the Wilson garage-basement that has no return ducts to the rest of their house in Belleville, Illinois. Gene keeps different pieces of wood cut to precise sizes, sanded and stored on walls of shelves in the basement.
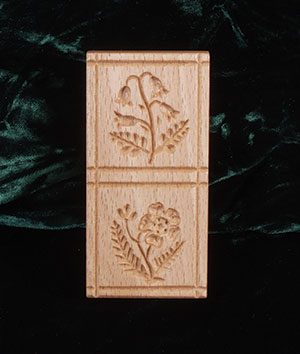
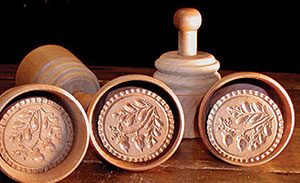
Carved from beech, this two picture Floral Springerle press is 4″ long by 2″ wide.
Using a handheld power router with a 1/4″ or 1/2″ straight bit, Gene makes a deep cavity in his first cut. Because the cavity is where the design will be carved, Gene uses a heat transfer pen to apply the pattern. He uses a 1 1/2 hp router with a super extended bit to get into the cavity for free-hand router carving. He carves the details for each mold with four to 12 different bits.
The molds vary in size from a 1 3/4″ square, four-picture “World’s Smallest Springerle Press” to a 12″ long by 5 1/2″ wide, deep-cavity mold of King William III. For Gene, carving redwood signs did not have the challenge and creativity he enjoys when carving molds.
He experienced considerable trial and error early. “One of my favorite comments is ‘Your work keeps getting better and better,’ ” he says. “The same pattern I may have done 20 years ago has changed because I’ve added other details.” Gene did not like the fuzziness with pine, so he began using beech and cherry.
His attitude toward routers also changed. “I invested more into carbide bits and routers,” Gene recalls. “At one time I had 18 routers. I thought I needed more routers so I could have them ready with different bits. Now I mainly use two routers—a Milwaukee and a Craftsman—and change the bits. I use about 20 different types of bits. The solid carbide bits are my best investment. They stay sharp.”
His Product Line
Gene’s 120 different cookie molds come in various sizes and themes including:
This six-picture Springerle press mold is Gene Wilson’s most requested mold.
Springerle Presses:
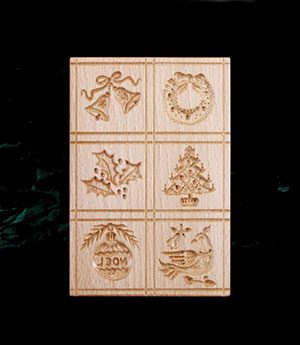
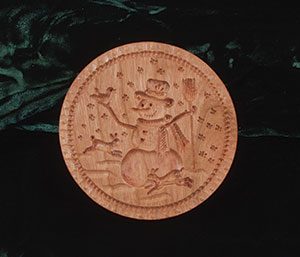
Designs are pressed onto rolled dough for picture cookies. They include Christmas ornaments and characters, Victorian images, Hansel, Gretel and the witch, fruits and animals. Gene’s most requested mold is a six-picture Springerle because it has Christmas designs. Snowmen have been especially popular the last few years.
Cookie Stamps:
Easiest of Gene’s wooden molds to use, chilled balls of dough are imprinted as a stamp flattens them. These include animals, a rose, strawberry, holiday themes and tea party designs such as a Dutch heart, floral heart and four hearts. Gene began making his popular cookie stamps about 20 years ago from pieces of wood too small for anything else. He consigns some of them for sale to marketplaces in Illinois.
Deep-Cavity Speculaas Molds:
Dough pressed into the carved cavity creates cookies bearing such images as Dutch and Alpine boys and girls, a windmill, cat and large Scottish thistle shortbreads. Gene personalizes deep molds along the perimeter with names and creates cookie mold plaques commemorating such milestones as a customer’s wedding, anniversary or loved one’s birth date. He numbers some molds, such as his heavily detailed Twelve Days of Christmas.
“There’s a lot of creativity in the designs,” Gene says. “I lean on other designs out there in the past and look at pictures to get ideas.” Gene not only signs or initials and dates each mold, but provides customers directions for using them. He suggests, for example, using slightly more dough than needed to fill a deep-cavity mold because it not only produces a thicker cookie, but one that will release more easily.
Gene plans to reduce his product line to 50 designs to focus on smaller molds, more popular now as opposed to the 1970s, when people liked larger molds.
 Gene’s Customers
His customer base includes people who have traveled in Europe, among them Americans in the military. “The Olde World molds are quite visible in areas such as Holland, Belgium, southern Germany and Switzerland,” Gene says. “Other customers are trying to reconnect with a family tradition, trying to find molds similar to ones their parents and grandparents had. Some people buy the molds for their collections.”
Grandparents are also customers. Sometimes, Gene adds Shaker-style peg handles to the stamps for easier use by elderly people and children.
Passing Along His Art
Gene fears carving cookie molds is a dying art. “The average person would not know the difference between a resin, plastic, or wooden mold,” he says. And about two-thirds of his molds are purchased for decorative uses. “I think a lot of people who get these as gifts are afraid to use them,” Gene says (see Finish Is Food Safe).
A few years ago, Gene might have jealously guarded his designs and mold carving information. His outlook has changed since battling cancer and seeking an apprentice. “I really want to pass this on,” Gene says. “I have a grandnephew who has worked with me a few weeks. He learns a little every time he comes over. We’ll see.”
 A Cookie Mold History Lesson
Cookie mold carver Gene Wilson says picture cookies date back to a variety of ancient Greek and Roman carved molds. European bakers used wood-carved molds during the 14th to 17th centuries for creating fancy cookies for the church and royalty. Such cookies also became popular with common people. Czechoslovakia, the German state of Bavaria and Hungary have rich backgrounds of creating and using fancy wooden cookie molds. Many immigrants to the United States brought small cookie molds.
However, wooden molds, with the exception of butter molds, were never mass-produced or carved in abundance in America. In early America, wooden mold users included the Penn-Dutch and bakers, who wanted to increase business with appealing, edible-art picture cookies.
Later, metal cookie cutters made wooden molds rare, if not obsolete. Metal and plastic cookie cutters were manufactured in abundance. Resin molds marketed were decorative and functional in shaping cookies such as Springerles. Gene says it has become more difficult to find any kind of hand-carved cookie or butter mold in the United States or Europe, and the market for carved cookie molds is a small one.
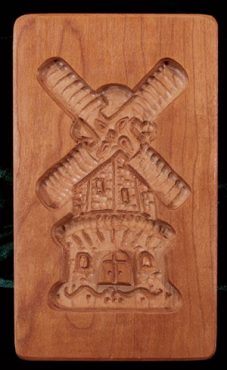
This Windmill mold in the typical Dutch style is made from cherry and makes a cookie 5″ high by 3″ wide.
Finish Is Food Safe
Gene Wilson first used vegetable oil to finish his molds so they would be food safe. Then, he discovered a beautiful finish could be applied with two or three coats of a non-toxic, food-safe, salad bowl finish from General Finishes Corp. Using a soft cloth or lint-free paper towels, he brushes on and wipes off the finish, allowing each coat to dry for at least four hours and the final coat to dry 24 hours.
The salad bowl finish provides for easy cleaning of the mold after use. This finish transforms cherry wood into a reddish brown that deepens in color with age.
Yummy Recipes
Here are two of June Wilson’s popular recipes for making cookies using her husband’s molds:
Orange Springerle Cookies
Ingredients for a four-dozen yield:
- 6 egg whites
- 1 lb. powdered sugar
- 2 teaspoons baking powder
- 1 teaspoon orange oil (natural flavor)
- 3 1/2 cups all-purpose flour
- Optional: rind of one orange
Instructions:
- Beat the egg whites until they are very stiff.
- Carefully fold in the sugar, baking powder, orange oil and rind.
- Work in the flour to make a stiff dough.
- Cover the dough and allow it to chill for at least four hours.
- Roll the dough and imprint with cookie presses. Allow to air dry for eight hours or overnight on a kitchen counter.
- Bake about ten to 15 minutes in a preheated oven set at 325 degrees.
Scottish Shortbread Cookies
Ingredients for a four-dozen yield:
- 1 1/2 cups margarine or butter
- 3/4 cup sugar
- 1 teaspoon butter flavoring
- 1 teaspoon almond flavoring
- 4 cups all-purpose flour
- Optional: icing
Instructions:
- Cream the margarine, sugar and flavoring in a large mixer bowl set on low speed.
- Stir in 1 1/2 cups of flour, 1/2 cup at a time. Mix well. Beat until light and fluffy. Knead in remaining flour.
- Shape dough into one or more large smooth balls, cover and refrigerate for three hours or longer.
- Shape into 1″-diameter smooth balls and flatten and print with a Scottish thistle or other cookie stamp. Trimming edge with metal cutter is optional.
- Bake about ten to 25 minutes in a preheated oven set at 325 degrees, until the center of the cookie is firm to the touch but not hard. Optional: Frosting may be applied to the backside of cooled cookies.
Tips
Cookie Mold Cleaning
Dusting a mold with powdered sugar before using it prevents the dough from sticking and keeps the mold clean and carved lines sharp. Clean molds immediately after use.
If dough sticks in a mold, remove it with a toothpick or moistened toothbrush. Do not let any dough residue in the mold harden. Gene Wilson says anti-stick Pam works well after using the mold and cleaning it.


• Plus! Get digital mini magazines in your e-mail between printed issues. Click here to subscribe to StropTalk, our e-mail newsletter.