Keep your tools sharp and secure for less than five dollars
By Lynn Diel
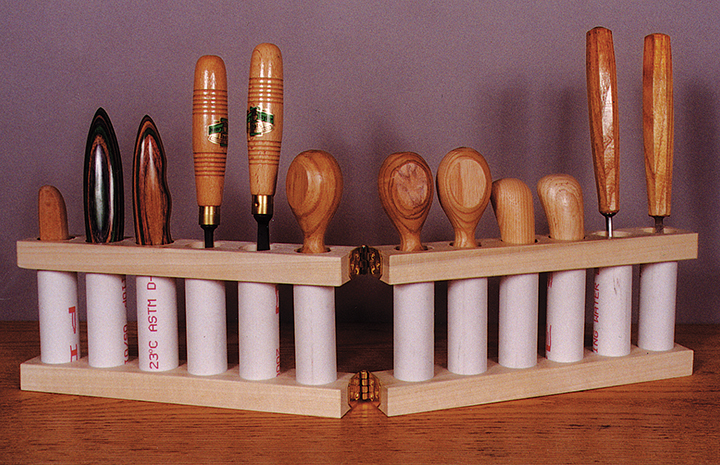
Almost every carver I meet has a way to organize tools for home use or to bring to club meetings or take on trips. Tool rolls, boxes and even fancy tool chests all come into play. After using these various tool totes, I decided to design my own. Organization was certainly a criterion, but I also needed to keep the carving tools separated and consequently sharp. My design holds 12 tools—or craft supplies such as paintbrushes, but it can be made larger to accommodate more. It folds for easier storage, but when open all the tools are lined up and readily accessible. When I added the cost of the components, I found the tool holder cost about $4.50.
Construction
The basic design of the tool holder has lengths of plastic pipe fitted top and bottom into wood. Start with a piece of hardwood lumber that measures at least 39 in. Most home centers carry 1 x 2 boards, actual size 3/4″ (1.9cm)by 1 1/2″ (3.8cm), so ripping the lumber will not be necessary. A 4-foot length of poplar costs around $2.
Schedule 20 plastic water pipe has an outside diameter of 1″ (2.5cm) and an inside diameter of 15/16″ (2.4cm). It is available at many home improvement centers or from local plumbing supply shops. The project requires a dozen 3 1/2″ (8.9cm)-long sections of pipe, so you will need a length that measures at least 4 feet. Give yourself some extra pipe to allow for saw kerfs and a mis-cut or two. Since the plastic pipe is sold in 10′ (3.05m) lengths, you may want to build two tool holders.
Cut the lumber into four equal-size boards and locate a centerline through the length of each. Locate the centers for the dozen sections of plastic pipe and, using a 1 1/8″ (2.9cm) Forstner bit, drill the holes 1/2″ (1.3cm) deep. A drill press is more accurate than a hand-held power drill. Take two of the boards and drill pilot holes 1/8 (3mm) in diameter straight through. Use the holes left by the point of the Forstner bit as a guide. Turn the boards over and drill holes using a 1″ (2.5cm) Forstner bit, making sure to break through to the 1 1/8″ (2.9cm) holes drilled from the opposite side. The two different-size holes provide the opening for the tool and allow the pipe to seat itself so it does not come all the way through the board
To assemble, spread a thin layer of slow-setting epoxy over the outside of the bottom 1/4″ (6mm) of each length of pipe. Press each piece into the bottom board. Set the assembly on the work surface and spread the epoxy on the outside of the top 1/4″ (6mm) of the pipes. Starting at one end, press the top board down on the pipes. If the epoxy runs out of the holes, use denatured alcohol for cleanup. Put aside the assembly for overnight drying.
To join the pair of tool holders together, line them up and clamp. Make sure the hinges, which are available at home centers and craft stores, are on the ends that have extra wood so the screws do not come in contact with the pipes. Screw the hinges in place and the holder is ready to organize your tools at home or on the road.
Materials:
• Hardwood, 1 1/2″ (3.8cm) thick: 4 3/4″ 12.1cm) x 9 1/2 (24.1cm)
• Schedule 20 plastic water pipe, 1″ (2.5cm)-dia.: 12 each 3 1/2″ (8.9cm)-long sections
• Brass hinges: 3/4″ (1.9cm) long x 2 3/4″ (7cm) wide
Tools:
• Hacksaw
• Drill press with bits: 1/8″ (3mm)-dia. twist, 1″ (2.5cm)-dia. Forstner, 1 1/8″ (2.9cm)-dia. Forstner