For more than twenty years, Rick Wiebe, who lives in Westbank, British Columbia, Canada, served as a pastor. During that time, he took a special interest in helping the congregation’s youth. After retiring from the ministry, he launched a different kind of mission—teaching kids to whittle with a pocketknife.
“I’ve always felt kids need to learn to do more things with their hands that don’t require electronics,” Rick said. “If somehow all of our electronics shut down, you can still work with your pocketknife. That’s the concept I’m trying to convey to kids. I’m not saying technology is bad—I’m just trying to teach them they can learn a useful skill independent of all that.”
Rick carries his pocketknife and a small block of wood wherever he goes. He has even been known to whittle 4″ hummingbirds at restaurants while waiting for his meal, and then leave the carving as a tip.
“The great thing about a pocketknife is you can safely fold it up and carry it in your pocket. So when the urge to whittle strikes, you can just pull it out and use it. That makes whittling easier. The easier it is, the more often kids will do it, and the more they whittle, the better they’ll become,” Rick reasoned.
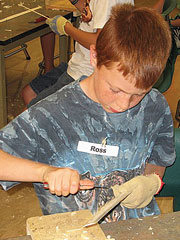
Nine-year-old Ross Freeman, from Calgary, Alta., Canada, lets the chips fly.
Rick got his first pocketknife at age seven and taught himself to whittle small toys, such as canoes, boats, and peashooters. He began selling his work in 1984. Four years later, he was teaching others. Today, his students number well into the thousands.
“I teach kids and adults, but I really enjoy teaching kids because they’re so open and eager” Rick said. “It’s enjoyable for me to see how fascinated these kids are with carving, and to watch them develop new skills that can be applied to other areas of their lives as well.
“Plus I’m still a kid at heart,” he said with a laugh. Typically Rick’s courses run three days, two hours per day. Shelia Gun, leisure services coordinator for Lake County, B.C., says Rick Wiebe’s classes have become an annual favorite.
“Rick has an amazing style with the students where he keeps a calm control over fifteen knifewielding young people excited about using their hands and imaginations,” Shelia said.
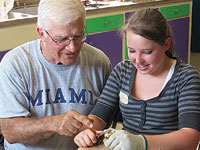
Rick offers fourteen-year-old Kate Noga some carving pointers at an after-school program held at St. Joseph’s school in Kelowna, B.C., Canada.
To pique his students’ curiosity right from the start, Rick arrives well in advance and starts whittling away. Students observe him as they enter the classroom and become inspired by what they see. Then, he grabs their attention with a stern warning and an eye-popping demonstration.
“I kind of freak them all out by telling them they’re going to have a knife in their hands that’s sharper than any knife they’ve ever held in their lives,” he said. “Then I pull up my sleeve, pick up one of the knives, and shave the hair off of the back of my arm to illustrate my point. That usually gets their attention.”
Nicknamed Mr. Chips, Rick teaches quick and easy whittling projects kids can have fun with, like rubberband shooters, boomerangs, paddle boats, and flying propellers.
“A big part of the lesson is to teach them a pocketknife is not a weapon, but a terrific tool they can use to make all kinds of things,” Rick explains.

Rick shows Meghan Irwin how to carve away from her body.
Rick has a great orientation speech for anxious parents, especially the ones who think learning to carve is too dangerous for their children.
“Kids are doing things all the time that are infinitely more dangerous than messing with a pocketknife. For example, it’s not anyway near as dangerous as jumping on a trampoline, which could paralyze you, or riding a bicycle on the road where cars can kill you,” he explained.
While Rick was explaining this to one group of anxious parents and their kids, a boy wobbled into the classroom on crutches.
“I asked him what happened and he told us he had fallen off his bike and broken his leg,” Rick said. “At that point all of the parents looked at me, looked at each other, and quietly exited the room, leaving their kids behind for the class.”
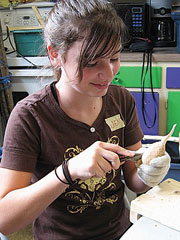
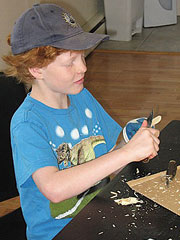
Thirteen-year-old Jen Murray from Kelowna, B.C., Canada focuses on her carving.
Rick takes great measures to ensure safety. This includes wearing cut-resistant gloves on the hands that hold the wood and a recitation of all of his safety rules before they even touch a knife. He deeply imbeds respect for the knife and for each other in their minds. As a result, even with a classroom full of frisky kids, his safety record is admirable.
“I think kids are really special people. To be their friend and a part of their development is a privilege I value greatly. I expect to continue teaching whittlin’ with a pocketknife to kids for a long time.”
For more information about Rick Wiebe and his work, visit his website at www.woodcarvingbiz.com.
Safety Tips For Kids
- Work with sharp tools only. Too much pressure must be applied to dull tools to make them work. When they slip, the result is apt to be more serious.
- Use a carving glove. Wear it on your non-knife hand to reduce the chance of injury.
- Do not use your leg as a workbench! Workbenches that bleed are a bad idea.
- Practice. Any skill worth learning is worth practicing.
- Slow down. Lots of little chips are better and safer than a couple of big chips that need muscle.
- Use a workbench, log, or other firm surface to assist when possible. Avoid dining room tables.
- Always think! Visualize what happens when, not if, this knife slips. Let the answer guide you away from hazard.
- Learn to carve toward yourself safely. Sometimes it is the only way to do the job, but safety should not be compromised.
- Consider others nearby little children especially. Absolutely NO horseplay can be tolerated in the presence of sharp items!
- Keep your blade sharp. Sharpen your knife frequently to reduce the risk of injury.
Rick ensures each of his students wear cut-resistant gloves and follow all of the safety rules.
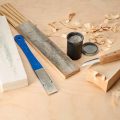
Sharpening a Pocketknife
Step 1:Set up the sharpening station. Start with a good stone; it will cost around $12 and will last for years. It’s much more efficient than sandpaper or emery cloth. Work on a firm surface like a sturdy table or workbench. Put a rubberized mat under the stone to keep it from skidding around. Work standing up.
Step 2: Put the knife on the stone at about a 10° angle. Make little wedges of wood and keep them with the stones to help get this angle right. At no time should the edge of your knife be in contact with either the stone or the strop at any angle steeper than 10°. Many sharpening problems can be traced to a failure to observe this rule.
Step 3: Holding that 10° angle, apply firm pressure to move the knife. Move it either straight back and forth, in a circular motion, or in some combination of the two. Make sure the grit of the stone grinds down the steel.
Step 4: Form the wire edge. Keep moving the blade over the stone until a little curl of steel, called a wire edge, forms on the edge of the blade away from the stone. Do not turn the blade over until the wire edge forms along the entire edge. Then, continuing to apply firm pressure, do the same thing on the other side of the blade. Do not quit until a wire edge forms all along the edge.
Step 5: Remove the wire edge. With the wire edge toward the stone, hold the blade at a 10° angle and rub it on the stone with light pressure until the wire edge goes to the other side of the blade. Then work the opposite side of the blade the same way. Repeat this five or more times until it is hard to detect a wire edge on either side of the blade.
Step 6: Finish the sharpening with a strop. A strop is a piece of leather, with the rough side up, glued to a flat stick. Apply a fine-abrasive stropping compound to the leather as directed by the compound’s manufacturer. Then, still standing, apply firm pressure at the same 10° angle while pulling the knife edge along the length of the strop. The edge must trail during this action or the blade will cut into the leather. Without changing the angle of the blade, pick up the blade, go back to the start, and do it again for at least 75 strokes. The edge will develop a polish. Do the other side at the same angle. The blade will now be sharp.
Step 7: Maintain the edge. When the sharp edge is dulled from use, 20 strokes on each side of the blade on the strop will bring back the sharp edge. There is no need to go back to the stone unless the blade is nicked or very dull. I usually strop my blades about 30 times before I need the stone again.