

Build a simple but sturdy organizer for your paint collection
By Dick Truesdell
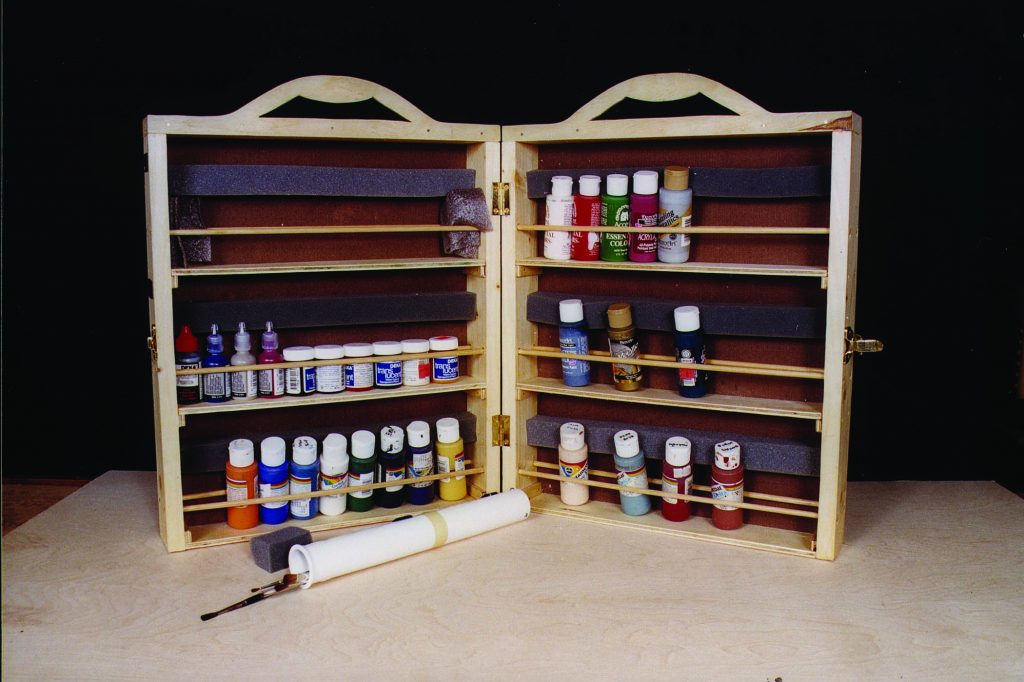
Like many woodcarvers, I have accumulated a sizeable collection of paint bottles. Storing, organizing, and transporting all of them to classes was difficult, so I decided to build this handy case. Done as a weekend project, I produced a paint tote that holds as many as 60 bottles and can be built for less than $20 in materials.
Selecting Lumber
I bought my lumber at the local home improvement store instead of at the lumber yard. I was able to purchase it already planed smooth with precise, 90° edges. While I could have cut the wood on a table saw and used a jointer for the final clean up, I spent a few dollars more on lumber that did not require heavy power tools. Once I found the boards I liked for the case, I cut my lengths with a circular saw, but even a handsaw will do the job. I chose pine, selecting lengths that were as knot-free as possible. But other woods such as poplar and maple are ideal, although the case will be heavier and cost slightly more.
When purchasing lumber, you need to be aware of measuring idiosyncrasies and nomenclature. A 1×3 is actually 3/4″ by 2 1/2″ (1.9cm by 6.4cm), and a 1×4 is 3/4″ by 3 1/2″ (1.9cm by 8.9cm). When you see the word “clear,” it means the wood is free of knots. S4S stands for wood sanded smooth on all four sides. And knotty pine stands for “a few solid knots.”
The dimensions of the two halves of the case, which are hinged to open and stand upright, depend on the size and the number of the bottles being stored. The paints I prefer are Ceramcoat®, Folk Art®, Apple Barrel®, and a few others that come in bottles 1 3/8″ (3.5cm) in diameter. Given that dimension, I was able to use 1x3s to construct the case framework. Liquitex®, Golden® and some other brands offer containers with larger diameters, so 1×4 lumber will probably fit the bill.
 Dowel Retainers
To prevent the paint containers from shifting, I designed the case with pairs of 1/4″ (6mm)-diameter dowel retainers. To make sure that the holes line up on both sides of each half of the case, drill the sides while stacked and clamped together. In fact, it’s wise to stack all four sides and drill the holes for the dowels in one operation. To prevent breakout on the lumber, use a brad point drill bit and a scrap board to back up the stack.
I made the pairs of holes for mine 1 5/8″ (4.1cm) apart on center, wide enough to accommodate the typical 1 3/8″ (3.5cm)-diameter paint bottle. Making them slightly closer together will provide a snug fit. Don’t worry about not having enough space between the dowels. They are thin enough to have a fair amount of flex.
For easy insertion, drill the holes so that they are slightly oversized. You can then slide each dowel through from one side of the assembled case and cut off the excess. Hold it in place with glue. If there is too much play in the hole, use epoxy. Before the glue dries, pull the parallel dowels together with your fingers or turn them if they are slightly bowed to minimize the spacing for a firmer grip on the bottles.
Assembly
The case framework consists of four sides, two tops, and two bottoms. Reduce the top pieces to 2 1/4″ (5.7cm) wide to allow room for the handles. If you don’t have a table saw, the lumberyard or home center should be able to rip the boards to size. Assemble the case with rabbet joints, or simply butt the pieces of lumber together. Use 1 1/2″ (3.8cm) #6 wood screws to assemble the case. Predrill the holes and glue the joints, making sure the sides are square before the glue sets up.
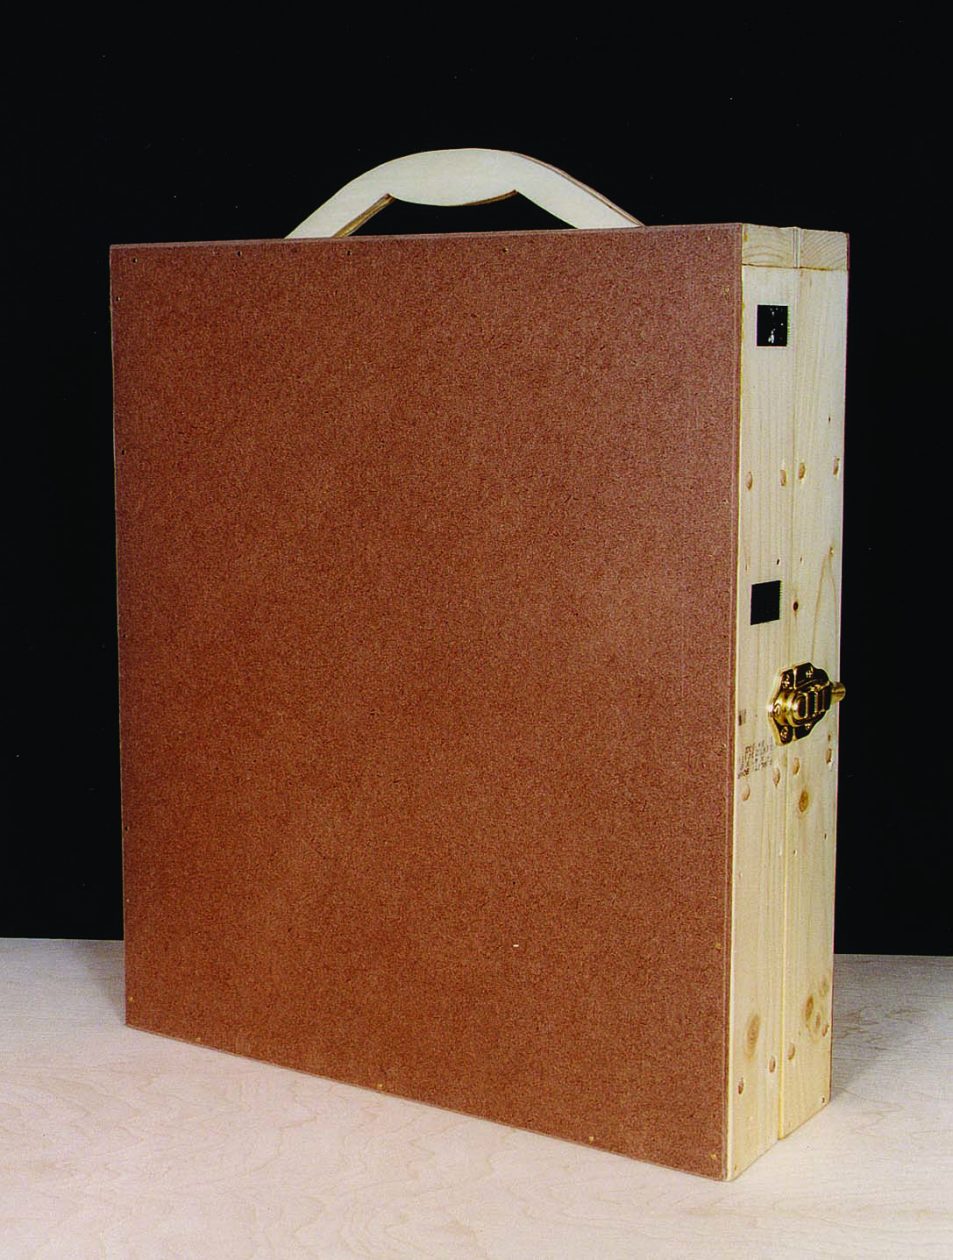
Place each half of the case on a piece of tempered Masonite and draw the outline. If you use a square corner of the panel as a guide, you are more assured of having the framework squared up. Use glue and 1″ (2.5cm) wire nails around the edges of the case to hold the Masonite in place. Apply weight to the backs and allow the glue to dry overnight. Then, put a slight bevel on the sharp edges of the Masonite with a block plane or sandpaper, being careful not to catch the nails.
The Hardware
To install the hinges, clamp the two halves together and mark the location for each hinge. Make stop cuts for the hardware and use a carpenter’s chisel to remove only enough wood to recess the thickness of each hinge. Screw the hinges in place and close up the case. Position a chest latch and attach it with screws.
Getting a Grip on the Project
I designed the paint tote case with two handles (see illustration). I suggest that you cut out a pattern first and see how your hand grips it. Once you find a fit that accommodates your fingers, trace the pattern on two 1/4″ (6mm)-thick pieces of solid lumber, making them slightly longer than the case is wide. You can use plywood, but be advised that it tends to splinter and may require considerable sanding. You will also have one side with a better grade of veneer.
Sandwich the two handles together and cut them out on a bandsaw or scroll saw. Saw them at the same time so they match up for a comfortable grip. Lay the closed case on a flat surface and place the handles between the two halves. Mark their locations with a pencil, making sure that they are centered. With the halves open, glue and nail each handle in place and cut off the excess on the ends of the handles.
Shelving It
Shelves keep the bottles upright and separated. Plywood or solid lumber will suffice, and the shelves can be dadoed into the sides or attached to shelf supports. If you don’t dado the shelves into the sides, support them with scraps of 1/4″ (6mm)-thick wood or plywood. Nail both shelves and supports in place with 3/4″ (1.9cm) wire nails. You may want to drill pilot holes into the sides to prevent damaging the case and shelves. If desired, line the shelves with foam strips used for insulating a window air conditioner to insure the bottles stay in place when you move the case.
The Finishing Touch
Regardless of the wood you choose, a good finish will give it a professional look and keep the wood clean. Staining is optional, but you should coat the case with varnish. Medium gloss polyurethane is a good choice. Apply the varnish only to the solid wood or plywood. Masonite becomes dull if varnished, so leave it unfinished. Use painter’s tape to mask off the backs before finishing the case.
Click here to download an assembly drawing to help you build a case. Here is another version, with dimensions: Paint Tote Case 3D.
Note that each half of my case is 18-1/4″ (46.3cm) tall by 15-5/8″ (39.7cm) wide by 5-1/4″ (13.3cm) deep.
Materials (for a case that holds 60 1 3/8″ (3.5cm)-dia. bottles):
- Masonite (backs): 1/8″ x 24″ x 48″ (3mm x 61cm x 1.22m)
- 1×3 lumber (framework): 14′ (4.27)
- Plywood or solid wood (shelves): 1/4″ x 2 1/2″ x 6′ (6mm x 6.4cm x 1.82m)
- Dowels, 1/4″ (6mm) dia. (retainers): 6 each 3′ (91cm) long
- Wood glue
- Epoxy (optional)
- Brass hinges: 2 each 1″ (2.5cm) wide x 1 1/2″ (3.8cm) long
- Chest latch: 2 3/4″ (7cm)
- Wood screws, No. 6 x 1 1/2″ (3.8cm)
- Wire nails: 1″ (2.5cm); 3/4″ (1.9cm)
- Polyurethane: medium gloss
- Painter’s tape
Tools:
- Circular saw, table saw, or hand saw
- Drill or drill press and bits: 9/32″ (7mm) brad point; assorted to match screws and nails
- Block plane or sandpaper
- Carpenter’s chisel
- Screwdriver
- Bandsaw or scroll saw
- Measuring tape
- Pencil


