 Learn the secrets that unlock this striking technique
By Rick Wiebe
I learned the basic process of making wooden fan birds from books and magazine articles, and then developed my unique style and process by lots of trial, error, and practice. It does take practice to get good at this—almost no one can get it right the first few times. I suggest preparing six or eight extra blocks of wood and practicing making fine, uniform splits before trying the technique on your project blank.
Many types of pocketknives will work to make fans. Look for a good-quality knife with a thin blade. It’s also helpful to have a blade that will reach across the blank. Your knife must be sharp—if you can’t shave with it, you can’t carve with it.
Fan carving demands long-fibered wood that will split straight. I use western white pine, spruce, and yellow cedar (Alaskan cedar). Other woods that work well are eastern or northern white pine, sugar pine, white cedar, Huon pine, and King Billy pine. Avoid ponderosa pine, lodgepole pine, jack pine, and radiata (Monterey) pine. Western red cedar and Douglas fir are hopeless, and basswood is not a good choice, either—it doesn’t split. You may have trouble finding appropriate wood at specialty wood suppliers because their wood is kiln dried—it will not re-soak well. Fresh, undried wood is ideal.
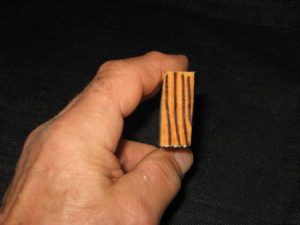
To prepare blanks for carving, saw pieces 6″ (152mm) long and split (don’t saw) the blanks to 1½” to 2″ (38mm to 51mm) wide by 3/8″ to ½” (10mm to 13mm) thick. Split the blanks so the growth rings run edge to edge on the blank. Orient the knife across the rings when you split the feathers apart.
Stand the blanks in a container and cover them with water. Cover the container with a plastic bag and let it soak for a week, adding water as necessary. Keep soaked wood wet in a sealed container or in the freezer to prevent drying or mold. You don’t have to soak fresh, undried wood.
Carving the Hummingbird
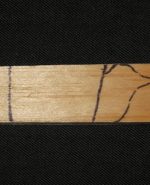 |
Step 1: Use a felt-tip pen to sketch the profile of the bird’s head, body, and feather block on the wet blank. Slightly angle the junction of the body and feathers (the hinge). The angle is not critical, but I always make the bottom feathers a little shorter than the top ones. |
 |
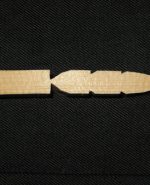
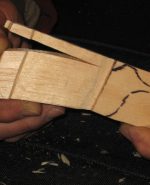
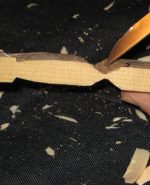
Step 2: Using careful controlled cuts, whittle the feather block as shown. The hinge where the feather block meets the body must not be wider than 1/8″ (3mm). The stop cuts must not extend into that 1/8″ (3mm). The shoulder below the feather block must be square (not bevelled) to positively stop the knife blade when you make the feather splits. The notch at the end of the feather block is ¾” (19mm) from the tip and 3/16″ (5mm) deep. The shape of the feather tip is not important. |
 |
Step 3: Add decorative notches (optional). If desired, cut one or two additional decorative notches in the feather block to create a more realistic feathery appearance. |
 |
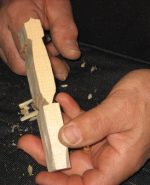
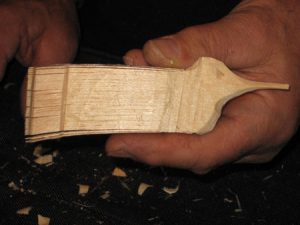
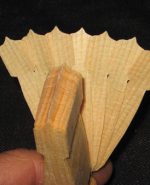
Step 4: Stand the blank on end (head down) on a hard nonslip surface or clamp it in a vise. Position the thumb of the non-knife hand on the back of the blank. Use your thumb to guide the width of the cut. Work from the bottom of the bird toward the top. Keep the fingers of your non-knife hand on the top of the blank— not along the side or bottom. The knife can easily slip—make sure nothing is in its path. Do not split the wood behind the bird’s head. |
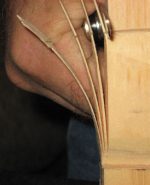 |
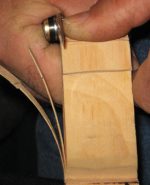
Step 5: Tilt the blade to match the angle the edge was sharpened to (10° in my case), and then hold it firmly at that angle as you apply pressure to carefully split the feather down to the square shoulder. Do not stop each split until the blade contacts the shoulder, but do not go farther than the shoulder. Each feather should be approximately 1/16″ (2mm) thick. Practice the technique on scrap wood first. |
 |
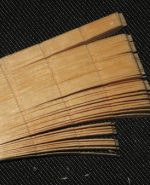
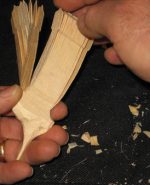
Step 6: Continue splitting the feather block until the cuts align with the back of the head, 1/4″ to 5/16″ (6mm to 8mm) from the edge of the block. You will discard the un-split piece later. |
 |
Step 7: Shorten the tail feathers (optional). After splitting the feathers, shorten nine of the bottom feathers at the first notch and reshape the tips. Hold the feathers together firmly to carve them like a solid piece of wood. |
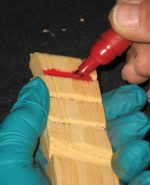 |
Step 8: Color the feathers (optional). Put on rubber gloves. Using a permanent felt tip marker, color the tips and notches of the wing and tail feathers. |
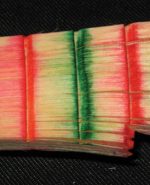 |
Step 9: Smear the color (optional). Using cotton balls, apply ethyl, or denatured, alcohol to the entire feather block so the colors run. Note: Isopropyl, or rubbing, alcohol will not work. Carve the rest of the bird with gloves on to keep your hands clean. |
 |
Step 10: Remove the shoulder. Bevel the shoulder down to the hinge, taking care not to thin the hinge any farther or to leave any shoulder. There should be no step on the hinge area, just a perfect V shape. |
 |
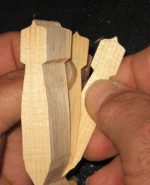
Step 11: Shape the bird. Holding the split feather block firmly, whittle the head and body profile. Narrow the head and beak, round the body, and add the eyes. Break off the un-split part of the feather block to gain access to the back of the head. |
 |
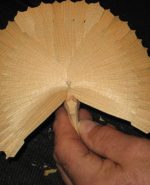
Step 12: Form the tail. Count nine feathers from the bottom of the bird (the shortened feathers, if you cut them in Step 7). The ninth feather in from the bottom will become the center of the bird’s tail. Grasp that feather in your left fingers, with the top of the bird toward you. Gently pull the next feather down (the eighth) over to the right and hook the notch over the ninth feather. Pull feather seven to the left and hook it in place. |
 |
Step 13: Finish the tail. Continue moving and hooking the remaining feathers, alternating sides, until there are seven feathers in the tail. If one breaks off, just continue the pattern with the next feather. Break off and discard any excess feathers. |
 |
Step 14: Form the wings. Flip the bird over so the tail is toward you. Gently hook the next feather in the stack over one of the outermost tail feathers. Do the same on the other side, and keep repeating the process on alternate sides until you run out of room or out of feathers. If you have too many feathers, break off and discard the excess. |
 |
Step 15: Position the wings. With the head of the bird toward you and pointing down, grasp the farthest right tail feather with your left thumb and forefinger. Grasp the adjacent wing feathers with the thumb and forefinger of your right hand. Twist down with the right hand and gently pull forward so the wing feathers squeeze past the tail feathers on this side. |
 |
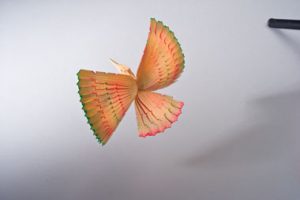
Step 16: Finish the bird. Turn the bird over, grasp the tail feathers in your left hand and the wing feathers in your right hand, and then twist the second set of wing feathers into place. Adjust the feathers as needed. Using cyanoacrylate (CA) glue or white glue, place a few drops on the hinge and a drop where every feather touches the next one to keep the feathers from unhooking as you handle the bird. |
TIP
Keep your wood wet
Carve the fan-tailed bird in one session. If you have to leave the carving until another day, wrap the wood in a damp towel to keep it from drying out before you get back to it.
Materials:
• 1/2″ x 2″ x 6″ (13mm x 51mm x 152mm) wet wood
• Felt-tip pen
• Cyanoacrylate (CA) or white glue
• Permanent felt markers (for coloring bird; optional)
• Ethyl alcohol (ink solvent; optional)
• Rubber gloves (for coloring bird; optional)
• Cotton balls (for smearing color; optional)
Tools:
• Carving knife
• Vise (optional)
CLICK HERE to download the Fan-Tailed Hummingbird Pattern.
 CLICK HERE to see more great projects from Woodcarving Illustrated Summer 2017 (Issue 79). CLICK HERE to purchase the issue.