Carve a Valentine’s Day Gift in a weekend
By Robert W. Tinsley
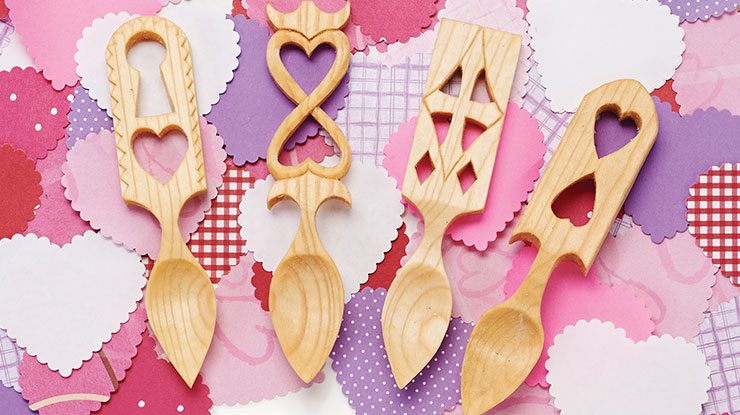
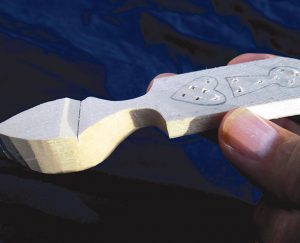
The Welsh lovespoon is an ancient symbol of romance and commitment. Legend states that a man carved a lovespoon to show interest in a woman. He incorporated a variety of symbols into the spoon, including a heart to signify love, a diamond to promise prosperity, and a keyhole to imply she held the key to his heart. His skill and persistence in carving the spoon showed the young lady and her parents that he would be a good provider. If she accepted the spoon, she accepted him as a prospective mate; the lovespoon was a rural engagement ring. We don’t know for sure whether this legend reflects reality, but if it doesn’t, it should!
The oldest known lovespoon is in the St. Fagan’s National History Museum in Wales and is dated 1667. The first lovespoons were plain, uncomplicated designs, much like those shown here. As time went on, the designs became increasingly complex, and some professional carvers began specializing in lovespoons. However, some rural swains still carve lovespoons, reflecting the romance and hope of those young couples.
Getting Started
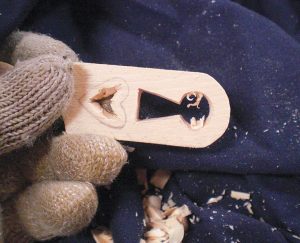
Transfer the pattern to the blank, and use a band saw, scroll saw, or knife to cut the perimeter. Use a 1/16″ (2mm)-diameter bit to drill a series of holes for the heart and keyhole. Later, you will connect the holes with a knife. If you decide to use a larger bit, drill the holes before you cut the spoon handle to the final thickness, which will minimize any tear-out from the bit on the back of the blank.
CLICK HERE to download the patterns.
 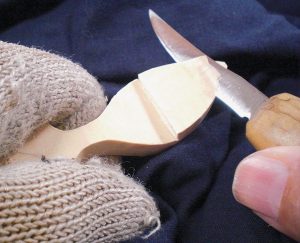 |
Step 1: Rough out the bowl. Use a craft saw to make a 1/4″ to 5/16″ (6mm to 8mm)-deep stop cut at the deepest part of the spoon bowl. Carve from the ends of the bowl to the saw cut. This method prevents the bowl from splitting along the grain. I use a knife with a long, thin blade to make slicing cuts. |
|
|
Step 2: Shape the back of the bowl. Remove the sharp corners on the back of the bowl, but leave extra wood around the edge. Aim for a consistent, gentle curve from side to side and from the widest, deepest part of the bowl to the ends. Blend the curve into the back of the stem where the bowl attaches to the handle. |
  |
Step 3: Hollow the bowl. I use a bent (crooked) knife or a hook knife (see page 45), but you could also use a gouge. Cut from the ends with the grain to the widest and deepest part of the bowl (left photo). Cut from the sides across the grain to smooth the bottom of the bowl (right photo). |
|
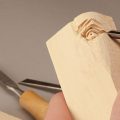
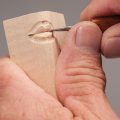
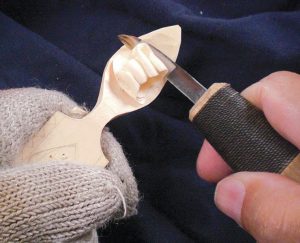
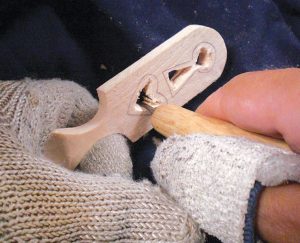
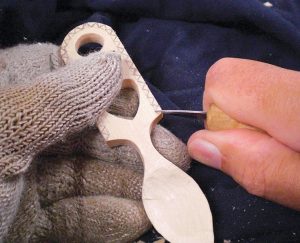
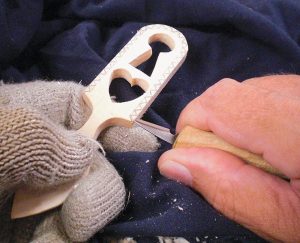
Step 4: Carve the heart and keyhole. I carve the handle after I carve the bowl. Carving the bowl requires a certain amount of force, and the handle can be delicate after you carve the frets. If something does break, repair it with cyanoacrylate (CA) glue. To start, use a thin, narrow-bladed knife, like the Flexcut Mini-Pelican, to connect the pre-drilled holes (photo above). Carving the top of the keyhole and the sides of the heart can be challenging. At the points where the angles of the cuts become parallel to the grain (the 3 o’clock and 9 o’clock positions), the knife will begin to dig in and split the wood. To prevent this, start from 6 o’clock and cut toward 3 o’clock. Then, go back to 6 o’clock and cut toward 9 o’clock. Move to 12 o’clock and cut to 3 o’clock, and then back to 12 o’clock and cut to 9 o’clock. You’ll be left with some curls, as shown in the photo. Once you remove the curls, there will still be a split or two in the wood. Using a very sharp, thin blade with very light pressure (little more than the weight of the knife itself) cut toward the split from both directions. With a little practice, you should be left with a nice, smooth transition. If not, don’t worry—use sandpaper to smooth the cuts. The same advice applies to the heart. |
| |
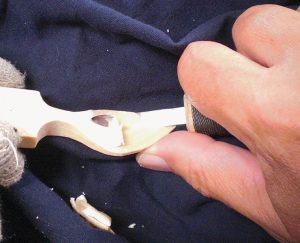
Step 5: Shape the point of the heart. Use the knife to cut straight down to the point. Be careful not to split the wood. Insert the point of the knife into the cut at the point of the heart and slice up in both directions so you can follow the grain of the wood and make a smooth cut. |
|
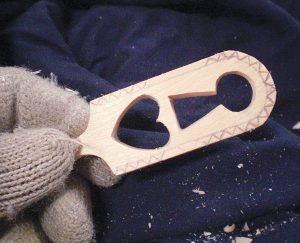
Step 6: Draw the triangle accents. Draw a line around the edge of the handle, just outside the heart. To draw the triangles, start at the bottom on both sides. For strength, the wood should be full thickness at the start of the pattern, and the first cutout should move away from the bottom edge. Before you extend the pattern too far, start another set of triangles at the top of the arch. Work down both sides to meet the patterns coming up from the bottom. This allows you to adjust the size of the triangles gradually as the runs meet. Don’t worry about being mathematically accurate with the sizes of the triangles. I always draw mine freehand and they turn out just fine. |
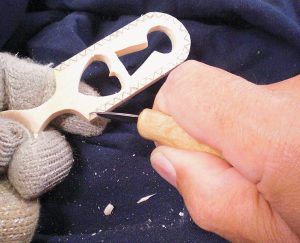  |
Step 7: Carve the sides of the first triangle. Use a small, thin knife to cut 1/32″ (1mm) straight into the wood along the first line. To make the second cut, push the point of the blade into the wood at the top of the triangle and rock the rest of the blade down into the wood until you have a consistently deep cut. Be careful, because the basswood is very delicate and the triangle can split out. A thin blade reduces the chances of splitting the wood. |
|
Step 8: Finish cutting the triangle. Turn the blade of the knife flat. Slide the knife into the wood along one leg of the triangle at the bottom of the vertical cut until the point reaches the top of the triangle. Then, rotate the handle toward the other leg of the triangle. The chip will pop out, leaving a nice, smooth bottom. Be careful not to over-rotate the knife; it’s easy to slip and slice off the neighboring triangle. Repeat the process around the edge of the handle. Apply a few coats of walnut oil, or any clear finish. Attach a screw eye to the top to hang the spoon. |
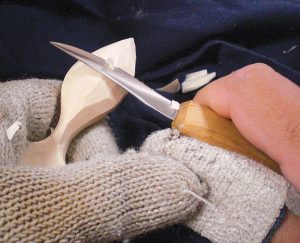
Hook Knives vs. Bent or Crooked Knives
 Many people think these two types of knives are the same thing, but they aren’t. A hook knife, like the Pinewood Forge knife in the background, is a specialized tool dedicated to carving bowls, spoons, and the insides of wooden clogs or sabots. It is hot-forged and has a very curved, or hooked, shape.
A crooked, or bent, knife, like the Preferred Edge knife in the foreground, is a more generalized carving tool. It was common among the North American First Nations tribes, who used it for everything from building shelters and canoes to carving ceremonial masks and totems. Crooked knives were originally cold-forged, or hammered over a curved form to attain the desired shape, which gave them less of a curve than hook knives. They are now hot-forged, but the shape difference remains.
Materials & Tools
MATERIALS:
• Basswood 3/4″ (19mm) thick: 1″ x 4 1/2″ (25mm x 114mm)
• Sandpaper
• Finish, such as walnut oil
•Screw eye
TOOLS:
• Fine-tooth craft saw, such as X-Acto
•Carving knives: general, Flexcut Mini-Pelican, Flexcut Mini-Detail, crooked or bent (optional, to carve bowl)
• Gouge (optional, to carve bowl)
• Pencil
About the Author
Robert W. Tinsley is a retired mechanical engineer. He has been carving, off and on, for more than 50 years. He and his wife of 41 years live on a 28′ sailboat in Florida. He sells his carvings through an Etsy store: cowboybob.etsy.com. Contact him at bobtinsley785@gmail.com.
 • Click HERE to get the Spring 2019 issue.