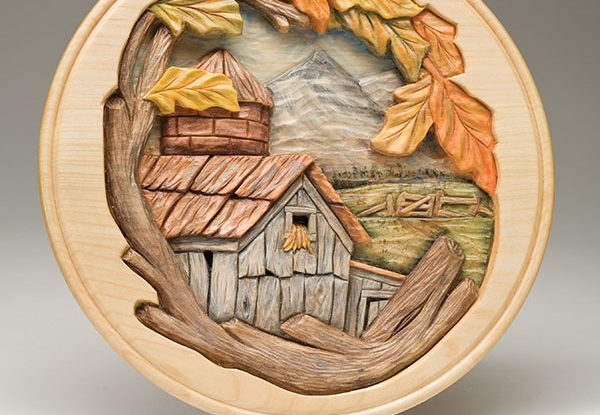
Use acrylic paints to add color to this charming design
By Robert Biermann
Download the Pattern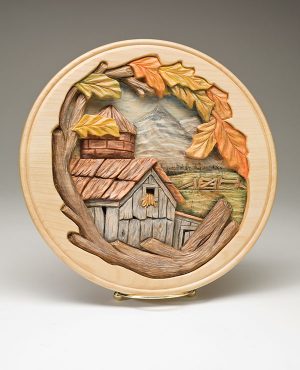 Most of my work is done in the intaglio style and focuses on faces and figures. This landscape is technically an intaglio carving because the carving is lower than the background, but it does have more of a traditional relief carving appearance.
There are three main levels in this design consisting of the background, the barn, and the limbs and leaves in the foreground. However, as with a carving depicting a face, areas within any given level are carved to different depths to create the proper perspective. If a face is turned to one side, the side farthest from the viewer will be deeper than the other side. The back side of the barn and roof, where the shed is attached, is deeper than the front side.
I start with a flat, beaded 10″ (25.4cm)-diameter plate. Orient the plate so the grain runs from left to right and transfer the pattern to the plate with carbon paper. Carve along all of the lines with a 6mm 45° V-tool. Along the perimeter, where the design borders un-carved wood, keep the outside wing of the V-tool perpendicular to the surface of the wood. Use the V-tool normally for the other lines.
Once the elements are defined, remove the wood from the deepest parts of the scene. I use a drill bit with a stop collar to remove excess wood and clean up the drill marks with a #3 gouge. Use the same technique to remove wood from the middle level. Once the levels are blocked out, you can go back and carve the details and texture. Work hard to get the proper perspective in the carving.
Painting and Finishing
Remove all fuzzies and chatter marks. Make sure you have a stop cut where one object meets another. Then apply a coat of undiluted boiled linseed oil and wipe off the oil with paper towels. Spread out the oily towels in a well-ventilated area to dry. Oil-soaked towels can spontaneously combust. Allow the carving to dry overnight. Apply thinned washes of paint to the carving. Build up the color with repeated coats to get the coverage you desire. Then shade the areas that should be darker, such as the leaves, mountain, and side of the barn. After the paint dries, seal the carving with clear matte finish.
Materials & Tools
Materials
• Basswood plate: 10″ (25.4cm)-diameter flat, beaded
• Acrylic paint, such as Delta Ceramcoat: blue heaven (sky), Payne’s gray (mountain), antique white (mountain), brown velvet (trees and fence), burnt sienna (roof), black green (shading); such as DecoArt Americana: buttermilk (mountain), primary yellow (leaves), burnt orange (leaves), plantation pine (leaves), heritage brick (silo), midnight blue (shading); such as Plaid FolkArt: barnwood (barn and shed), light gray (shading)
Tools
• V-tools of choice
• #3 gouges: assorted sizes from 5/64″ (2mm) to 3/8″ (10mm)
• #7 gouge: 1/4″ (6mm)
• #11 veiner: 1/8″ (3mm)
• Knife
About the Author
Robert Biermann, of St. Louis, Mo., has won awards at several woodcarving shows, including the International Woodcarvers Congress in Davenport, Iowa. He also received the Caricature Carvers of America Merit Award in 2006.
 |
Get the Winter 2019 Issue Purchase the IssueFor more articles like this, subscribe to Woodcarving Illustrated magazine. Magazine SubscriptionPlus! Get digital mini magazines in your e-mail between printed issues.
|