![[#Beginning of Shooting Data Section] Nikon D200 2008/01/15 10:49:07.8 RAW (12-bit) Image Size: Large (3872 x 2592) Color Lens: VR 24-120 mm F/3.5-5.6 G Focal Length: 34 mm Exposure Mode: Manual Metering Mode: Multi-Pattern 1/10 s - F/4 Exposure Comp.: -0.3 EV Sensitivity: ISO 200 Optimize Image: Portrait White Balance: Auto Focus Mode: AF-S VR Control: Long Exposure NR: OFF High ISO NR: Off Color Mode: Mode I (Adobe RGB) Tone Comp.: Auto Hue Adjustment: 0° Saturation: Auto Sharpening: Medium low Flash Mode: Flash Exposure Comp.: Flash Sync Mode: Image Authentication: OFF Image Comment: [#End of Shooting Data Section]](https://woodcarvingillustrated.com/wp-content/uploads/2016/02/Birdhouse-Shop-Lead-214x300.jpg)
By Barry McKenzie
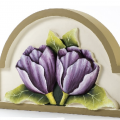
With the classically shingled roof and brilliant, stylized chip carving, you might be hesitant to hang this birdhouse outdoors. But returning songbirds will reward your generosity with their cheerful presence.
The birdhouse is fairly simple to construct. In fact, over 50 of them were completed by students in my classes last year. Most of the students chose this bird by a fence post design. The bottom of the house has a gate hook to keep the hinged front from being opened by a predator or pushed out by too much nesting material inside.
The roof is at a 12° slope for water run-off, and the shingles, while easy to carve, make an impressive display. This form of chip carving is called stylized free-form, which is not as precise as geometric chip carving. Chip carving through paint does have a tendency to dull the knife’s cutting edge a little faster, so I strop more often. The design could easily be carved in shallow relief if you prefer. I assemble my birdhouses using only exterior weatherproof glue on the joints because brads always seem to fall exactly where a chip is going. The interior cavity of the birdhouse is left natural wood.
Materials:
Wood, 3/4″ x 4″ x 5″ (19mm x 102mm x 127mm) (bottom)
Wood, 3/4″ x 5″ x 8 15/16″ (19mm x 127mm x 224mm) (rear)
Wood, 3/4″ x 5″ x 7 7/8″ (19mm x 127mm x 200mm) (front)
Wood, 3/4″ x 5 1/2″ x 8 15/16″ (19mm x 140mm 224mm),
Wood, top angles from 7 7/8″ (200mm) up to 8 15/16″ (224mm) (2 sides)
Wood, 3/4″ x 7″ x 6 7/8″ (roof)
Wood, 1/4″-5/16″ (6mm-8mm) dia. x 1″ (2 each)
Dowels (hinges, do not glue in place)
Gate hook set, 2″ long
Glue, exterior weather resistant
Paint, acrylic
Spray exterior spar urethane
Tools:
Chip carving knife
Gouge
Ruler
Mechanical pencil
Paintbrushes
CLICK HERE to download the Stylish Birdhouse Pattern.
 Read more great articles from Woodcarving Illustrated Spring 2008 (Issue 42) here.