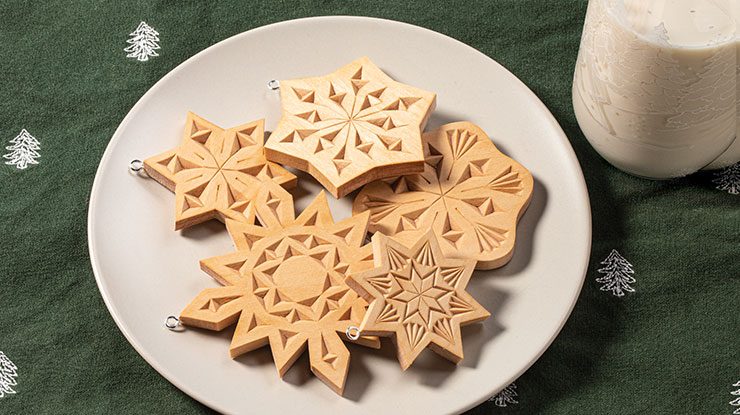
These cookie-sized classics are sweeter than dessert
By Tom Noller
If you live in Texas, like me, you don’t get to see much snow. So, I decided to make my own. These small snowflakes are fun for beginners since they only use two- and three-sided chips. They are great as ornaments or for decorating winter projects, such as centerpieces and Christmas gifts.
Getting StartedPrepare your blanks. Sand them smooth with 220-grit sandpaper. This will allow a smooth transfer of the patterns to the wood and minimize irregularities as you carve the patterns. Transfer the patterns by your method of choice; I prefer to use spray adhesive, but you can use graphite paper or a heat transfer tool. When placing the patterns on the wood, line up one set of points with the direction of the grain. Note: I also like to place all the patterns I’m going to make on a single piece of wood and carve them before cutting the perimeters. This gives me more wood around the patterns to rest my hand on, and helps me keep the knife angled correctly.
|
CarvingI like to use two knives for chip carving: a small chip carving knife for the smaller chips and internal lines and a large one for the larger chips. Note: Try to create nice, crisp lines between any two adjacent chips and maintain a consistent angle throughout the carving process. If you are having trouble with the larger chips, try cutting the center of the chip out first as practice, holding the same angle. Then go back and cut along the true pattern lines. Carve the chips. On the patterns with lines in the middle, carve the inner circle of chips first, and then carve the lines that join them. These lines need to be moderately wide, or else they will close when you apply finish and the grain expands. Use a stab knife to make the cuts on the dotted lines. Place the point of the knife on the line closest to the center, and then tilt the knife toward the outside of the pattern while stabbing it into the wood. If you don’t have a stab knife, just leave the dotted lines out. Look it over carefully before making your first cut on the inner section. Once all the patterns are carved, cut the designs out on a scroll saw. Sand away any fuzzies on the bottom of the cutouts with 220-grit sandpaper. Then remove the patterns. If you glued the patterns on, use mineral spirits to remove the paper. If you traced them or used a heat transfer tool, make sure to remove any remaining lines. |
Staining and FinishingI like to go over my carvings with a magnifying glass to make sure there are no areas with wood left in the chips and all the ridges are crisp. Once satisfied, brush on a coat of pre-stain wood conditioner, making sure to coat the edges that have end grain twice. This will help keep these edges from absorbing too much stain and turning distractingly dark. Wipe off any excess conditioner with a fresh paper towel. Coat the snowflakes with stain; I used Minwax® golden pecan. Wipe off the excess and let them dry overnight. Apply finish. I used three coats of semigloss spray, letting the finish dry between coats. Make sure to check the edges and lightly sand them between coats to remove any rough areas. Then buff the entire piece with a brown paper bag for a nice smooth surface. Assemble the ornaments. I used eye pins from a craft store to make the eye hook at the top of the ornament. These can be pushed into the wood with a set of needle-nose pliers. I’ve never needed to use glue, but you can, if desired. Hang with a decorative ribbon or string and display. |
| Materials
• Basswood, 1/4″ to 3/8″ (6mm to 1cm) thick: sized for patterns • Sandpaper: 220-grit • Spray adhesive, 3M #45 • Paper towels • Pre-stain wood conditioner, such as Minwax® • Stain, such as Minwax®: golden pecan #245 • Finish, such as Rust-Oleum®: semigloss • Brown paper bag • Eye pins: 5 each, small • Decorative ribbon or string |
Tools
• Scroll saw with blades: #3 or #5 reverse-tooth • Knives: stab, small chip carving, large chip carving • Paintbrush • Magnifying glass (optional) • Needle-nose pliers |
| About the Author |
|
Tom Noller started carving in 2009 after retiring as an engineer in food and beverage manufacturing. He is the president and newsletter editor for the Lake Ray Hubbard Woodcarving Club in Rowlett, Texas. Tom enjoys chip carving, caricature carving, and cottonwood bark carving. E-mail him at txwoodguy@gmail.com. |
 |
Get the Winter 2022 Issue Purchase the IssueFor more articles like this, subscribe to Woodcarving Illustrated magazine. Magazine SubscriptionPlus! Get digital mini magazines in your e-mail between printed issues.
|