Simple mixtures and techniques to create a variety of flesh colors
By Lora S. Irish
While there are a variety of pre-mixed paints to simulate different skin tones, I prefer to mix my own. That gives me complete control over the colors, highlights, and shadows. It also allows me to personalize a flesh color.
Skin tones are often subtle and barely noticed on a nicely finished carving. Paying close attention to this detail will enhance your carving. A skin tone that conflicts with the piece or rest of the finish is glaringly noticeable.
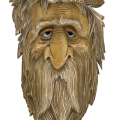
Adding skin color to a wood spirit carving presents a unique challenge for carvers. Since the facial features blend into the wood texture or leaves of the surrounding background, there are few well-defined outlines to the face area like you would find in a Santa Claus or cowboy caricature. Plus you want to avoid solid-toned, heavy coloring that distracts from the natural wood tones of the rest of the piece.
I’ll use a wood spirit cane topper for the purpose of demonstrating the painting technique. For this style of carving, I use a dry brushing technique to apply the paint. Dry brushing very thin coats of acrylic color to create the facial coloring blends the face into the wood texturing, and keeps your coloring soft and light in application.
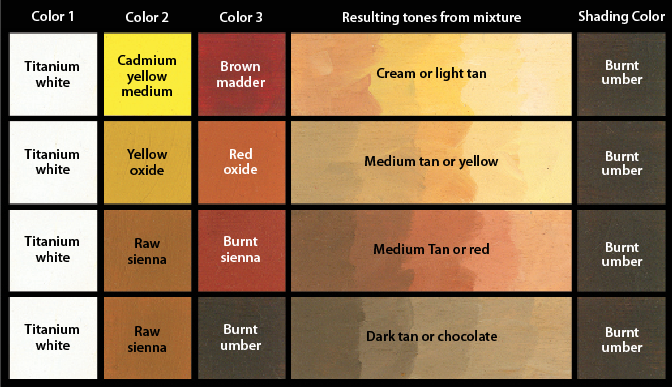
The color listings in the chart apply whether you are using watercolors, oils, or acrylics. Paint manufacturers work hard to adhere to a color standard for each tone no matter which media the color is created in. If you place burnt umber acrylic and burnt umber oil paint side-by-side on a palette, you should not see any difference in color between the two of them.
Mixing Custom Flesh Tones
Remember, there really are no white, black, red, or yellow skin colors. Instead, skin colors are shades or tones of orange. The more orange-brown tones that a skin mixture contains, the darker the color will become and the closer to a chocolate color your face will appear. Pale tone skins contain more white tones, and yellow or golden skin tones contain equal amounts of all three colors. By mixing different ratios of three basic pigments, you can produce a wide array of colors.
Types of Paints
Oil paints: I use oil paints when I need absolute control over blending color tones and when I want colors that are semi-transparent to transparent.
Control: Since oil paint takes several days to dry, you have plenty of time to mix a new color on your palette and blend that color into one that you have already applied. I can apply a base coat of the skin tone in oils to the entire face. I can now add some white to the mix to make a highlighting color that I would use over the bridge of the nose, forehead, and along the tops of the cheek bones. Since they are oil paints, this new color does not go on as a brush stroke, but blends into the base skin color. I could add burnt umber to the base coat to darken it slightly and brush along the sides of the nose, in the eyelid areas, and along the jaw line. It will instantly blend to create shadows; lots of color but very few brush strokes.
Application: Oil paints can also be used over a carving that has already been stained. You can stain the piece with burnt umber first, allow it to dry then add a coat of polyurethane spray. Then you can brush oil paints that have been thinned with a mixture of turpentine and linseed oil. You could also use stand oil or walnut oil. Linseed oil is commonly available and often used, but it develops a slightly yellow cast over time. Stand oil is a finer grade of artist’s oils; it is thicker and allows the artist more working time. Walnut oil is a fine grade, absolutely clear oil that is easy to work with and never changes the coloring of the wood. Walnut oil and stand oil are available through art supply stores. This thinned oil color lets all of the stain show through, but gives a coloring over top. When oil paints are used directly over the wood, you will still be able to see some of the grain lines of the wood through the color.
Clean up: For oil paint clean up, I use freezer paper as my palette. It’s cheap and it’s disposable! Plus, if I don’t finish the painting in one day, I can pull off another piece and lay that right on top of the palette piece. This keeps the oils fresh until the next day, when I peel the two papers apart. Use a palette knife to pick up any paint from the top paper, put it back on the palette paper, and start into painting. So the only clean up I have is to wash the brush in turpentine.
Acrylic paints: Acrylic paints dry much faster than oil paints, so I use them when time is an issue, or when I want a semi-transparent or opaque finish.
Control: The speed at which acrylic paints dry factors into the control you have. While you don’t have as much time to blend acrylic paints into each other, there are a few mediums you can add to slow down the drying. Even with the addition of these mediums, the paints still dry faster than oil paints. When mixing colors, though, the best method is to mix the color and medium on the palette, and then apply to the carving.
Application: The biggest advantage that acrylics have in painting is when you want an opaque effect; a strong, solid color, such as the red of Santa’s coat. But in the past few years, acrylic paint pigments have evolved to the point that you can heavily thin the paint with flow medium or water for a semi-transparent effect similar to oil paints. I suggest you use flow medium for the craft-style paints, but you can use water for the artist quality acrylic paints. That allows you to see some of the grain, or add highlights to a piece you’ve already painted. If you don’t like the effect, let it dry and paint again. It’s easy to correct.
Cleanup: Acrylic paints clean up with water when wet. If you accidentally allow the paint to dry, Windex with ammonia, or even straight household ammonia, work well to dissolve any paint left in the ferrule area of the brush.
Watercolors: Watercolors are finely ground pigment mixed in a water based float. Because the base float has no coloring of its own, the finished look of watercolors is extremely clear and crisp. This avoids the heavy look of thinned acrylics or oils. It’s easy to get a transparent or semi-transparent coat with watercolors, but difficult to get an opaque coat.
Control: Heavy thinning will aid you in controlling how much color goes on with each step. Thin the colors until the hues almost disappear on your palette.
Application: Wait a few minutes between each coat for the previous coat to dry before you apply another coat. After you have finished building the colors you want, seal the carving with a light coat of polyurethane to set the color before you use any other painting or finishing method.
Clean Up: Watercolors are easy to clean up with just water. If the paint dries in the ferrule area, soak it in a bit of water to loosen up the paint.
Definitions
Opaque: A solid color. You cannot see through to the wood below. Undiluted paint is usually opaque.
Transparent: You can see the wood grain clearly. Mixing acrylic paint with four times more water than paint produces a tint through which you can clearly see the grain.
Semi-transparent: The wood grain is faintly visible. Mixing acrylic paint with an equal portion of water produces a stronger tint, but still allows the grain to show. Woodcarvers commonly use semi-transparent paint washes.
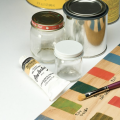
Materials:
• Carving of choice
• Soft, lint-free cloths
• Paper towels
• Acrylic paint: titanium white, cadmium yellow medium, brown madder, burnt umber, yellow oxide, red oxide, raw sienna, burnt sienna
• Boiled linseed oil
• Turpentine
• A scrap of printed newspaper
Tools:
• Assortment of sable flat shader brushes
• Water pans
• Palette
CLICK HERE to download the Viking Cane Pattern.
CLICK HERE to download the Wizard Cane Pattern.
 Read Relief Carving Wood Spirits by Lora S. Irish for more information on carving. Learn the enjoyable craft of relief carving from start to finish, as you create an amazing wood spirit with detailed instructions from a nationally-recognized designer. The entire craft is here, from preparing the wood to roughing out and detailing your wood spirit, to applying a long-lasting finish. No step is left out and no technique is left unexplained. Includes 20 additional original patterns to keep you carving for seasons to come. The book is available from www.foxchapelpublishing.com for $19.99 plus S&H.
CLICK HERE to read more great articles from  Woodcarving Illustrated Spring 2008 (Issue 42).