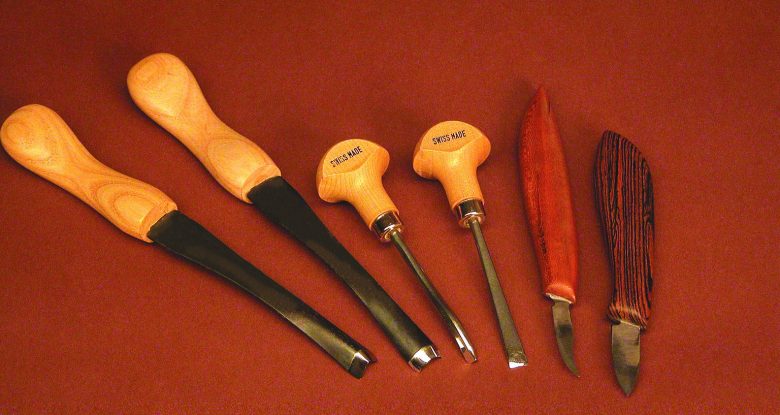
Tips for keeping your carving tools razor sharp
by John Mignone and Roger Schroeder.
This article was first published in issue 32 of Woodcarving Illustrated.
Ask ten carvers how to sharpen a tool and you are bound to get ten different answers. But what is the right way to sharpen a tool?
Unfortunately, there is no “right” method—only a correct outcome. You want a tool that can shave a thin slice off end grain as easily as cutting with the grain. Sharpening by hand can be done almost as quickly as by machine and with results just as good. But before you go out and buy the sharpening accessories, take a closer look at these three terms: bevel, burr and polishing.
Getting the Right Bevel
The tool’s bevel determines whether or not it will carve. Carvers all have their own favorite bevel angle, but you generally want to increase the angle as you increase the hardness of the wood. One rule of thumb is to use a shallow angle (15° to 20°) for easily carved woods such as pine and basswood and steeper angles (25° to 35°) for harder woods such as oak and walnut.
Why do you need different bevels for different woods? The shallower the bevel, the easier the tool slides through the wood. But shallower bevels also give you a weaker edge.
You can use a shallow bevel for hardwoods, but the sharp edge won’t last as long—so you’ll need to sharpen more often. You can also use a steeper bevel for softwoods, but it will be harder to push the tool through the wood. When using harder woods, carvers usually use mallets and chisels, so a steeper bevel works fine.
Although there are exceptions, generally a flat bevel is desirable. A rounded bevel makes the tool roll out of the cut prematurely. A hollow ground bevel makes the cutting edge brittle and subject to quick dulling.
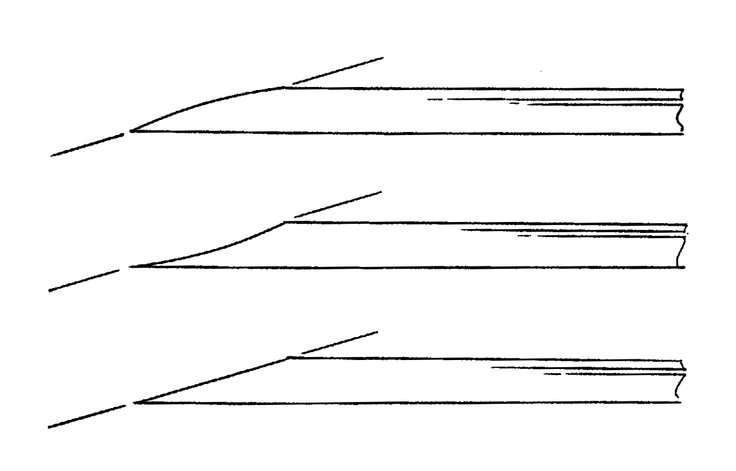
The three bevel profiles, from top to bottom: the rounded bevel, the hollow ground bevel, and the flat bevel. It’s important to have the correct bevel profile. The illustration from the book, Woodcarving Tools, Materials & Equipment Volume 1 by Chris Pye is used with permission from the Guild of Master Craftsmen.
Another sharpening problem is the double or blunt bevel—an extra bevel, or what might appear as a blunt edge, exists on the end of the tool. Sometimes the manufacturer may be the culprit, but it may be the result of your own sharpening. Double bevels result from sharpening at inconsistent angles and can make it difficult for the tool to enter and leave the wood smoothly—the tool will feel sharp but won’t cut efficiently.
The Language of SharpeningBevel The primary part of the tool tip that is sharpened to create a sharp cutting edge. Burr When sharpening, a thin strip of metal, often called a wire-edge or a burr—not to be confused with a power carving accessory—turns up at the end of the cutting edge as it becomes too thin to resist the abrasive material. The burr must be removed or it will tear the wood instead of cutting it. Dish A hollow in the sharpening stone may develop as the material is worn away. For the stone to continue to function, the dish has to be removed by rubbing it on sandpaper or on another stone. Glaze When a stone or sandpaper gets loaded up with metal particles and crushed abrasive, a glaze is formed. Sandpaper or another stone will remove it. Grit Natural or synthetic grit consists of a mineral in crystal- line form. Harder than steel, the crystals have sharp edges that make it possible to cut steel. Lubricant A lubricant—oil or water—is needed for most sharpening stones because it facilitates the cutting action and it prevents metal particles from getting embedded in the stone. Polished Edge If you can see your reflection, the cutting edge is polished. That mirror finish allows the tool to cut into the wood with very little resistance. Strop A strop typically consists of leather backed up with a board or other solid and flat material. Stropping serves to polish the edge and remove the burr. |
There are two main ways to shape a bevel—sandpaper and coarse sharpening stones. Sandpaper often offers the fastest way to shape a bevel because it is available in very coarse grits. For sharpening, the best choice is silicon carbide sandpaper, commonly referred to as wet-and-dry sandpaper. The hardest grit, silicon carbide will cut faster and shorten the time spent on the cutting edge. It is also preferred because the paper can be kept wet to aid the sharpening process.
For silicon carbide paper to work efficiently, it needs to be backed with an absolutely flat surface. Your best bet is a 1/4“-thick piece of glass that measures approximately 6″ wide by 12” long. If the glass slips when you are sharpening, add a piece of non-skid carpet padding to the back of the glass. To hold the paper in place, soak it in water until it is thoroughly wet and smooth it out on the glass, making sure to squeeze out air bubbles. Once the sandpaper is in place, you are ready to sharpen. Make sure it stays wet throughout the sharpening process.
Start with coarse sandpaper and use progressively finer grits to remove the scratches left by the previous paper.
A sharpening stone works the same way. The grit in the stone wears away the metal of the blade as it passes over the surface. It doesn’t matter if you use diamond stones, oil stones or water stones. Use a coarse stone until the bevel is shaped and work your way through the finer grits.
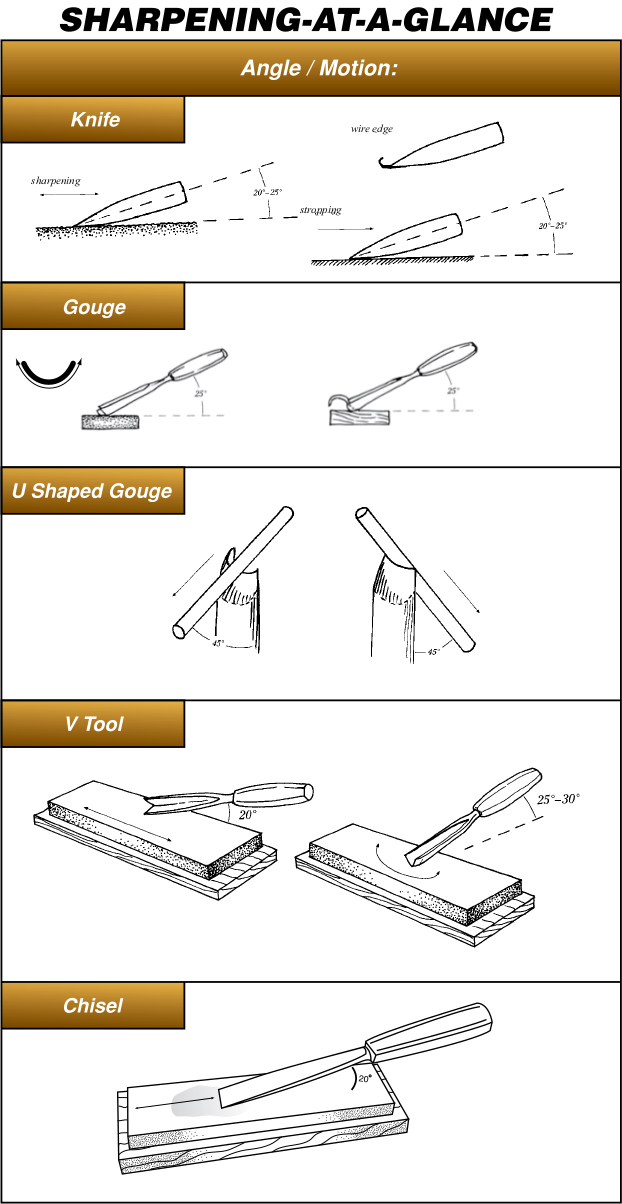
Illustrations of knife, gouge, U-Shaped gouge and V-tool are reprinted with permission from How to Sharpen Carving Tools ($14.95) published by Stackpole Books, 800-732-3669. The chisel illustration is by Chris Jordan.
Oil stone manufactures recommend you apply a light oil before sharpening to float the metal particles away. There are commercially available sharpening oils, but carvers I know use everything from kerosene, to mineral oil, to light-weight motor oil. Some carvers use the stones dry and scrub them off with soap and water regularly—but this isn’t recommended by the manufacturers.
Coarse waterstones are usually soaked in water, but finer grits just require a spray of water before sharpening. Ceramic stones and diamond stones do not require any lubrication—they just require a regular cleaning with soap and water.
While you don’t have to worry about replacing spent sandpaper when using a sharpening stone, you do need to make sure the stone stays flat. Diamond stones stay flat, but it is possible to wear a groove into an oil stone or a water stone. Regular re-shaping on a flattening plate or using glass backed sandpaper is required to keep them in shape.
Holding a Constant Bevel
There are jigs and holders available for most sharpening needs, but it’s sometimes just as easy to learn to sharpen by hand. When shaping a bevel, the most important thing is to keep your angle constant—otherwise you will get a double bevel.
Position the sandpaper and glass or sharpening stone so that its length is perpendicular to the front of your body. That way you can eyeball the angle of the tool to the paper or stone and maintain a constant angle throughout the sharpening process. For tools like gouges and chisels with short bevels, place a visible angle guide at the end of the glass to help you keep the angle constant. Check out the Sharpening At-A-Glance chart for the suggested motions to sharpen each tool.
Use a side-to-side motion with the gouges and V-tools. If you attempt to sharpen with the direction of the bevel, even the finest grit will create a slightly scalloped edge, which will give you a jagged cut.
Fresh, bright metal is exposed on the bevel through the sharpening process. If you have trouble seeing your progress, coat the edge with black magic marker. After the first few strokes, make sure the ink is being worn away evenly.
The easiest way to maintain the same bevel is to place the top of the bevel down first and slowly rotate it until the edge rests on the stone.
As you sharpen, you will see a wire-edge, or burr, forming on the tip of the blade (see below). Continue sharpening with the coarse stone or paper until you have a burr the entire length of the blade.


The Burr
The goal of sharpening is to achieve a burr or wire edge. As you sharpen, the metal on the end of the cutting edge becomes very thin and usually rolls over. This is the best indicator that you are very close to having a sharp edge. Continue sharpening until this extra metal is present across the entire cutting edge. Make sure you are maintaining a consistent angle when sharpening for best results.
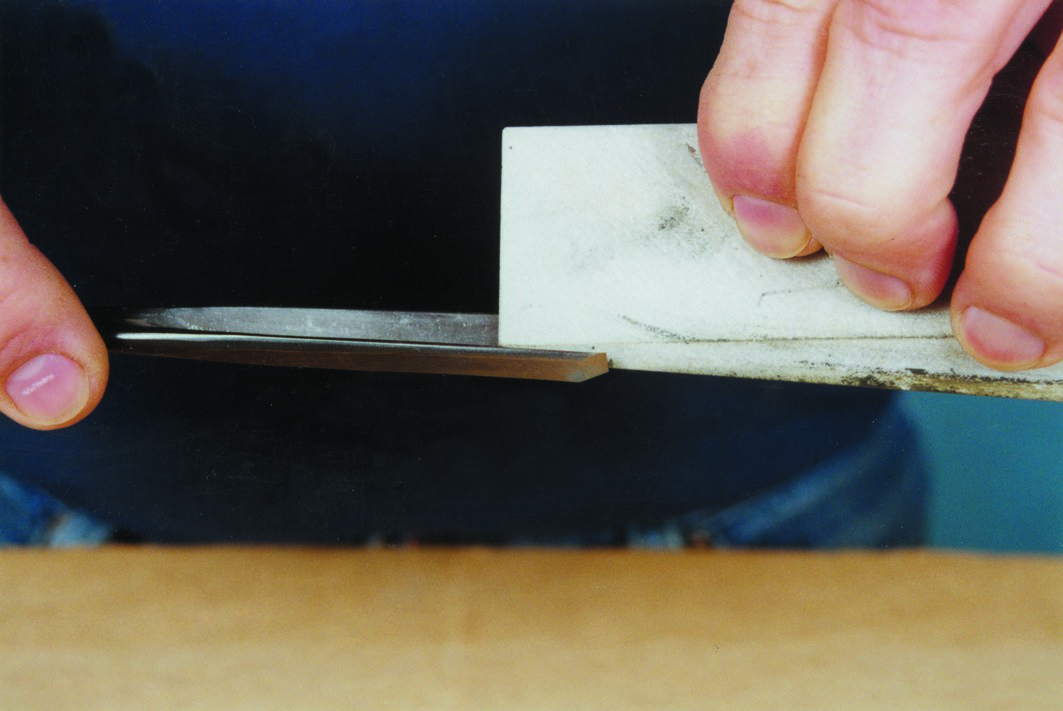
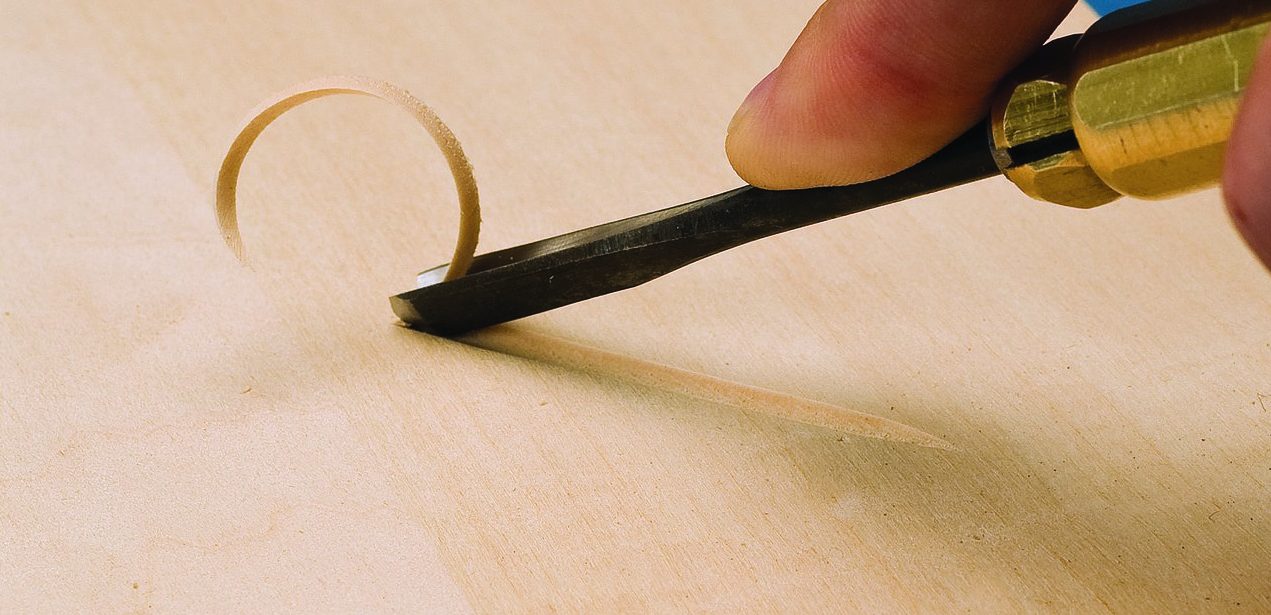
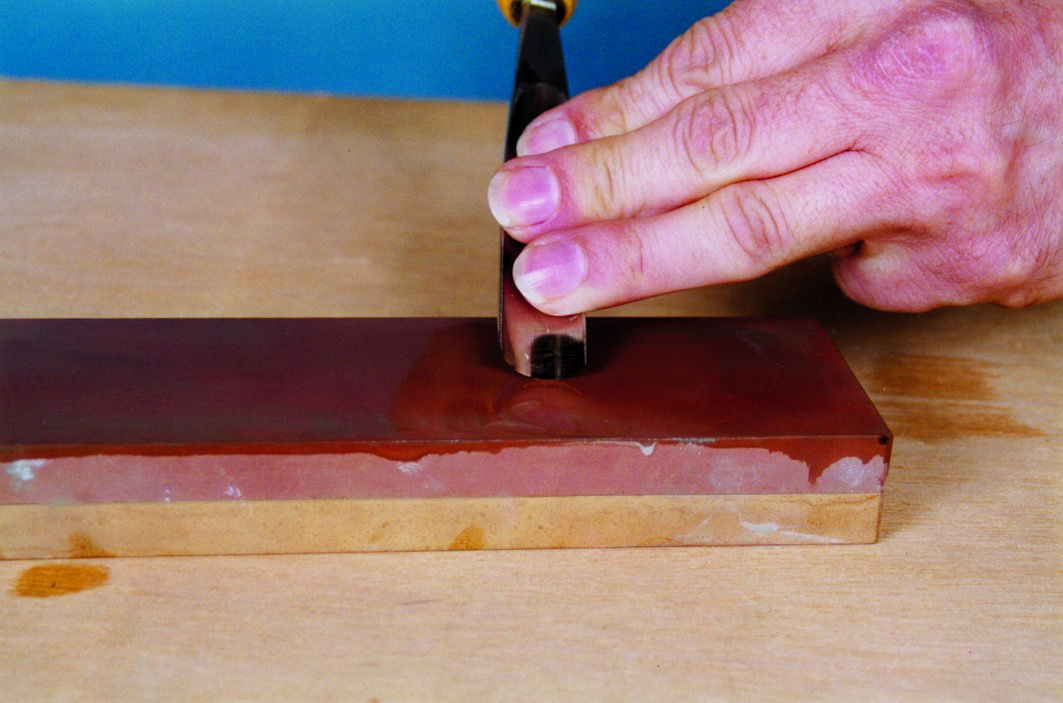
Slip stones are also invaluable aids for getting rid of a burr. Here a knife-edge slip stone is used to de-burr a V-tool.
Despite the need to create a burr, it has to be removed; if it isn’t, the tool may not cut at all. There is more than one way to remove the burr.
Working through finer grits of sandpaper should take it off, especially if you finish sharpening with 1200-grit sandpaper.
Fine sharpening stones, such as a hard black Arkansas stone or the finest-grit water stones will also remove the wire-edge. With the sandpaper or sharpening stones, the wire-edge will be removed easily if you maintain a constant sharpening angle.
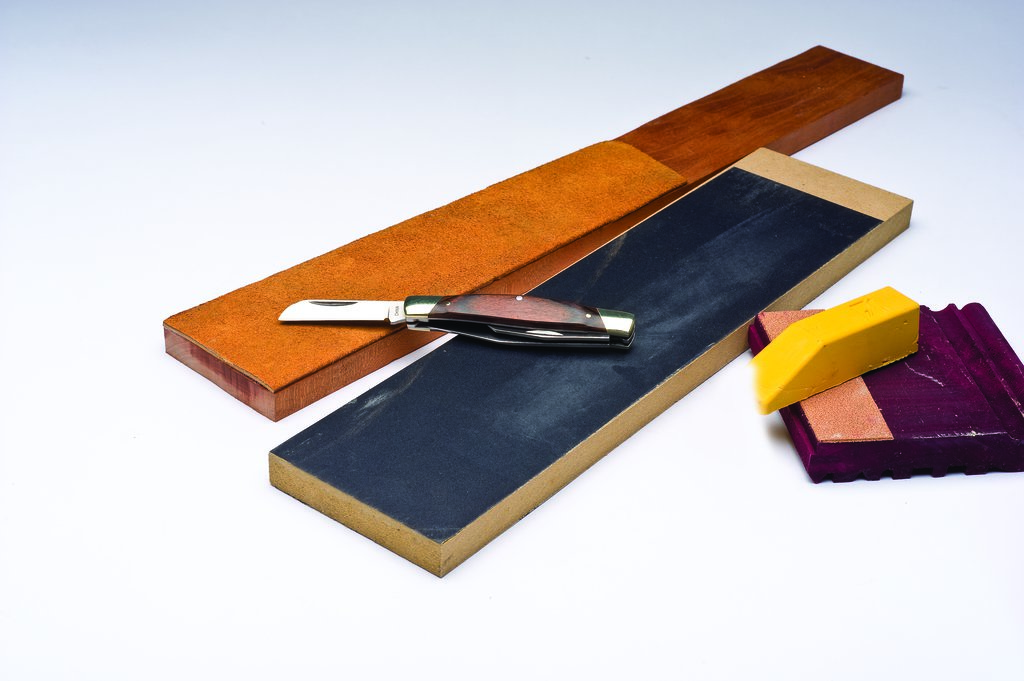
To make sure the burr is gone and to put a polished edge on your tool, stropping is the last step.
Stropping removes the burr and polishes the edge. A polished edge glides through the wood easier. Unless you nick your blade, you can usually just strop a tool rather than re-sharpen it totally.
All you need to achieve a polished edge is a strop and abrasives or stropping compounds. A carver’s strop consists of a piece of hard leather glued to a piece of wood. Two popular abrasives are aluminum oxide and chromium oxide, available as powder, paste or in stick form. Most carving supply companies stock a variety of abrasives and stropping compounds. Note: chromium is a heavy metal and is toxic in high concentrations—you use a small amount when stropping, so it really isn’t much of a problem, but avoid contact as much as you can.
A combination stone is a good choice for fine-tuning a cutting edge and removing a burr before stropping.
To start stropping, apply a small amount of abrasive compound to the strop. To strop gouges, chisels, and V-tools, hold the tool at a constant angle, apply pressure and pull the tool across the leather. The bevel is held at a constant angle, pressure is applied, and the tool is pulled across the leather away from the cutting edge.
When stropping a knife, lay the blade flat on the leather and pull it with the cutting edge trailing. Resist the temptation to turn the blade up at the end of the stroke. That extra motion will round the bevel, which you want to avoid.
If you push any of the tools or strop them from side to side, you are liable to cut the leather. Stropping is rarely as rigorous as sharpening, but the strokes should be long and firm.
If you see “tracks” in the stropping compound, the tool probably has a burr. In that case, continue stropping until it disappears. If the burr is still present, return to the finer-grit sandpapers.
Every carver has a different opinion about how often tools should be stropped, but most agree that they should be stropped at the beginning of each day of carving. This removes any moisture that may have collected while they were stored.
Removing the Whole Wire-edge
It is important to remember that there are two sides to every cutting edge. And when sharpening, the wire-edge tends to bend over. With straight and skew chisels and carving knives, it’s easy to alternate sides to strop off the burr, but gouges and V-tools call for different techniques.
For gouges, bend a piece of leather and push it out of the channel to avoid cutting the material. For a more permanent strop, glue a piece of leather to a dowel. If this proves too troublesome, wrap a dowel that fits inside the channel with a piece of very fine sandpaper. If the paper has a tendency to tear, “charge” or rub the dowel with stropping compound. A charged piece of wood is particularly effective with micro tools.
A traditional way to remove the burr from inside a gouge is to use a slip stone. Slip stones, specially designed for de-burring an inside edge, come in a variety of shapes and are available in many carving catalogs.

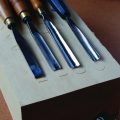
A selection of sharpening stones. From left to right: Hard Arkansas, ceramic, diamond, and Japanese waterstone.
Choosing a Stone
|
For a V-tool, try a charged leather shoelace to remove the burr. A good investment is a knife-edge slip stone ideal for getting inside V-tools. However, you usually need to sharpen the knife-edge with a piece of sandpaper or a stone—otherwise the slip stone will wear an unwanted groove in the channel of the V-tool.
The Learning Curve
Like any technique, practice may not make perfect, but you’ll invariably get better. Work to maintain a consistent bevel angle and avoid shortcuts as you go through the steps to remove the unwanted burr. You may get frustrated that it takes a while to bring a dull edge back to life, but the payback of making polished cuts in the latest project is hard to beat.
Discuss this material on the Woodcarving Illustrated forums.