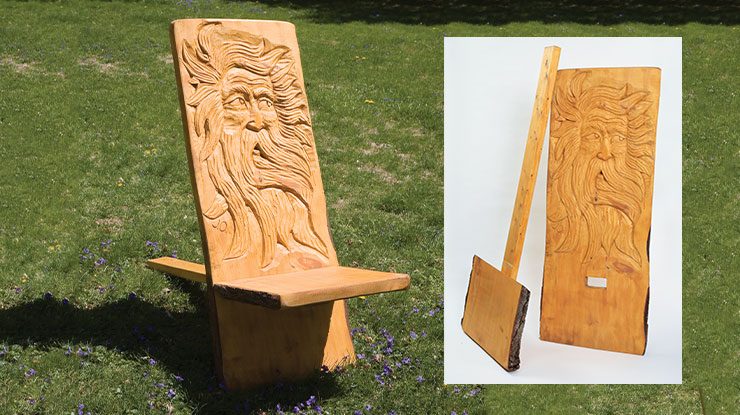
Customize this sturdy chair with your own relief carved design
By Jan Oegema
Project Furniture
This one-of-a-kind chair makes a unique addition to your garden or back yard. The chair is easy to construct, extremely sturdy and very comfortable. By adding a relief carving to the chair back, you can create your own functional work of art.
The chairs can be made from materials you find in home improvement stores, but I prefer the rustic look of unfinished wood. Contact your local sawmill to check on pricing and availability. If you decide to purchase materials from a home improvement store, buy two 2×8 pieces of lumber and edge-glue them together.
Materials & Tools
MATERIALS:
• 2″ x 14″ x 61″ (5.1cm x 35.6cm x 1.5m) wood of choice
• 2″ x 4″ x 48″ (5.1cm x 10.2cm x 1.2m) stud-grade lumber
• Spar varnish
• Waterproof wood glue
• 2 1/2″ (6.4cm)-long wood screws
TOOLS:
• Table saw that can cut at an angle
• Drill with 3/8″ (1cm)-diameter drill bit and screwdriver bit
• Saber saw with wood-cutting blade
• Carving tools of choice
|
Step 1: Cut the two main pieces. The mitered cut on the bottom of the chair back should match the mitered cut at the back of the seat. The easiest way to do this is to cut the seat portion off of the bottom of the longer back piece. Set the table saw at a 65º angle, and cut 14″ (35.6cm) from the end of the 61″ (1.5m) slab. The chair back should be 47″ (1.2m) long. |
|
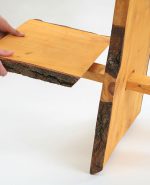
Step 2: Cut the 2×4 to size. The 2×4 should be cut to 48″ (1.2m) in length. |
|
Step 3: Attach the 2×4 to the seat. Center the 2×4 on the bottom of the beveled end of the seat, 12″ (30.5cm) in from the beveled end. Apply wood glue to the face of the 2×4 where it will join the seat bottom, and screw it in place with wood screws. Make sure the length of your screws provides adequate strength, but won’t stick up through the seat. |
|
Step 4: Cut the hole for the 2×4. Mark a line 10 1/2″ (1.3cm) up from the bottom on the chair back. Cut a 2″ (5.1cm)-high x 4″ (10.2cm)-wide hole in the center of the chair back, using the line you just marked as the bottom. Drill a pilot hole, and cut the square with a saber saw. |
|
Step 5: Embellish the seat back. I suggest a wood spirit or outdoor theme for the relief carving on the back of the seat, but you can choose any design you wish. Bold designs work better than patterns with fine details for this type of project. |
|
Step 6: Apply the finish. Since this chair is intended for outdoor use, I recommend applying an exterior spar varnish to protect it from the elements. |
About the Author
Jan Oegema teaches six woodcarving classes a week from his studio in Bowmanville, Ontario, Canada. Visit his website at www.nutmegwoodworking.ca/artists.html.

Want more nature-themed projects? Check out Wood Spirits and Green Men
By Lora Irish.
Available for $19.99 plus S&H from www.FoxChapelPublishing.com.