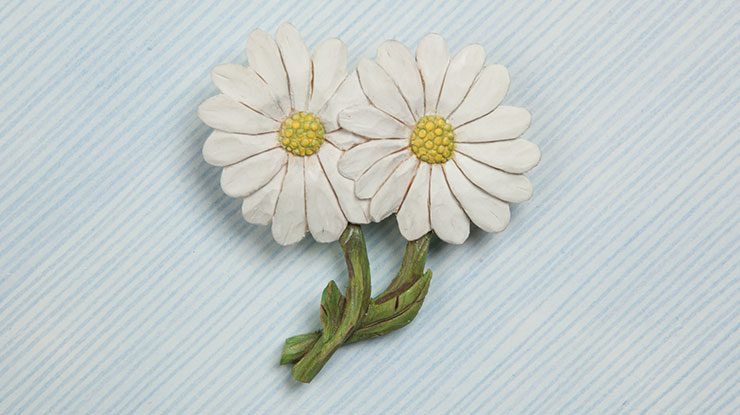
Floral pin is a perfect gift for Mother’s Day
By Glenn Stewart
Step-by-step photos by Peyton Sharp
I like to carve seasonal pins. I can usually carve them in one sitting, and folks love to wear them. I always associate daisies with summer, so they make a great pin for warmer weather.
Getting Started
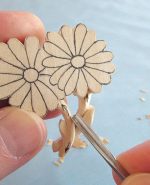
Transfer the pattern onto the blank. Drill a 1/16″ (2mm)-diameter blade-entry hole between the stems of the daisies. Cut the perimeter and between the stems with a scroll saw. Draw a centerline around the entire edge of the blank.
MATERIALS:
- Basswood, 3/8″ (1cm) thick: 3″ (7.6cm) square
- Meltonian Shoe Cream: #1 neutral
- Brad, 16-gauge: 1 1/2″ (3.8cm) long
- Glue: craft, cyanoacrylate (CA)
- Pin back: 1″ (2.5cm) long
- Dowel, 1/4″ (6mm) diameter: 3″ (7.6cm) long
- Acrylic paint, such as Delta Ceramcoat: crocus yellow, white; such as Plaid FolkArt: classic green
TOOLS:
- Knives: carving, detail
- Drill with bit: 1/16″ (2mm) dia.
- Scroll saw with small blade
- #5 gouge: 1/4″ (6mm)
- #3 gouge: 3/8″ (10mm)
- Shop-made eye punch
- Rotary tool with bit: small ball-shaped diamond (to make eye punch)
- Woodburner with tip: skew
- Paintbrushes
Click here download the Daisy Pins pattern: WEB-STROP TALK-Issue 10-Stewart-Daisy Pin Pattern
Pin: Carving the Daisies
 |
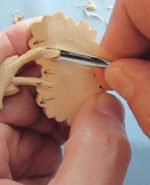
1. Make stop cuts between the stems and the flowers. Use a 1/4″ (6mm) #5 gouge. Remove about 1/8″ (3mm) from the top of both stems next to the flowers. Lower the right stem an additional 1/8″ (3mm) on both sides of the left stem. Redraw the leaves, and lower the stems more to move the leaves higher. Make the stems look like the left one sits on top of the right one. |
 |
2. Draw the stems onto the back of the flowers. They should extend up about 1/4″ (6mm) from the edges of the petals. Make stop cuts on both sides of both stems. Remove wood from alongside the stems to the centerline with a 3/8″ (10mm) #3 gouge. Round the stems with a carving knife. Remember to keep the left stem on top of the right. Lower the leaves and make the stem ends about the same size. |
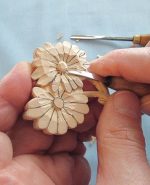 |
3. Round the center of the flowers. Make stop cuts around the centers and taper the petals from the middle to the center with the 1/4″ (6mm) #5 gouge. Carve from the middle to the outer edges. Keep the left flower behind the right. Do not damage the overlapping petals. Make stop cuts on each petal from the center to the edge, and undercut the sides of each petal so some are under and some are on top of each other. Work out to the edge and around the back. |
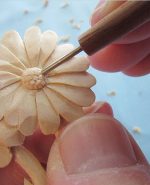 |
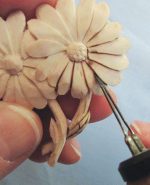
4. Add the details to the center of the flowers. I use a shop-made eye punch. Push and turn the punch in the middle of the flower center. Add a second circle next to the first one. Continue the process until you’ve covered the center of both flowers. Use the tip of a detail knife to make three cuts in the section where three circles meet to carve a small inverted pyramid. |
Pin: Painting the Flowers
 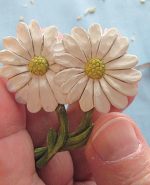 |
5. Burn along each petal. Use a skew tip with the woodburner set at a low temperature. Add a few marks to the stem and around the leaves. Paint the petals with several thin washes of white. Do not cover the woodburned details. Paint the flower centers with a thin wash of green paint. When dry, paint the circles with slightly thinned yellow paint. Drybrush a little yellow on the stems as a highlight. Use craft glue to attach the pin back to the back of the flowers. When the paint is dry, wipe on some Meltonian Shoe Cream, allow it to dry, and buff it with a soft cloth. |
Shop-Made Eye Punch
Drill a 1/16″ (2mm)-diameter hole in the center of a section of 1/4″ (6mm)-diameter dowel (see Step 4). Cut the head off a 16-gauge wire brad, which is 1/16″ (2mm) diameter, and use a small ball-shaped diamond bit to create a round hollow in the end of the brad. Use the bit to create sharp edges on the edges of the hollow. Secure the brad in the hole in the dowel with cyanoacrylate (CA) glue such as Super Glue®. Use different sizes of brads or nails to make different sizes of punches.
About the Author
Glenn Stewart has been carving for more than 30 years. He lives in Hawesville, Ky., with his wife, Judy. They have two daughters, two granddaughters, one grandson, and one great-grandson.
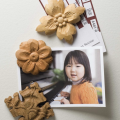
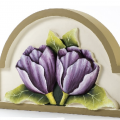
 Want more botanical patterns? Check out Carving Realistic Flowers
By Wanda Marsh.
Available for $14.99 plus S&H from www.FoxChapelPublishing.com.