This nostalgic lamp is an instant conversation starter
By Mike Burton
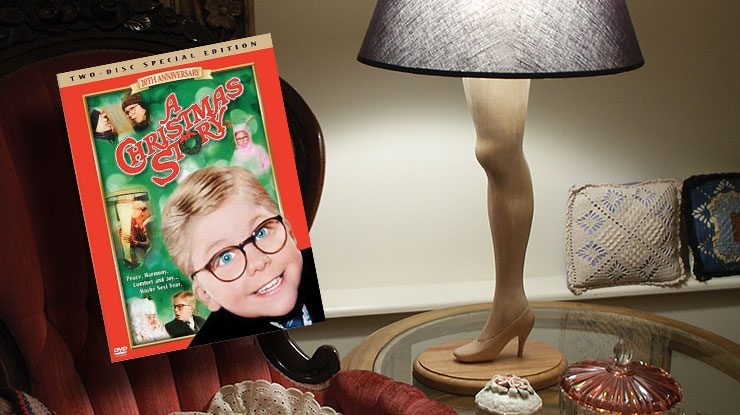
This leg lamp is the perfect gift for the person who deserves a “Major Award!” Fashioned after the lamp that Ralphie’s dad won in the classic film, A Christmas Story, the lamp is a great exercise in portraying the human form and is sure to become a favorite holiday decoration.
Your spouse may not let you showcase the piece in the front picture window, but it will make a great addition to your wood shop!
For the leg which forms the column of the lamp, I chose basswood, mostly for ease in carving. For the base, I chose mahogany for a little contrast. Poplar, mahogany, and walnut would also make good choices for either the leg or base.
MATERIALS:
- Basswood or wood of choice, 2″ (5.1cm) thick: leg, 5 1/2″ x 38″ (14cm x 96.5cm)
- Mahogany or wood of choice, 1 1/4″ thick: base, 7″ x 10″ (17.8cm x 25.4cm)
- Set of electrical components (several suppliers sell lamp kits consisting of a socket, shade harp and power cord. I got mine at a home improvement center. The only additional item was a 1 1/2″ (38mm) nipple to fasten the socket to the lamp.)
- Drywall screw: 2 1/2″ (64mm)
- Felt: 9″ x 12″ (22.9cm x 30.5cm)
- Finishing materials of choice
- Yellow glue
- Sash cord
- Sandpaper: 120, 220 grit
TOOLS:
- Mallet
- Medium sweep gouge
- #6 gouge: 3/8″ (10mm)
- Spokeshave
- Hand plane: small (optional)
- Horseshoe rasp
- Large skew chisel
- Carving knife
- Small scraper
- Utility knife
- Drill with bits: assorted medium
Prepping and Carving
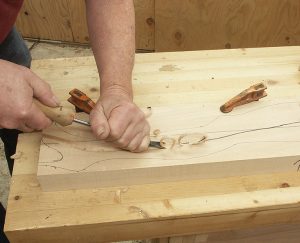 |
1. Prepare the blank. Mark two arrows pointing toward the face of the plank. Cut the plank in half, and transfer the pattern to each blank. Mark the location of the arrow on the pattern. Draw a graceful line from the top center of the leg to a point on the foot just where it will contact the base. With a 3/8″ (10mm) #6 gouge, cut a channel about 3/8″ wide and 3/8″ deep along this line for the power cord. For the last couple of inches at the top, keep the groove perpendicular to the top and a bit less than 3/8″. |
 |
2. Glue the blank together. Place the half without the channel in the position it will be glued, and transfer the side pattern to it. Drill some 5/32″ (4mm)-diameter pilot holes for drywall screws in such a position that they will be cut off in the waste. Place a piece of rope or heavy twine in the channel. I use 5/16″ (8mm) sash cord. The cord should be at least twice as long as the channel. Spread glue on the non-channel piece, and screw the assembly together. You could use clamps rather than screws, but the pieces tend to slip, which can make clamping quite frustrating. Pull the cord halfway through the channel and wipe any glue from it with a damp cloth. Pull the cord in the opposite direction and wipe again. Continue the process until no glue appears on the cord; then do it a few more times. This is the only time you can remove glue squeeze-out from the channel. |
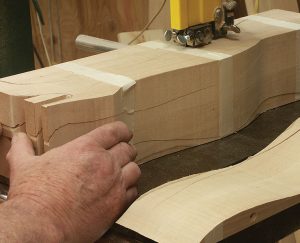 |
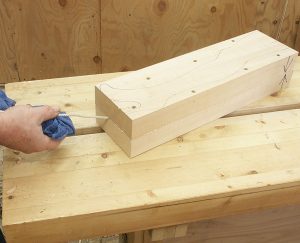
3. Remove the waste wood. Allow the glue to set for 20 minutes, and clean any squeeze-out. Transfer the front-view pattern to the blank. Cut out the front view and save the waste. Tape the waste back on, and cut out the side view. After cutting one side, add more tape for stability. Note: I have left a pillar at the arch of the foot to accommodate my rotary vise. |
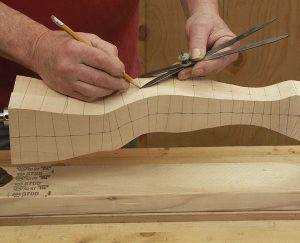 |
4. Draw on the centerline of all four sides. In order to keep the leg proportioned, you will need centerlines on all four sides. Use a square to draw lines across the leg every few inches—closer together on the curves. Divide these lines in half to determine the centerline. I use a pair of dividing dividers for the task, but you could use regular dividers or a tape measure. |
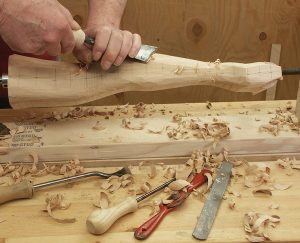 |
5. Create a half-round between each of the centerlines from thigh to ankle. Use your tool of choice. I use a large skew chisel for most of the roughing. The tip is useful at the tight curve of the foot. Keep the centerline intact for now. You will find that in most areas you are actually creating an oval. Notice that there are a number of grain changes. Just cut to the grain change and remove the area between with a rasp. |
 |
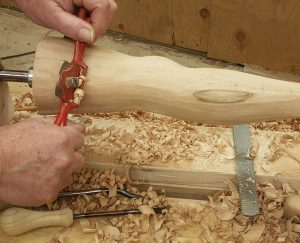
6. Shape the lamp from ankle to foot. Use caution; this is an area to cut a bit, then stand back and look. Refer to the reference shots. Once you have done most of the rounding on the upper foot, sketch in the shape of the front of the shoe. Once you are satisfied with the shape of the front of the shoe, carve in the spike heel. Don’t be tempted to make the heel too pointed. For mechanical integrity, keep the spike to a minimum of 3/8″ (1cm) in diameter. |
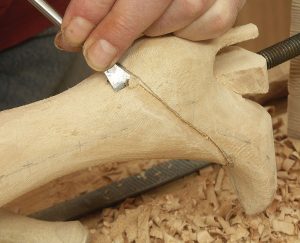 |
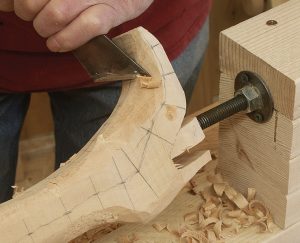
7. Set-in the line where the shoe meets the foot. Use a knife to make a 1/16″ (2mm)-deep stop cut along the line. I use a knife for this, because a mallet blow could split the work, particularly at the front. In most cases, the grain runs away from the stop cut rather than towards it. I found the easiest way to remove the waste is with a sharp skew cutting across the grain. |
 |
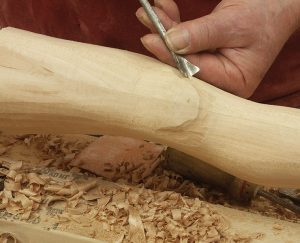
8. Smooth off some of the major tool marks. A spokeshave will remove marks left by the skew. While working with the spokeshave, remove the centerline and any flat area that might have been left there. The fine end of a horseshoe rasp will get into tight areas. The marks left by the rasp can be removed with a scraper. I made one from a piece of 1 1/4″ (32mm) band steel. |
 |
9. Shape the knee and anklebone. Protecting the knee joint is the kneecap. The protrusion of the kneecap produces a hollow on both sides, vaguely extending to the bottom. With the #6 gouge, create this soft hollow. Behind the knee there are some tendons and a small bundle of muscle. These produce a slight hollow to either side. Create this with a medium sweep gouge. The anklebone will protrude to the outside of the leg. The most dramatic protrusion will exist between the bone and the shoe. Toward the upper part of the leg, it is nonexistent. The bone is straight and flat; feel your own. Create this flat by using a spokeshave or even a hand plane. In the sanding process, you will want to soften these hollows even further. |
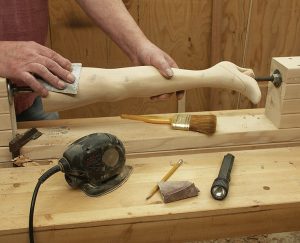 |
10. Sand the project. I hand sand with 120-grit followed by 220-grit. Mark spots that need extra attention with a pencil, and have a brush on your bench to dust with. Once you think the job is finished, shine a flashlight along the surface. You’ll be surprised at what you missed. |
 |
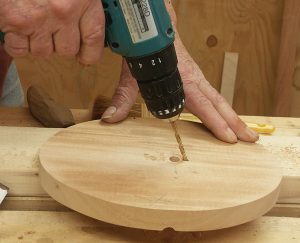
11. Drill the hole for the electric cord. Mark the location of the channel on each side of the foot, and transfer these marks to the base. Drill a 3/8″ (1cm)-diameter hole in the base at the appropriate location for the power cord. Turn the base over, and cut a channel that will accommodate the power cord. The cord will be held in position by a piece of felt glued to the bottom of the base. |
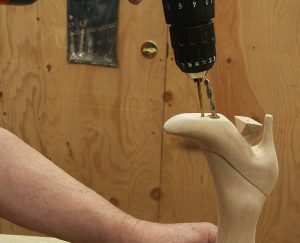 |
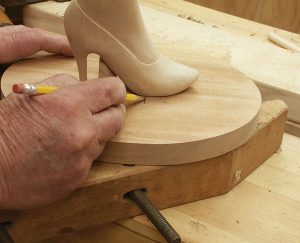
12. Drill the mounting hole in the lamp. Drill a 1/8″ (3mm)-diameter pilot hole 5/16″ (8mm) in front of the electric cord channel for the mounting screw. Place something in the channel to indicate its angle. Then bore the pilot hole at such an angle that it will not end up in the channel. A mounting screw bored perpendicular to the base of the shoe won’t have much wood to get a hold of and could split the foot. Placing it at an angle, you should be able to use a 2 1/2″ (64mm) drywall screw for mounting. |
 |
13. Drill the mounting hole in the base. From the top of the base, drill a 3/16″ (5mm)-diameter hole for the screw 5/16″ (8mm) to the front of the channel hole and also at an angle. This will compensate if your angles are not correct. Apply your finish of choice. I use clear Danish oil following the instructions on the container. If you use Danish oil, don’t omit the burnishing step. The whole process will actually harden the surface of soft-textured woods. USE CAUTION: Rags soaked with Danish oil can spontaneously combust. The safest way to dispose of them is to hang them outdoors to dry—as you would laundry. After a few days, they will turn stiff and may be disposed of in the trash. I decided not to paint the shoe black, but I did accentuate the line between the foot and shoe with a pencil. |
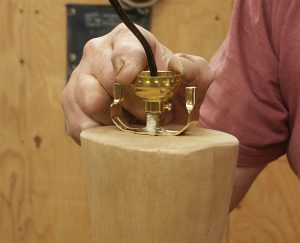 |
14. Install the electrical components. First enlarge the channel by boring a 3/8″ (1cm) hole about 2″ (5.1cm) deep at the top. This might compact some shavings in the channel. Loosen them with a piece of wire, and blow them clear. Place a neat wrap of tape around the end of the cord to prevent the wires from doubling back. You should be able to push the cord through the channel a little at a time. Should this fail, insert a stiff piece of wire—such as that from a lightweight coat hanger—through the channel from the top. Tape the cord to it, and while pushing the cord and wire with one hand, pull the wire from the top with the other. Screw the nipple into the socket base, and lock it in place with the set screw. Screw this through the harp base into the 3/8″ (1cm) channel bore. If the threads fit loosely smear them with a bit of yellow glue. Make the electrical connections, and snap the socket together while pulling excess cord through the channel. Then, install the harp. |
 |
15. Attach the felt to the base. Smear the underside of the base with yellow glue, and place it on top of a piece of felt. After about 10 minutes set time, the felt can be trimmed with a utility knife. The felt will protect any tabletop you set the lamp on in addition to holding the cord in place. Install the shade to complete the lamp. |
Click HERE to download the Leg Lamp pattern. Photocopy to 200% or desired size.
About the Author
An Ogden, UT, cabinetmaker who specializes in architectural woodwork, Mike Burton spends most of his time freelance writing. His books include Veneering a Foundation Course, Simple Marquetry, Architectural Carving, and his newest endeavor: Make Your Own Woodworking Tools. He does take commissions that include carving, turning, veneering, marquetry, and some curved cabinetry. Mike can be reached at StickBndr@aol.com.
 • Click HERE to get the Winter 2018 issue.