Add some pizzazz to your pencil pouch this St. Patrick’s Day!
By Randy True
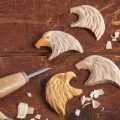
I have always enjoyed carving pencils. You can add a lot of detail in a small space—plus they make personal and practical gifts! The best pencils I’ve found for carving are made of resin or plastic; I usually use Berol or Empire brands. To ensure you are getting the right kind, look at the sharpened end. In a plastic or resin pencil, there are no seams where the pencil is formed around the lead. On wooden pencils, you can see where the two halves have been joined around the lead.
Getting Started
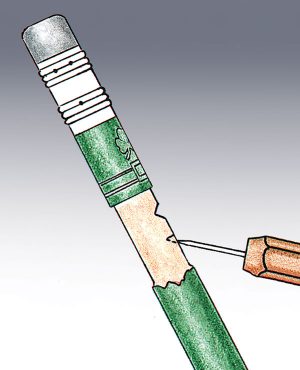
Clear away the paint. Use a fine-point detail knife to make a stop cut about 1″ (2.5cm) below the pencil’s metal band. Drop down 3/4″ (1.9cm) from the stop cut and shave off the paint up to it the entire way around the pencil.
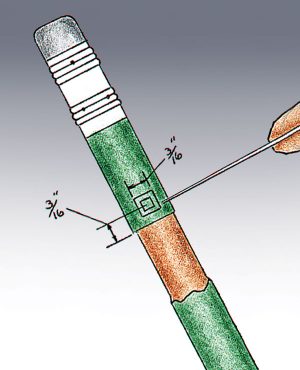 |
Carve the hat buckle. Use a micro V-tool to carve a 3/16″ (5mm) square, placing the center of the square 3/16″ (5mm) above the stop cut. |
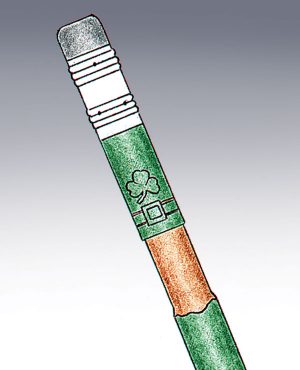 |
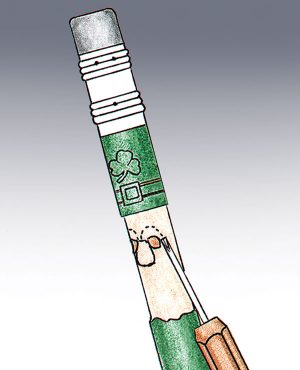
Carve the hatband and shamrock. Use the knife to make parallel stop cuts 1/8″ (3mm) apart and 1/8″ (3mm) above the original stop cut. Carve along both hatband stop cuts with the micro V-tool. Use a micro V-tool to carve a shamrock just above the buckle. |
 |
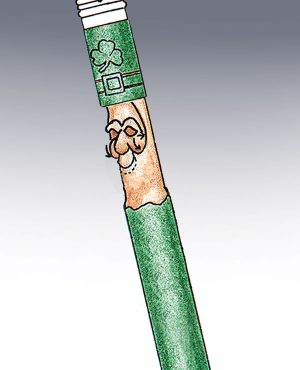
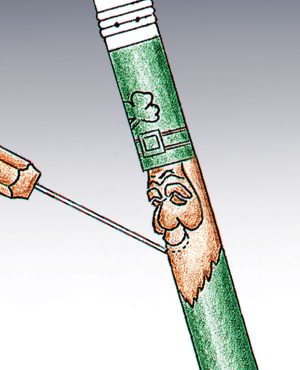
Carve the face landmarks. Measure 1/4″ (6mm) from the bottom of the hat under the hat buckle and stab a 1.5mm to 3mm micro skew chisel straight in 1/8″ (3mm). Move down 1/4″ (6mm) and repeat the process. Use the skew chisel to carve down at a 45° angle to the bottom of the upper stab cut. Carve up to the bottom of both stab cuts at a 45° angle to set in the bridge and bottom of the nose. |
 |
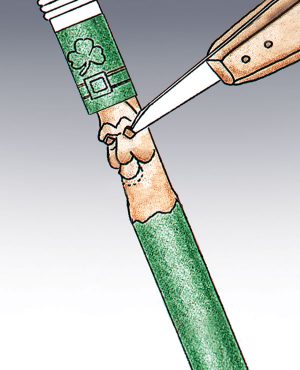
Rough out the eyes and nose. Use the micro V-tool to carve around the perimeter of an oversized triangle for the nose. Then use the same tool to carve 1/8″ (3mm)-deep eye sockets. Start at the outside corner of one eye and carve the top of the eyebrow arching over the eye to the bridge of the nose. Repeat on the other side. |
 |
Carve the cheeks. Using the micro V-tool, start at the corner of the nose and carve around the cheeks up to the hat. Use a micro skew chisel to make a stop cut in these V-grooves and carve up to the stop cut from below to shape the cheeks. Round the cheeks and refine the bridge of the nose. Make stop cuts alongside the nose and round the cheeks into them to separate the nose from the cheeks. |
 |
Carve the eyes. Use the point of the knife to carve a three-corner chip out of each eye. Increase the depth of the cut until you can see the black pencil graphite. Use the micro V-tool to carve crow’s feet into the corners of the eyes. Clean up the cuts. |
 |
Carve the beard. Use the knife to shave away paint from the area under the nose to make the beard come to a rounded point. Use the micro V-tool to carve the outline of an oversized upper lip. With the micro skew chisel, carve up to the line to separate the top lip from the beard. Carve under the lower lip with the micro V-tool to separate the lower lip from the beard. Then use the micro V-tool to carve the beard and eyebrow texture. |
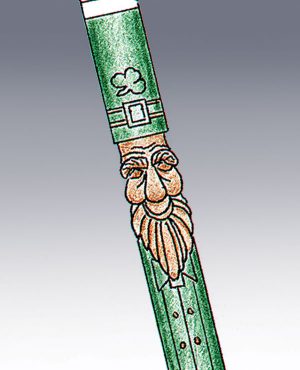 |
Add the coat details. Use a pencil to draw the bow tie, jacket, and vest. Carve along the lines with the micro V-tool. Use the micro gouge to carve the buttons on the vest. |
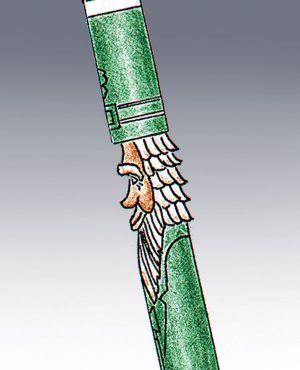 |
Carve the hair. Starting just below the hat, push the micro gouge in at a 45° angle and lift it slightly to create the locks of hair. Work across the back of the head. Stagger the cuts between the rows like shingles on a roof. Be careful not to break off the chips. Use the skew chisel to thin the nose and carve a slight point on the tip. |
Painting and Finishing
Paint the eyebrows with full-strength white acrylic paint. Use the same brush to go along the micro V-tool cuts on the jacket, overcoat, and bowtie. Thin the white paint slightly and paint the beard. When the paint is dry, use your fingernail to scrape off any paint outside the V-tool cuts on the jacket, vest, and tie. Then seal the carving with matte acrylic spray.
Antiquing (optional)
Mix 15 parts of paint thinner, 2 parts of copal (an oil painting medium available wherever artist oil paints are sold), 2 parts of pale drying oil, and 1 part burnt umber oil paint. Use a paintbrush to apply the stain to the face and all other carved or painted areas. Let the stain sit for about 30 seconds, and then wipe off as much as possible with a clean cloth. The copal in the stain mixture acts as a sealer, so a topcoat is not required.
Materials
• Pencils, such as Berol or Empire
• Acrylic paint: white
• Oil paint: burnt umber
• Paint thinner
• Copal
• Pale drying oil, such as Grumbacher
• Finish: clear matte acrylic spray
• Soft cloth
Tools
• Detail knife
• Micro gouge
• Micro V-tool
• Micro skew chisel
• Paintbrush
About the Author
Randy True lives on a farm in Winchester, Ind., with his wife, Debbie. Always artistic, Randy made cabinets and furniture before joining a woodcarving club and finding his real passion
in carving.
 |
Get the Spring 2021 Issue Purchase the IssueFor more articles like this, subscribe to Woodcarving Illustrated magazine. Magazine SubscriptionPlus! Get digital mini magazines in your e-mail between printed issues.
|