Carve a basswood blank into a cute pal to take trick-or-treating
By Lori Dickie
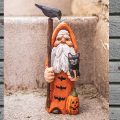
This petite pumpkin trick-or-treater is dressed in festive layers to stay warm during the chilly October night. A few careful cuts and a splash of paint will bring her to life. If you are a fan of this project, be sure to check out the other trick-or-treaters and carve this pumpkin some friends. A sweet skeleton (Whittling Vol. 7), an adorable alligator (issue #96), and other spooky carvings (Quick and Cute Carving Projects) will form the perfect group to keep her company while loading up on candy!
Getting StartedThis carving is made using a premade basswood turning that I purchased online. (See Special Sources below.) Draw a centerline down either side of the blank. Then transfer the pattern onto the blank using graphite paper and a pencil. Draw the basic landmarks.
|
CarvingUse a knife to make a stop cut around the top line on the hat. Then angle the knife and carve up to the stop cut to remove wood on both sides of the line. Continue to make stop cuts and remove wood until the cut is 1⁄4″ (6mm) deep. Round the top of the head to form the pumpkin stem. Round the hat and form the pumpkin leaves. Then make stop cuts around the bottom two lines on the hat. Remove wood from above the top line down to the stop cut. Remove wood from below the bottom line up to the stop cut. Carve the hatband flat. Make a stop cut around the neckline. Remove wood under the neck and taper the body into the stop cut. Round the head. Then make stop cuts around the arms and the bottom of the shirt. Remove wood from around the cuts to separate them from the body and the shirt from the pants. Then make a stop cut around the bottom of the pants to separate them from the shoes. Remove wood from around the cuts to create pants and feet. |
Adding Details |
|
Use a micro V-tool to carve the grooves for the hair and hatband. Change the hair to make a boy, if desired. Wrap black wire around a small dowel to make spirals for the pumpkin leaves. Use an awl to bore a small hole near the hat stem and glue the ends of the wires in place. |
Painting and FinishingUse a woodburner to add details to the face, hat, pumpkin shirt, and shoes. Add paint. I used an assortment of acrylic paints (see Paint Guide and Paint Notes below). Paint the child’s face and hands with warm beige, or any color you desire. Once dry, paint the child’s eyes, eyebrows, and smile black. Add freckle’s around the child’s nose with red iron oxide. Then paint the cheeks with a mix of warm beige and red iron oxide. Paint the hair with bright red, or your desired shade. Paint the hat and shirt pumpkin. Then paint the jack-o’-lantern’s face with black. Paint the hat leaves and stem hunter green. Then paint the tops of the shoes with bright red and the soles with white. Allow the paint to dry fully. Once dry, apply finish. I used two coats of matte varnish. |
Painting GuideHat, body: pumpkin (4) Hat leaves, stem: hunter green (4) Face, pumpkin face: black (3) Shoes: white (1) Hands, face: warm beige (1) mixed with red iron oxide (4) Hair, shoes: bright red (3) |
Paint Notes1 – Americana® Acrylics 2 – Apple Barrel® Colors 3 – Craft Smart® Acrylic 4 – Delta Ceramcoat® Acrylic 5 – FolkArt® Acrylic 6 – DecoArt® Crafter’s Acrylic® 7 – FolkArt® Metallics 7 – FolkArt® Metallics 8 – DecoArt® Dazzling Metallics |
Materials
|
Tools
|
SPECIAL SOURCESTurned basswood blanks are available from: •Stadtlander Woodcarving Supplies, •The Woodcraft Shop, 1-800-397-2278, thewoodcraftshop.com (item 554731) |
| About the Author |
|
Lori Dickie lives on a small farm in Michigan with her husband Steve. She has been carving for 20 years and displays her work at local shows. Find her on Etsy at lmdickie1. |
 |
Get the Whittling 2021 Issue Purchase the IssueFor more articles like this, subscribe to Woodcarving Illustrated magazine. Magazine SubscriptionPlus! Get digital mini magazines in your e-mail between printed issues.
|