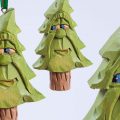
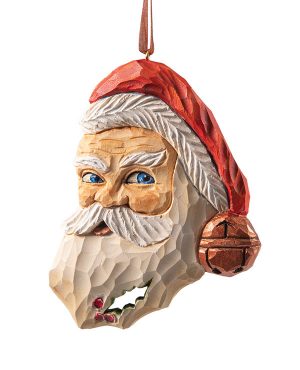
This pierced relief caricature is making a list and checking it twice
By Bob Hershey
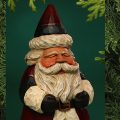
This jolly fella is a relief carving with vanishing point perspective. The vanishing point of his face is far to the left when you face him, which creates the illusion that he is looking away. Note: It might be helpful to look in a mirror, turn your head left, and look back into the mirror with just your eyes. Notice how your features look, and how they differ on opposite sides of your face.
For this project, whenever you use a veiner or gouge anywhere on the face, the size used on the right side will be larger than the tool used on the left side. I added holly in Santa’s beard for some extra fun.
Getting StartedTransfer the pattern onto the blank using graphite paper and a pencil, making sure the grain runs vertically. Cut the blank on a band saw. Note: Make sure the growth rings follow the general curve of the face (see Tip below). This will give your piece more strength and the facets on Santa’s face will be more appealing. |
Roughing OutUse a knife to cut back and round the right side of the face. You will have to redraw the right eye, cheek, and mustache. Block out the hat, fur trim, and bell with a 3/8″ (10mm) 60° V-tool. Set in the left eye socket with a 9/32″ (7mm) #11 veiner and the left side of the nose with the same tool. Use a 5/32″ (4mm) #11 veiner to set in the right eye socket. Then use a 5/64″ (2mm) #11 veiner to separate the right cheek and nose. Block out the cheeks with the 1/8″ (3mm) 35° V-tool. Set in the bottom of the mustache with the same tool. Shape the beard with a 5/8″ (16mm) #5 gouge. |
Adding DetailsUse the knife and the 9/32″ (7mm) #11 veiner to shape the hat. Then, using the 5/32″ (4mm) #11 veiner, create the basic flow of the fur. Note: It might be helpful to draw the lines for the fur before carving. For added depth, make small, random marks to the fur trim with the 5/64″ (2mm) #11 veiner. Round off the bell with the knife and redraw the bell details. Then detail the bell with the 1/8″ (3mm) 35° V-tool. To create the two holes on the bottom of the bell, use a 1/6″ (4mm) micro gouge. Block out the eyebrows with the 1/8″ (3mm) 35° V-tool and use the 5/64″ (2mm) #11 veiner to texture them. Detail the eyes with the knife, and then use a 1/8″ (3mm) #11 veiner on the left eye for both eyelids. On the right eye, use the 5/64″ (2mm) #11 veiner for both eyelids. Shape the left side of the nose with the 9/32″ (7mm) #11 veiner, and then use a 3/64″ (1mm) #11 veiner to create depth and shadow on the right side of the nose. Round the cheeks and nose with the knife. Use the same tool to make a three-corner cut for the mouth. Set in the bottom lip with the 5/64″ (2mm) #11 veiner. Remember, the mouth and lip will be slanted toward the right side of the face. Add texture to the mustache with the 9/32″ (7mm) #11 veiner on the left side and the 5/32″ (4mm) #11 veiner on the right. Come back with the 5/64″ (2mm) #11 veiner on the bottom of the mustache to break it up a little. Use a 5/8″ (16mm) #5 gouge to add shape and a little texture to the beard. I kept the mustache and beard simple, but you can add more detail, if desired. To add the holly leaf and berries to the beard, use the 5/8″ (16mm) #5 gouge to reduce this area to a thickness of about 1/4″ (6mm). Be careful here, as the wood can easily break. Use the pencil to mark the holly leaf and berries. Drill a few starter holes in the holly leaf with a 1/8″ (3mm)-dia. bit. Then, using the tip of a detail knife, carefully carve the negative space, as noted on the pattern, to create the holly leaf. Because you will have to work against the grain in a very tight area of thin wood, go carefully. Use the 1/6″ (4mm) micro gouge to relieve the holly berries. Make a starter hole in the top of the hat near the center; I used an awl. Insert a small brass screw eye into the hole with a drop of cyanoacrylate (CA) glue. Let dry. Then hold onto the hook while painting. |
FinishingPrepare the carving for paint. Using a dental brush, scrub on a mixture of Simple Green® and warm water to remove any remaining pencil marks. Don’t soak the wood. Pat with a paper towel and let dry overnight. Paint the ornament using oil paints mixed with natural stain, such as Minwax®. I used thin washes for most of the carving, and applied heavier coats on the eyes, bell, and holly. Once dry, spray three thin coats of satin finish, such as Deft®. Then apply three thin coats of varnish, such as Jo Sonja®, to the eyes to give them a twinkle. Thread a string or ribbon through the screw eye and hang to display. |
Paint Notes
|
|
|
MATERIALS •Wood, such as basswood, 1/2″ (1.3cm) thick: approx. 4″ x 5″ (10.2cm x 12.7cm) • Graphite paper • Pencil • Cleaner and degreaser, such as Simple Green® • Paper towels • Glue: cyanoacrylate (CA) •Oil paints, such as Winsor & Newton™: black, cadmium orange, cadmium red medium, cobalt blue, light brown, raw umber, rose madder, sap green, titanium white, white; such as Georgian: buff titanium, burnt sienna; such as Williamsburg®: iridescent copper • Stain: natural, such as Minwax® • Finish: satin spray, such as Deft® • Small screw eye: brass • Varnish, such as Jo Sonja® • Decorative ribbon or string |
TOOLS • Band saw • Knives: carving, detail • Micro gouge: 1/6″ (4mm) • #5 gouge: 5/8″ (16mm) • V-tools: 1/8″ (3mm) 35°, 3/8″ (10mm) 60° •#11 veiners: 3/64″ (1mm), 5/64″ (2mm), 1/8″ (3mm), 5/32″ (4mm), 3/16″ (5mm), 9/32″ (7mm) • Drill with bit: 1/8″ (3mm)-dia. • Dental brush • Paintbrushes: assorted • Marking tool: awl |
| About the Author |
|
Bob Hershey is a retired truck driver who started carving in 1982. A national award- winning carver, Bob was inducted into the Caricature Carvers of America in 2018. He is a member of the Conewago Carvers and Lancaster County Woodcarvers clubs. He lives in Lititz, Pa., with his wife, Debby. |
 |
Get the Winter 2021 Issue Purchase the IssueFor more articles like this, subscribe to Woodcarving Illustrated magazine. Magazine SubscriptionPlus! Get digital mini magazines in your e-mail between printed issues.
|