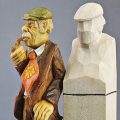
Whether you love hiking or hunting, celebrate your hobby with this easy, adaptable project
By Eric Owens
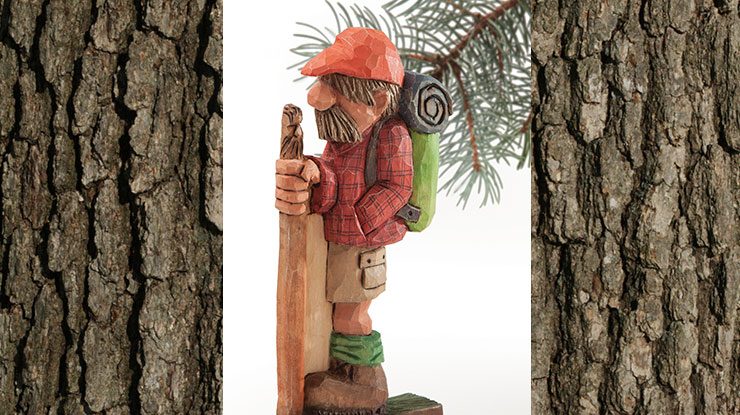
I love to hike, and when I look at this guy, I just want to strap on my boots and hit the trail! He is a beginner/intermediate project, and most carvers need a minimum of tools and skill to create him. I particularly enjoy carving the wizard face at the top of the hiking stick.
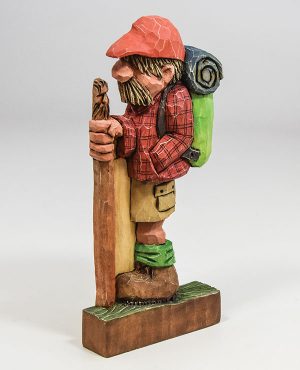
The carving can stand alone, or you can attach it to a bookend, photo frame, or add hooks and a hanger to form a key rack.
Not a fan of long walks? No worries—this carving is easy to adapt. See the bonus patterns included of a hunter, soldier, and fireman. Feel free to sketch your own interpretation of the design.
Carving a HikerI carved my hiker from one piece of wood. Add a separate, larger base if desired. I left the wood in the negative space between the body and hiking stick to strengthen the weak areas and protect the integrity of the carving. If you prefer, remove it after you carve the majority of the piece. My carving has hair covering the face so I didn’t have to carve eyes, which can be challenging. To make it even easier, cover the ears with hair as well. |
Finishing the ProjectUse a woodburner to separate the areas to be painted. This prevents paint from bleeding from one area to another. I use acrylic paints thinned with water to allow the wood grain to show through. I use between 7 and 10 drops of water per drop of paint. You can adjust the intensity of the color by adding more or less water to the wash. I added the lines on the jacket for interest, using an ultra fine point Sharpie® marker. Paint the hiker using colors that have meaning to you or draw a logo on the hat or shirt to show your team spirit. Allow the paint to thoroughly dry. Then spray the carving with two light coats of Minwax® clear satin polyurethane. This finish helps protect the carving from oils transferred through handling and keeps the colors vibrant. |
Paint NotesHat: tangelo orange (1) mixed with a drop of tomato red (1) Bedroll: deep midnight blue (1) Exposed skin: mixture of flesh (2), medium flesh (2), and dark flesh (2) Jacket: tomato red (1) Backpack: lime green (2) Shorts: mink tan (1) Walking stick: burnt sienna (1) Boots: burnt umber (1) Boot tread and hair: soft black (1) Drybrush texture: buttermilk (1) 1 DecoArt Americana® 2 Delta Ceramcoat® |
 |
Materials• Basswood, 7/8″ (2.2cm) thick: 3 1/4″ x 7 1/4″ (8.3cm x 18.4cm) • Acrylic paints, such as DecoArt Americana®: burnt umber, tomato red, deep midnight blue, mink tan, burnt sienna, tangelo orange, soft black, buttermilk; such as Delta Ceramcoat®: flesh, medium flesh, dark flesh, lime green • Marker: ultra fine-point Sharpie® • Finish, such as Minwax® clear satin polyurethane |
Tools• Knife: 1 1/2″ (38mm)-long blade • #5 fishtail gouge: 1/2″ (13mm) • #5 gouge: 1/4″ (6mm) • #9 gouge: 5/16″ (8mm) • V-tool, bent: 1/4″ (6mm) 45° • Woodburner with nib: spade • Paintbrushes |
About the Author
Eric Owens of Boise, Idaho, is a middle school science teacher. He has been carving caricatures since 2006. Before then, he carved neckerchief slides, bolo ties, and walking sticks around Boy Scout campfires. He has taught classes locally and is both a past president of the Idaho Woodcarvers Guild and former director of the IWG’s Jamboree. To see more of his work, visit his website at www.ericowensart.blogspot.com.
 |
Get the Spring 2022 Issue Purchase the IssueFor more articles like this, subscribe to Woodcarving Illustrated magazine. Magazine SubscriptionPlus! Get digital mini magazines in your e-mail between printed issues.
|