 Use basic cuts to create accents for frames and furniture
By Chris Pye
Most carved molding looks more difficult to carve than it really is. Decorative molding has many uses, such as around the edges of tables or picture frames.
The simpler carved moldings offer a good introduction to traditional woodcarving. Moldings require consistent tool control and clean cutting. They are made from a series of basic cuts and are a useful way to practice skills.
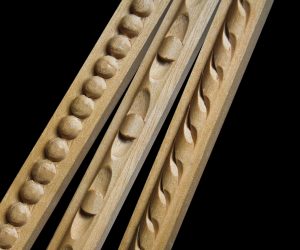
What you see is a repeating pattern made from individual cuts. Single, precise cuts are repeated along the length of your wood and overlaid, a “run” at a time, to build the final molding. This sort of work can be tedious, but the results can be very impressive and well worth the effort.
Every carved molding starts with a blank strip of wood having a profile particular to that variety. Only one profile is needed for the three varieties we’ll be learning. You’ll need to make up strips or have a woodworker do it for you. You also need a way to hold the molding while you carve it.
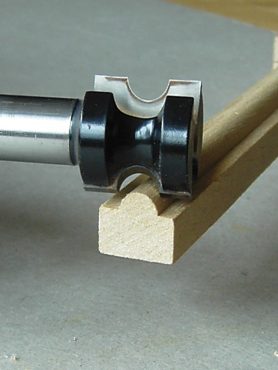
The router bit produces the astragal or bead.
Setting Up Molding Blanks
The profile of the molding we will be carving is called an “astragal,” a fancy name for a semi-circular “bead.” The flat ledge on either side of the bead is called the “quirk.” It’s a very important plane or surface that we will be using. Use a router cutter that will produce a 5/16″ (8mm)-diameter bead. Prepare several practice strips to try out the different molding styles. In the old days, you would work the molding profile by hand with a molding plane, or “scratch stock,” a piece of hardened steel the shape of the astragal you want. A scratch stock is moved along the wood until you scrape the bead to shape. For some profiles, it may be easiest to create the astragal with carving tools.
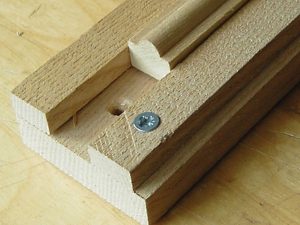
A simple, shop-made vise holds the blanks in place.
Holding Jigs
I prefer to hold the strip of molding tight between two fences, but you can nail down the ends to a board or tack the wood down with hot glue.
CLICK HERE to download the step-by-step instructions for Simple Carved Moldings.
| About the Author |
| Chris Pye is a master woodcarver, instructor and author of several books, including Woodcarving Projects and Techniques, produced by Fox Chapel Publishing. Chris runs the video-based teaching website, WoodcarvingWorkshops.tv, with instruction on tools, sharpening, lettering, relief carving, in-the-round projects and much more; and from where he writes a free monthly blog about woodcarving. You can see a gallery of his commissioned work at www.chrispye-woodcarving.com. |
 Read more great articles from Woodcarving Illustrated Holiday 2007 (Issue 41) here.