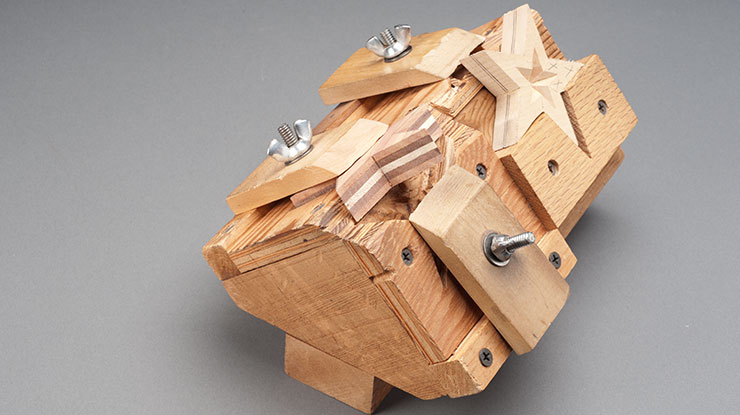
Star Carving Fixture
Shop made tool helps you carve and sand stars without breaking them
By Jim Sebring
I developed the holding fixture so I could mass produce the laminated stars Use the drawings as a guide. Choose a soft wood 4×4 for the base unit; hard woods will damage the fragile points of the stars. The shaded areas on the fixture are where I added pieces of 1/8″ (3mm)-thick plywood to help stabilize the star while sanding. The holding pieces should be cut from relatively hard wood such as poplar.
Making the Star Fixture
Step 1
Cut the materials to the dimensions listed in the materials list. Measure 2″ in from one corner of the base block and rip off one corner of the block to produce a flat surface for the fixture to rest on your bench. Cut a 45* angle on the top of the star support pieces and the ends of the hold downs.
Step 2
Cut the stop cut supports and side supports. Attach the patterns to the blanks. Cut the pieces with a saber saw, band saw, or scroll saw. Try to follow the lines exactly so the stars sit properly into the fixture. Then cut the 1/8″-thick insert piece for Station 4. Carve out the angled parts on the side points of Station 4 to support the star when you are sanding.
Step 3
Drill the holes. Drill the holes in the hold downs and the pilot holes for the screws in the bottom rails, the stop cut support, the star supports, and the vise block. Drill a 5/16″-diameter hole in the hold downs and match the diameter of your screw pilot holes with the diameter of your screws. If you use #8 screws, drill 1/8″-diameter pilot holes. Do not worry about drilling pilot holes in the base block; the screws will go easily into the soft pine.
Step 4
Assemble the holding fixture. Glue and screw the bottom rails onto the base block. Then glue and screw the stop cut support and the star supports to the base block. Glue and screw the vise block to the bottom of the base block. Attach the hold down pivot and the Station 4 insert with glue and small nails.
Step 5
Add the hanger bolts. Screw the hanger bolts into the pilot holes. You may need to drill 3/16″-diameter pilot holes for the hanger bolts. I put a cap nut on the bottom of the hanger bolt and use an appropriate socket to screw the bolts into place.
Step 6
Add the hold downs. Place hold downs over the hanger bolts. Place the washer on top of the hold down and screw down the thumbscrews.
3D View of Star Fixture
|

Using the Holding Fixture
Step 1
Place the stars in Station 1 to make the stop cuts with the hobby knife. Use the technique explained in step 6 of the article in Woodcarving Illustrated Holiday 2009 (Issue 49). Make all of the stop cuts on both sides of the star.
Step 2
Carve the first side of the star. Lock the star in place in Station 2. Use the arrows on the pattern as a guide as you carve the angled sides using the techniques explained in step 7 of the star carving article. Rotate the star as needed to carve the points.
Step 3
Carve the second side of the star. Lock the star in place in Station 3. Use the same technique explained in step 2 to position and carve the star.
Step 4
Sand the star. Lock the star in place in Station 4. Sand the piece carefully using the techniques explained in step 9 of the star carving article
Materials
|
Tools
|
| About the Author |
|
Jim Sebring lives in East Stroudsburg, Pa. He has been carving in the tramp-art style since 1995. His work has been on display in many historic venues and at the Northeast Woodcarvers Roundup in Honesdale, Pa. |
 |
Get the Latest Issue! [button link=”https://foxchapelpublishing.com/products/woodcarving-illustrated-issue-109-winter-2024?_pos=1&_psq=109&_ss=e&_v=1.0″ bg_color=”#ff0000″]Purchase the Latest Issue[/button] For more articles like this, subscribe to Woodcarving Illustrated magazine. [button link=”https://www.foxchapelpublishing.com/wood-carving-illustrated-subscription.html” bg_color=”#ff0000″]Magazine Subscription[/button] Plus! Get digital mini magazines in your e-mail between printed issues.
[button link=”https://woodcarving.zeeframes.com/enews/” bg_color=”#ff0000″]Subscribe to Strop Talk[/button]
|

Get the Latest Issue
For more articles like this, subscribe to Woodcarving Illustrated magazine.
Plus! Get digital mini magazines in your e-mail between printed issues.