Celebrate the patriotic summer holidays with these quick carvings
By Pete Zanauskas
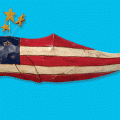
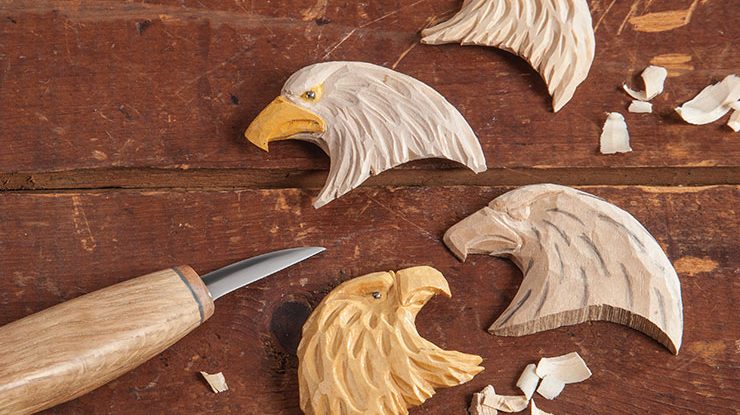
Carve these easy eagle heads to celebrate Fourth of July and Veteran’s Day. You can use a band saw to mass-produce blanks, and then carry them with you to whittle in your spare time. I turned mine into pins, but you could also use them as magnets. You could even add an eyelet or neckerchief loop, if desired. They look great painted or plain. Note: Always wear carving gloves and a thumb guard. These photos were taken without them to clearly show hand and tool positions.
Getting StartedTransfer the pattern to the blank. I use a thick board that I slice into thinner blanks. Cut around the outline of the eagle. Then set the rip fence of a band saw and slice the board into 1/4″ (6mm)-thick blanks. Use a carving knife to clean up the perimeter of the eagle. |
CarvingTaper the beak back to the line. Remove some wood from the lower part of the beak. Then remove the sharp corners from the neck and back of the head. Draw the eyebrow with a pencil. Carve a V-shape groove on the line, using the carving knife or a V-tool. Remove wood from under the eye and next to the beak. Then remove a sliver of wood from the top corner of the beak to separate it from the rest of the head. Make a stop cut around the eye. Carve up to the stop cut to separate the eye from the head, and then use the knife to round the eye. Carve the nostril hole. Make a stop cut along the top beak and shave down the lower jaw. Add the feather texture; I use a 1/4″ (6mm) #9 gouge, but you can use the carving knife. Undercut the bottom of the neck slightly and carve notches at the ends of the feathers. Deepen the feather texture with the carving knife or V-tool. |
|


FinishingMark the location of the pupil. Use an awl or ice pick. Hold a 5/64″ (1.9mm)-dia. drill bit between your fingers and drill a small hole for the eye bead. Glue the eye bead in place. Glue a magnet or pin to the back, if desired. Paint the eagle, and then seal it with a clear spray in a satin or matte finish. |
|

| Materials
• Basswood, 3/4″ (1.9cm) thick (makes three): • Pencil • Silver bead • Glue, such as Elmer’s® • Acrylic paint: sunbeam (eyes), tangerine (beak), vintage white and cottage white (feathers) • Finish: clear satin or matte spray • Pin back or magnet • Eyelet (optional) |
Tools
• Band saw • Carving knife • #9 palm gouge: 1/4″ (6mm) • V-tool: small (optional) • Awl or ice pick • Drill bit: 5/64″ (1.9mm) dia. |
| About the Author |
|
Pete Zanauskas lives in Massachusetts and has three daughters. A lover of the outdoors, Pete has been carving since 1995. |
 |
Get the Summer 2022 Issue Purchase the IssueFor more articles like this, subscribe to Woodcarving Illustrated magazine. Magazine SubscriptionPlus! Get digital mini magazines in your e-mail between printed issues.
|