Carving Santa and Rudolph
 Your new chance to carve our very first Santa
By David Sabol
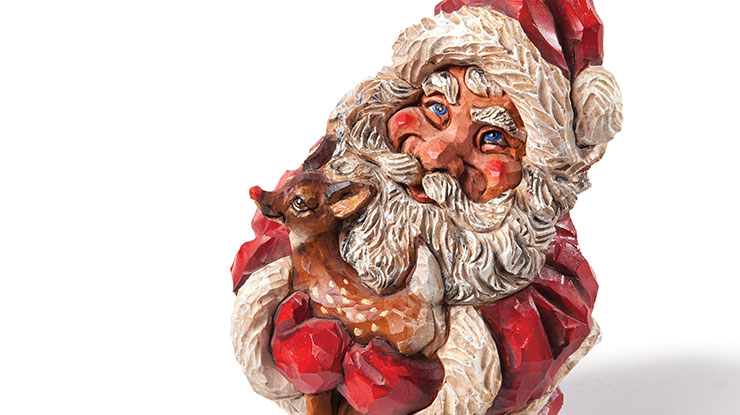
In many ways, it’s the iconic carving we compare all Santa projects to—the cover project of Woodcarving Illustrated Issue 1. This piece captures the whimsy and fun of carving, and the finishing technique leaves no question that it’s carved from wood. It requires surprisingly few tools to carve. More experienced carvers can get started right away with just the pattern, but for everyone else, we’ve included step-by-step instructions below.
Wood Selection
This piece was carved from green (or unseasoned) pine, which means the blank is very wet. At the time, this wood was readily available, carves easily, and has a prominent grain that adds interest to the finished piece.
Santa: Roughing Out Santa
 |
 |
| Step 1: Remove the excess wood around Santa and Rudolph. I choke up on a full-size 3/4″ (or 20mm) V-tool, which helps me to remove a lot of wood quickly. Even though I push the tool toward me in an arching motion, I have good control and it’s a safe technique. I don’t use a lot of force because I make small shearing motions. | Step 2: Hollow the inside of the hood. Use a 9/32″ (7mm) #9 gouge. Block out the face while locating the nose and cheeks. |
 |
 |
| Step 3: Rough in the facial features. I use a Cape Forge carving knife. The handle shape of this knife allows me to move it around in my hand easily. Carve the outline of the nose and the top of the mustache. | Step 4: Carve the open mouth. Use the carving knife. Then, shape the top of the beard around the mouth. |
 |
 |
| Step 5: Care Rudolph’s head. Use the knife. | Step 6: Outline where Santa’s mittens are going to be. Use a 1/4″ (6mm) 45° V-tool. At the same time, I move the body in by removing wood around the mittens. |
 |
 |
| Step 7: Rough out the body. Use the 3/4″ (or 20mm) V-tool. | Step 8: Separate the boots. Use the 1/4″ (6mm) 45° V-tool. |
 |
 |
| Step 9: Round the pant legs. Use the 11/16″ (18mm) #7 gouge. | Step 10: Separate the fringe of the coat from the pant legs. |
 |
 |
| Step 11: Hollow under the arms. Use the knife. | Step 12: Undercut the jacket. Use the 1/4″ (6mm) 45° V-tool. |
 |
 |
| Step 13: Round the arms. Use the 11/16″ (18mm) #7 gouge. | Step 14: Wet the wood as needed. Use a spray bottle. Green, wet wood is a pleasure to work with. It has a pliability that I just love to carve. |
Santa: Adding the Details
 |
 |
| Step 15: Carve the deep facial details. I use a Warren detail blade and handle. Create deep shadows to give character to the face. Deepen the mouth, refine the nose, and shape the mustache. | Step 16: Shape the inside of Rudolph’s ears. Use a 5/32″ (4mm) #11 gouge. Us the knife to finish shaping Rudolph’s body, tail, and legs. |
 |
 |
| Step 17: Add the fur texture to the coat and hat trim. Use the same gouge. Use a 1/8″ (3mm) 45° V-tool to add the hair, beard, and mustache texture. | Step 18: Carve Rudolph’s eyes. Use the detail knife. Then carve his smiling mouth. You want this to be a cute, loveable reindeer. |
 |
 |
| Step 19: Make deep cuts to define Santa’s eyes. The carving, not the paint, creates the expression. | Step 20: Clean up the carving. Remove any fibers left by the knife cuts. Use a woodburner set at a medium heat |
 |
 |
| Step 21: Carve the final details. Clean up any cuts as needed with the knife, and then touch it up with the woodburner. | Step 22: Deepen the undercuts. Use the woodburner. |
 |
|
| Step 23: The finished Santa and Rudolph are ready for painting. |
Santa: Painting Santa and Rudolph
I thin oil paints with Minwax natural oil stain to create a colored stain. This method works well for me because the stains soak into the wood and are not affected by the water content of the green wood.
After the paints are all dry, seal the carving with a semi-gloss spray lacquer, such as Deft.
- Santa’s face: use thinned red for the cheeks and burnt sienna for the shadows
- Santa’s eyes: ultramarine blue for the irises, black for the pupils, and white for the highlight dot.
- Santa’s beard: mix white, ultramarine blue, and black to make gray
- Coat, hat, pants: red with ultramarine blue shadows
- Boots: black with ultramarine blue highlights
- Rudolph’s coat: brown ochre with brown ochre toned down to a cream color for the spots.
- Rudolph’s nose: red
MATERIALS & TOOLS:
CLICK HERE to download the pattern for Santa and Rudolph
MATERIALS:
- Pine, 6″ (15.2cm) square: 9″ (22.9cm) long
- Oil stain, such as Minwax: natural
- Oil paints: red, burnt sienna, ultramarine blue, black, white, brown ochre, cream
- Spray lacquer, such as Deft: semi-gloss
TOOLS:
- Knives: roughout, detail
- #7 gouge: 18mm
- #9 gouge: 7mm
- #11 gouge: 4mm
- V-tool, 60°: 20mm
- V-tool, 45°: 1/8″ (3mm), 4mm, 1/4″ (6mm)
- Spray bottle of water (to keep carving wet as you carve)
- Woodturner with small tip
About the Author
David Sabol is a professional woodcarver and instructor who lives in Wrightsville, Pa. An emeritus member of the Caricature Carvers of America, David carves a wide variety of subjects. Contact him at 717-968-5000.
CLICK HERE for more articles from Woodcarving Illustrated Holiday 2017 (Issue 81).
 CLICK HERE to purchase the issue.
• Plus! Get digital mini magazines in your e-mail between printed issues. Click here to subscribe to StropTalk, our e-mail newsletter.

Get the Latest Issue
For more articles like this, subscribe to Woodcarving Illustrated magazine.
Plus! Get digital mini magazines in your e-mail between printed issues.
