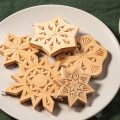
Wow dinner guests with this intricate utensil-turned-art-piece
By Marty Leenhouts
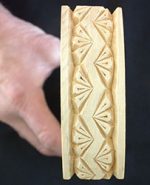
This wine bottle holder will balance a bottle of wine and form an unusual and interesting centerpiece at your next dinner with guests. Add carving to it and now you’ve really got something to talk about! Carving and finishing this item is quite easy. If this is your first time chip carving, practice first on a spare piece of basswood before carving the final item.
Getting Started
Attach the pattern to the blank. Cut the slanted end at a 37-degree angle, and then drill the hole in the top using a drill press with a 1-3/8˝ (3.5cm) Forster bit with the table angled at 37 degrees.
Wine Holder: Carving the Project
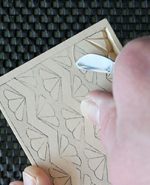 |
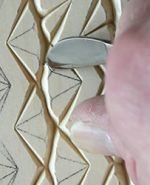
1. Make the first series of cuts. Start at the base of one fan and sweep across the top of the neighboring fan all the way down to the base of the next fan. As the pattern area gets wider, increase the depth of your cut. Draw the knife out of the wood at the end of the cut as it comes to a point. (Note: We will leave the cuts that will separate the fan elements until later. Make a smooth cut across the top for now.) Make this same cut all the way down one side of the pattern. |
 |
2. Make the second series of cuts. Turn the holder 180 degrees and make these same cuts on the opposing fans. When making these cuts, the wood in the center will start to lift out when this cut meets the cut previously made. If it doesn’t lift out, don’t pry or pull it out. Instead, return your knife to the first cut and increase the depth of your cut until it meets the one on the other side. |
 |
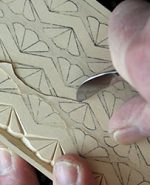
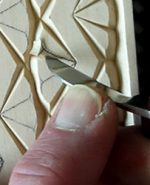
3. Rough out the fans. With the center section removed, make the next cut to remove the wood on the sides of each fan. Place the point of your knife into the center section and draw it out at the base of the fan. |
 |
4. Clear the sides of the fans. To remove the chip on the other side of the fan, roll your knife over in your hand so you can place the tip inside the center section. When rolling the knife over in your hand, keep your thumb on the wood and under the handle. This will ensure a firm base and consistent angle of cut. It also generates more consistency compared to placing your thumb on the spine of the knife. Place the tip of the knife in the center section between fans. Start the cut at the same place where the opposite chip started. This will form a nice V-shape where the cuts meet. With the knife rolled over, complete the cut by finishing at the base of the fan. Continue making these cuts down the pattern. |
 |
5. Separate the fan sections. Make one cut using the standard grip and the other with the knife rolled over. All of these cuts will start in the center section just like the previous cuts. If the grain causes the wood on the top of the fan to chip off, change the order of cuts. In this case, make the first cut by rolling over the knife and follow it with the cut holding the knife with a regular grip to remove the chip. |
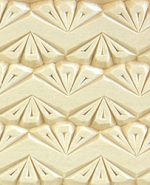 |
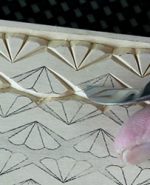
6. Dot each of the fan sections with a stab knife. No wood is removed when using the stab knife. When “stabbed” into the wood, the wood fibers are crushed, forming the impression. |
 |
7. Carve the edges and ends. This time, instead of making the sweeping curved cuts first, make the long straight cuts on the edges first. This will avoid the problem of the wood running with the grain if the edge is cut last. |
Finishing the Project
Remove all leftover pattern lines with a Tombow Sand Eraser. Unlike sanders, this eraser will erase the lines without removing wood on the surface. Vacuum the surface to clean out the carved recesses. Apply three clear coats of spray matte acrylic or satin lacquer. After the clear coat is dry, brush on a gel stain and wipe off the surface with a cotton cloth. I used a brown mahogany color gel stain. See that all excess gel stain is brushed out of the recesses. After drying overnight, re-apply gel stain to any areas that need more color. Spray on a final clear coat and your carving is complete.
Click HERE for the Wine Bottle Holder Pattern.
WEB-Chip-Carved Wineholder Patterns
Materials & Tools
Materials:
• Gel stain
• Wine bottle holder, basswood, 1˝ (2.5cm) thick: 3 1/2˝ x 12˝ (8.9cm x 30.5cm)
• Acrylic spray: clear matte; or lacquer: clear satin
Tools:
• Pattern transfer tool (or graphite transfer paper)
• Chip carving knife
• Sand eraser: Tombow or similar
• Brush
• Cloth: cotton or similar
About the Author
Marty Leenhouts is a regular contributor to Woodcarving Illustrated. He has 30 years of teaching experience and is the owner of MyChipCarving.com and EZcarving.com. His videos have 2.5+ million views. He is also the author of Chip Carving Essentials: A Step-by-Step Guide to Successful Chip Carving.
Want more chip carving projects and tips?
Check out Chip Carver’s Workbook by Dennis Moor.
Available for 14.95 plus S&H from Foxchapelpublishing.com.