Celebrate the spirit of the season with a whimsical Fright Night carving
By Tom Mellott
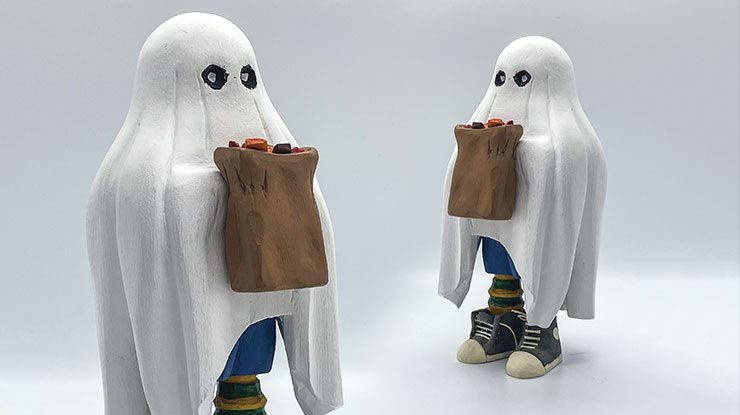
This ghost kid started off as a sheet draped over a simple form, holding a large candy corn. Then I thought there should be some human form under the sheet. My wife suggested, “why not have the sheet covering a little boy and have his feet showing out the bottom?” Okay! And off I went. I wanted the legs and feet to be those of a “real boy”: one sock falling down, the old high-top sneakers with the ankle patch, one sneaker untied, laces dangling. To get the folds of the sheet to look right, I draped a small square of cloth over a bottle to use as a model. This carving developed a lot as I went, which is part of the adventure. I hope you enjoy the spook-tacular result!
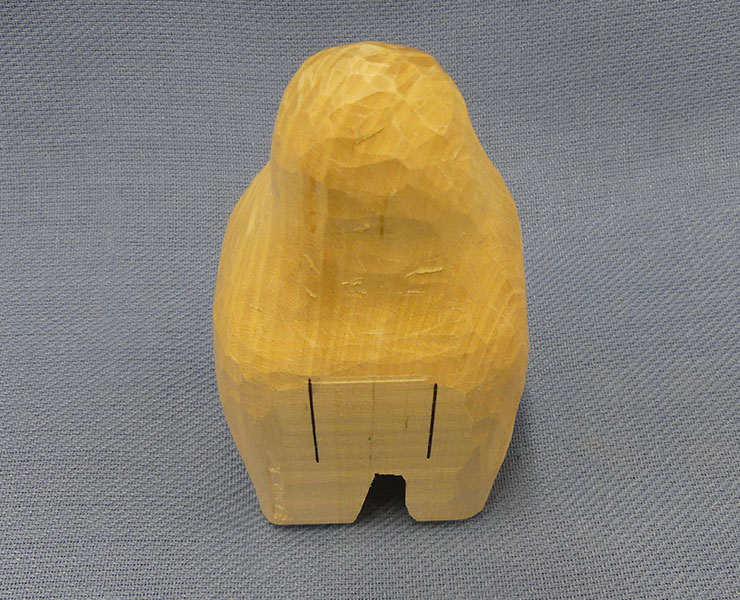
Getting StartedPrep the blanks. I carved this caricature in three separate pieces—the torso, the legs, and the treat bag—to make it easier to sculpt. Transfer the patterns to the blanks. Prior to cutting the torso, drill a 1” (2.5cm)-dia. flat-bottom hole 1-5/8” (4.1cm) deep to form the cavity for the leg section. Note: I used a Forstner bit, but a spade bit would do just as well. Cut the torso on a band saw; cut the other two pieces on a scroll saw. Save the offcuts, as you’ll use them to make the treats later. |
CarvingRound over the head and corners of the torso area with the rough out knife. Use a pencil or pen to mark the main sheet folds and the location of the treat bag. Using the gouges and V-tool of your choice, create the fabric folds, keeping them random as they would be in reality. Keep in mind that the bottom of the sheet is not level, and some of the inside of the sheet will be exposed in the finished project. Using the knife and a gouge of your choice, create the indentation for the treat bag, and rough out the bulges for the hands holding it. With the knife, thin down the edges of the sheet to create the look of delicacy. Add the eyeholes in the sheet; I used a drill to make two 1/4” (6mm) holes around 1/8” (3mm) deep. Refine the sheet’s shape; when you’re happy with the overall look, sand the surface to 220-grit. |
 |
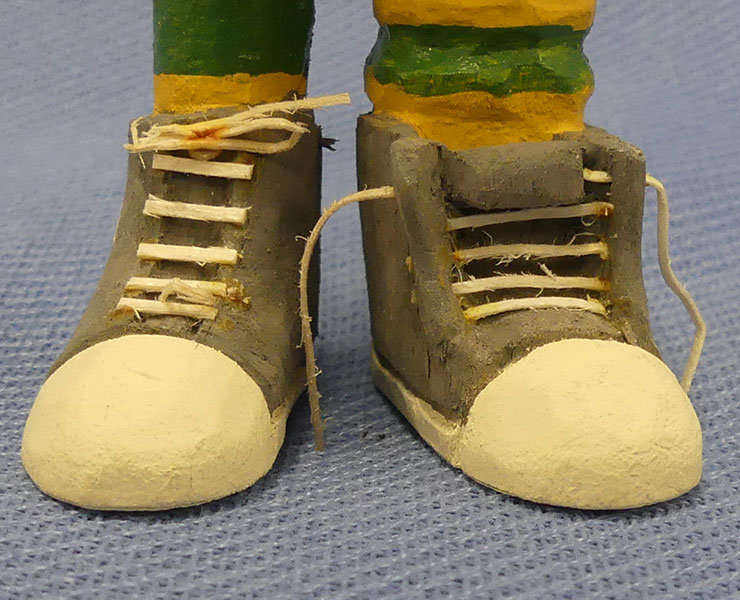
| Carve the leg area. I started from the bottom and worked my way up. Draw the shape of the soles on the bottom of the blank and shape the body of each sneaker with the rough out knife. Separate the sole and toe cap from the main shoe with a V-tool. Then add the rest of the shoe details. You have a few options here: 1) Carve basic sneakers, with no additional details. 2) Carve the tongue indentation and paint on the laces later. 3) Carve them with the high top spread open and the tongue hanging out a bit. 4) Use method 3, but add hand-carved laces, using the tip of a detail knife to cut both sides of a V (about 1mm wide) in the surface of a flat scrap of basswood. Drill small holes for the eyelets with a hand drill, and wet the wood before feeding it through the holes. Glue the parallel laces on top of each sneaker. |
| Add the final details. Carve the socks and shorts, leaving one sock bunched down around the ankle. Separate the pant legs and add creases as desired. Then carve the treat bag, rounding the sides, corners, and bottom. Scoop out the top of the bag to a depth of 1/4″ (6mm) to allow room for the treats to sit. Then carve the treats as desired. |
Painting and FinishingI painted the pieces before gluing them together, but you could also glue and then paint. For the sheet section, paint the black eyes first. Once dry, paint the sheet white, inside and out. With a toothpick, add a drop of white paint in the center of each eye. Paint the treat bag with coffee latte, and paint the candy with your preferred colors. Then paint the leg section; I painted the sneakers with gray storm, using antique white for the trim and laces. I painted the socks with yellow ochre and forest green stripes, and the shorts with denim blue. Once all the paint is dry, glue and clamp the pieces together (including the candy in the bag) and finish with a few coats of a clear spray lacquer. |
 |
Materials• Basswood, 2-3/4” (7cm) square: ghost torso, 5” (12.7cm) long • Basswood, 1-1/2” (3.8cm) thick: legs, 1-3/4” x 2-1/2” (4.5cm x 6.4cm) • Basswood, 3/4” (1.9cm) thick: treat bag, 1” x 1-1/2” (2.5cm x 3.8cm) • Pen or pencil • Wood glue • Acrylic paints, such as Americana: coffee bean, forest green, grey storm, spiced pumpkin; such as Ceramcoat: antique white, black, denim blue, tompte red, white; such as Folk Art: coffee latte, yellow ochre • Clear spray lacquer: satin or semi-gloss |
Tools• Saws: band or scroll • Drill press or hand drill • Knives: rough out, detail • Gouges: assorted • #11 veiner: 1/4″ (6mm) • V-tool: 70° • Clamps • Paintbrushes: assorted |
| About the Author |
|
Tom Mellott of Colorado Springs, Colo., remembers carving a hippo from Ivory soap as a Cub Scout in the late 1940s. He also carved neckerchief slides as a Boy Scout. After retiring from a career in engineering, Tom studied and worked part-time as a cooper (barrel maker) at a colonial village for 12 years. A past member of the Bloody Thumbs Carving Club in Roaring Springs, Pa., he’s currently a member of the Pikes Peak Whittlers and the First Lutheran Carving Club. Shoot him an email at malcath361@gmail.com. |
 |
Get the Fall 2023 Issue Purchase the IssueFor more articles like this, subscribe to Woodcarving Illustrated magazine. Magazine SubscriptionPlus! Get digital mini magazines in your e-mail between printed issues.
|