Carving Folk Art Fish Keychains
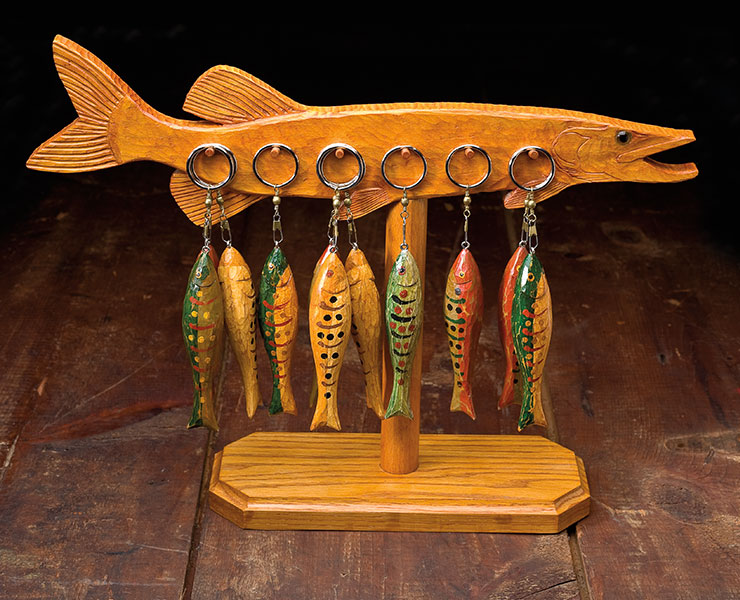
This simple design is easy to carve and fun to paint!
by John Reichling
I carve a variety of decorative fish-spearing decoys and end up with a lot of small cutoffs that are just too good to throw away. To save them from the burn pile, I came up with this simple, fun, and useful project for carvers of any skill level.
The advantage of these fun designs is that you can make them as simple or complex as you wish. Use materials that you have on hand, such as leftover house paint. Add fins or change the shape to make the designs your own.
[button link=”https://woodcarving.zeeframes.com/wp-content/uploads/2019/05/WEB-StropTalk14-Fish-Keychain-Pattern.pdf” size=”large” icon=”download” color=”red” bg_color=”#d70000″ border=”#d70000″]Download Pattern[/button]
Carving the Fish
 |
Step 1: Rough out the fish. Transfer the patterns to heavy paper or thin cardboard and cut the pattern lines to create a template. Trace the template onto the blank and draw centerlines on the top and bottom. Use a band saw, scroll saw, or coping saw to cut along the top template lines. Use tape to reattach the cut-off pieces and cut the side view. |
 |
Step 2: Remove the sharp corners on the front and tail. Carve with the grain. If you feel the knife catching in the grain and starting to split the wood, rotate the blank and begin cutting from the opposite direction. Turn the blank often and remove equal amounts of wood from all of the sides. |
 |
Step 3: Add the details. Check the body for symmetry as you work. When you are satisfied with the shape, taper the edges of the tail. Draw the gill slit and make a stop cut along the line with a hobby knife. Hold the knife at a 45° angle about 1/8″ (3mm) from the stop cut and carve up to the stop cut to create a channel that represents the gill slit. Make gill slits on both sides of the carving. |
 |
Step 4: Attach the screw eye. Carve 1/16″ (2mm) from the tip of the nose to create a flat surface for the screw eye. Find the center of the flat spot and gently twist the point of the knife into the wood to create a starter hole for the screw eye. Thread the screw eye the whole way into the fish’s nose. |
 |
Step 5: Basecoat the fish. I use white Liquitex gesso, but use your choice of primer. Draw the color demarcation line. Paint the top half of the fish a color of your choice. Here I used green; see the photo on page 25 for more ideas. |
 |
Step 6: Add painted details. Use the photos as a guide to paint the eyes, dots, and stripes. Allow the paint to dry. |
 |
Step 7: Finish the fish. Use 150-grit sandpaper to lightly distress the keychain, removing some paint to allow the raw wood to show. Brush on three coats of amber shellac to tone down the bright paint and give the piece an antique look. Apply a coat of Krylon matte finish to tone down the gloss of the shellac. Attach a brass swivel snap and split key ring to the screw eye. |
Materials & Tools
MATERIALS
• Basswood, 1″ (2.5cm) thick: 1 1/4″ x 5″ (3.2cm x 12.7cm)
• Sandpaper: 150-grit
• Gesso, such as Liquitex white
• Acrylic paint, such as Liquitex: black, green, red, yellow
• Pencil
• Amber shellac, such as Zinsser Bullseye
• Spray matte finish, such as Krylon
• Split ring: 1″ (25mm) diameter
• Brass swivel snap: size 5
• Small screw eye
TOOLS
• Band saw, jig saw, coping saw, or scroll saw
• Carving knife or hobby knife with #11 blade
• Paintbrushes: #4 flat and #3 round
• Pliers
About the Author
“Trapper John” Reichling resides in a 100-year-old log cabin on High Lake in Vilas County, Wis., with his wife, Carol, and two dogs. He is a self-taught woodcarver in the traditional style who began carving about 30 years ago. His work is available for purchase at the Trading Post International, Inc., in Land O’ Lakes, Wisc. Contact John at reichlingjohn46@hotmail.com.

Get the Latest Issue
For more articles like this, subscribe to Woodcarving Illustrated magazine.
Plus! Get digital mini magazines in your e-mail between printed issues.


