Whether pushed or pulled, these tools rank high as wood removers
By Roger Schroeder
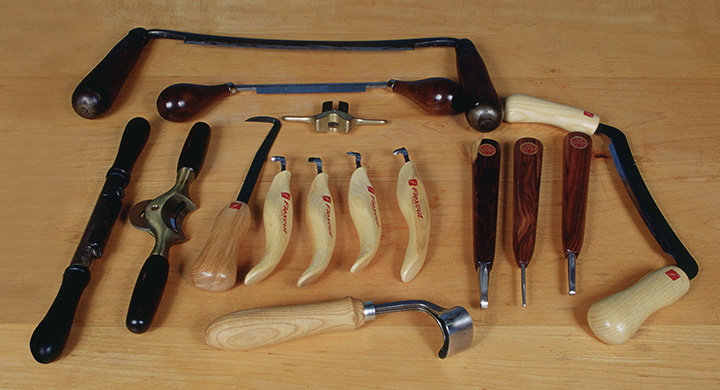
As a woodcarver, you know that the game plan is to remove wood. A sharp knife can’t be beat for a small project in softwoods. For large hardwood pieces, chisels, gouges, V tools and power tools get the job done accurately and efficiently. But other cutting tools such as drawknives, spokeshaves and scorps are available. Despite their intimidating names, they have found their way into woodcarvers’ shops.
 The Drawknife
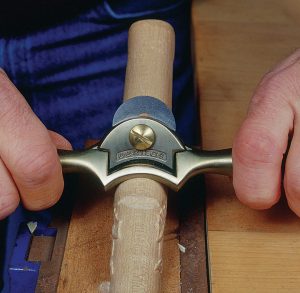
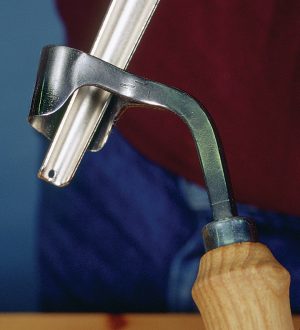
What is a drawknife? Visualize a two-handled chisel with a very long cutting edge and single bevel. The drawknife has been designed with a number of configurations; the typical form offers a long naked blade tapering into narrow ends or tangs. To make the blade more manageable, the tangs are covered with wooden handles. Most handles are bent at angles to the blade, but a few come straight out. The drawknife can tackle both convex and concave surfaces, pare wood down exactly to a line, and hog off wood very quickly. If the blade is curved in, the drawknife becomes an inshave, which works great for hollowing out or “scooping” work.
Is Using a Drawknife Safe?
I’ve heard of no serious mishaps with the drawknife, but be prudent. Obviously, use the handles and don’t grip the drawknife by the blade. When you want to clear away chips, keep the tool well to one side so you don’t sweep the clean-up hand into the blade. And don’t work with your body too close to the project. You probably won’t gut yourself with the tool—I haven’t come across that happening, but why be the first?
 Sharpening
Because of the long blade and the handles, it’s hard to sharpen a drawknife on a grinding wheel. For that reason, it’s a good idea to purchase a new one that will probably just need a good honing and not a major sharpening.
If you do need to sharpen it, you have several options. The safest way is to hold the tool upright with one handle resting on a workbench or tabletop. Use a flat sharpening stone—diamond, ceramic, natural and manmade are all good choices. Make sure the stone is flat against the bevel and apply long strokes instead short choppy ones. Use an extra-fine stone on the back to get rid of the wire edge.
If you do manage to get a ding in the blade, or if it’s one of those antiques dulled by years of neglect, then you are in for a little work. A fine mill file, available at most hardware stores and home improvement centers, works well to reshape the edge. It will take some time to get the bevel in tiptop shape, but the result will be worth the effort.
Some drawknife enthusiasts put a slight bevel on the back of the blade for extra maneuverability when working with the bevel up. There is more control with this extra bevel, but it is hard to grind or file evenly across the long cutting edge.
Get a Grip on It – 8 Steps to Mastering the Drawknife
Here’s how you can familiarize yourself with the tool in eight steps:
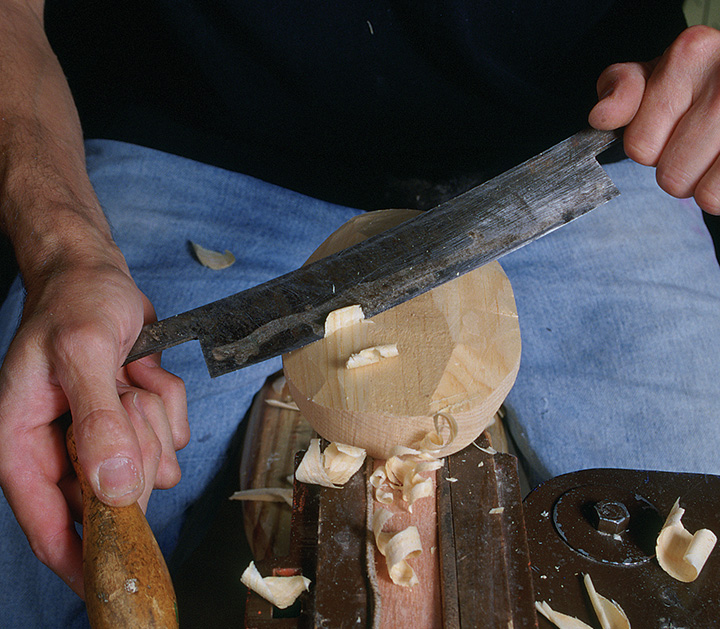
1. Take a good look at the drawknife and study its anatomy. Grip the tool firmly in both hands, but not too hard. Hold it so the bevel is up, then turn it around so the bevel is facing down. The tool should feel pretty much the same, regardless of which way the bevel is facing.
2. Prepare your practice block. Find a sizable chunk of scrap wood and clamp it firmly in a holding fixture. Make sure the area you are going to work on is fully exposed and fairly flat. Orient the wood so you can cut with the grain.
3. Practice cutting bevel-side down. Find a position that offers a firm, braced stance on the floor. Holding the tool bevel side down, pull or “draw” it toward you. If the tool is razor sharp, a chip or curl should break free from the surface almost immediately. Take a number of short and long strokes.
4. Practice cutting bevel-side up. Turn the tool over so the bevel side is up. Again, remove wood with a series of short and long strokes.
5. Refine the cuts. Hold the blade at an angle to the work, either bevel up or down, and slide the blade to one side as you pull the tool. It helps to imagine slicing a loaf of bread. You don’t have to start from one edge of the blade and work to the opposite side. Begin at a point about 1″ from an edge.
6. Use your thumbs for more control. For more control, place your thumbs on the upper part of the blade and grip the handles with the rest of your fingers.
7. Master the push stroke. Turn the tool so that the cutting edge is facing away from you. With bevel up and then down, push the blade across the surface. This technique saves you from having to turn a project around if grain changes direction.
8. Practice heavy strokes for heavy wood removal. With a good grip on the handles and the bevel down, make a series of short, heavy yanking strokes toward you. You should dig the blade into the wood and bring the handles up. By taking short strokes, you won’t be cutting so deep into the wood that the blade gets trapped or that you break away too much waste. Keep the blade angled to the surface and slide the blade from one side to the other. You can take a lot of wood off quickly with a lot of control using this method.
After using the drawknife both ways, it’s easy to see what the bevel does. With the bevel down, the tool tends to rise up from the cut, which helps prevent cutting too deep. Working with the bevel side up, you can remove finer shavings and cut closer to a line.
When hollowing out a project with the drawknife, cut with the bevel down. As you pull or push, lightly lift the handles clear to pry out the wood chips. Work to the low point from both sides of concave surface to avoid breaking away too much wood where the grain changes.
When working on a convex surface, start at the high point of the curve and cut down. You can cut with the bevel side down, but if you cut with the bevel side up you can literally pare away the wood with a lot of control.
 Spokeshaves
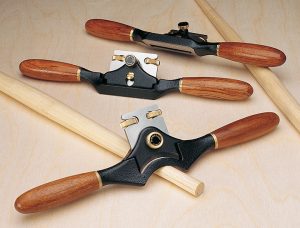
If you want to compare a spokeshave to a familiar tool, think handplane. New spokeshaves, designed with a cutter and cap iron, come in several shapes: flat-edge for flat and some round surfaces, half-round for convex cuts, radius for hollows and chamfer for edges. Not all, however, are going to be useful in woodcarving.
Put to Use
A spokeshave can be pushed or pulled and leaves the same finish as a handplane. However, because the sole of the spokeshave is so narrow, it is harder to control. It’s not an easy tool to use, but with practice and the right blade, you can put a very smooth finish on a variety of surfaces. Keep in mind that the tool is not designed for hogging off wood. Instead, aim to produce fine shavings.
Traditionally, the spokeshave was a furniture carver’s tool used to shape curved legs and rolling skirts on tables and cabinets. But I find the tool ideal for removing facets prior to sanding the hardwood sculptures I like to carve. It’s not a big investment to own one of these tools, and it will probably come in handy one day when you find your favorite carving tools can’t achieve the surface you are looking for.
Sharpening and Care
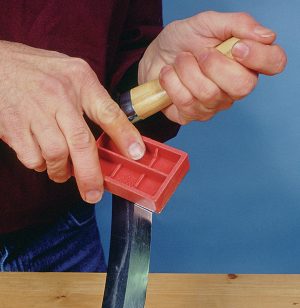
The problem with sharpening a spokeshave’s cutter is its size. The curved and radius profiles are difficult or impossible to put to a grinding wheel, and even the flat-edge cutter is hard to hold to a wheel without a holding fixture. One manufacturer recommends using a homemade blade holder and sanding disc, driven in a drill press, for a blade with a concave radius. My advice is to purchase a new blade if the one you are using gets too dull. However, if the blade only needs honed, a round honing stone works fine for curved blades and flat stones work for flat blades. That said, if your cutting edge does get a nick, it might pay to replace it.
 When not in immediate use, put the tool blade-down on a wooden work surface. Don’t worry about dulling the edge – it’s meant for wood. Nothing dulls an edge faster than hitting it with another steel tool. Many spokeshaves have a hole in one handle, so hanging it up is a good storage option. Finally, take care not to drop it, especially if you are working over a concrete floor. A metal spokeshave is not indestructible.
Spokeshave redesign?
Veritas added a new concave spokeshave in their lineup. Like the other handplanes in its line, the company focused on improving traditional feed mechanisms and blade adjustments. Like the company’s flat and round spokeshave, the new concave spokeshave features two thumbscrews to adjust and control blade skew and depth of cut. Since it is concave, company officials say it is much easier to blend adjacent cuts together.
 Scorps
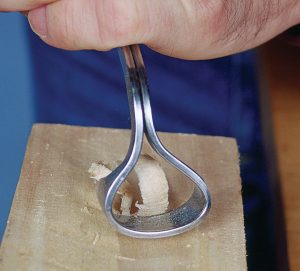
If an inshave works well, imagine how useful it would be if the blade were bent into a loop with both tangs fitted into one handle. Coopers and bowl makers have already been using this tool, called the scorp, for many years. It has one primary function: to hollow. Sometimes called a single-hand inshave, the scorp definitely has a place among woodcarvers. With the bevel on the outside, it leaves a cleaner finish than a gouge and usually works on the pull stroke. Scorps come in a variety of sizes. The largest are 4″ across with a nearly 7″ cutting edge. Micro scorps have openings as small as 1/16″. To use the tool, get a good grip on the handle, let the cutting edge dig into the wood, and give a pull. If the tool is well honed, it should take out a nice curl from a species like basswood. Don’t cut too deep when first using a scorp. Like the spokeshave, this tool is meant for light wood removal.
 Sharpening Strategies
Scorps with large openings are easily sharpened with flat stones on the outside and round ones to hone off the burr on the inside. Micro scorps require a different strategy. To maintain a razor-sharp edge, use a honing compound or micron paper over a piece of flat glass. To remove the burr on the inside, use a short length of dowel slightly smaller than the opening. Wrap the down with fine sandpaper or charge it with honing compound. Push the dowel in from the top of the opening and hone away from the cutting edge.
What’s New on the Market?
Aside from the micro scorps, which I find excellent for cleaning up small recesses, Flexcut Tools has come out with an innovative design. Instead of a complete circle, these small scorps are open on the top, with the cutting edge at right angles to the handle. Their profiles suggest gouges and V tools. Like traditional scorps, they can be pulled and are available for both right and left-hand use. If you feel comfortable changing hands, you can push the tool away from you. I tried out a set of four and enjoyed using all of them.
Drawknives, spokeshaves and scorps may not be for every woodcarver. But when your best knife, chisel, gouge, V tool or rotary bit just can’t do the job, then it’s time to turn to one of these exceptional tools.
Spokeshave Tips
1. Grip the tool with both hands. Thumb pads are sometimes cast in the frame, so that’s where your digits belong. It’s the thumbs that push when moving the spokeshave forward and the other fingers steer.
2. Keep a good steady downward pressure on the tool. If you don’t, it will chatter and skip.
3. Shearing action produces clean cuts. Once you make some passes with the tool, hold it at a slightly skewed angle to achieve a shearing action that produces a much cleaner cut.
4. Frustration levels can reach the boiling point when working with new tools, and especially with harder woods. Set aside knot-free white pine scraps of different thicknesses to try out wood shaping tools such as drawknives, spokeshaves and scorps. When you get comfortable with the tools, then graduate to harder species.