 Make a miniature tool with a sharp knife and a few careful cuts
Based on a traditional design made famous by Ernest Warther
The ability to make multiple interconnected parts from a single piece of wood is a whittler’s specialty—as evidenced by the popularity of chains and cages. These miniature pliers aren’t your casual, sitting-on-the-porch type of whittling, but they will reward you with an amazing mechanism. Even after we made our first successful pair of pliers, we had trouble figuring out how it actually works. This is a nifty little project you’ll make to confound people time and again.
Marking the Blank
The success of this project begins with a properly marked blank. CLICK HERE to download a detailed set of drawings.
1. Draw centerlines on two opposite sides of the blank, now the right and left sides. Draw the blunt nose of the pliers as dotted lines.
2. With the left side facing up, measure and mark 1/2″ (13mm) down the centerline. Draw a line at a 45° angle to the right edge. Measure and mark from the end down 1″ (25mm) along the left edge of the blank and draw a line at a 45° angle to the centerline.
3. Extend the lower end of the first 45° line from the left side across the top of the blank. Use a dotted line to mark the upper end of the line across the top and bottom of the blank.
4. Extend the upper end of the second 45° line across the bottom of the blank. Use a dotted line to mark the lower end of the line across the top and bottom of the blank.
5. Refer to the drawing and mark the right side. The right side should be a mirror image of the left.
6. Draw two parallel lines lengthwise on the top of the blank, dividing the blank into thirds. Extend the lines just past the dotted lines. Connect the two parallel lines with a line corresponding with the line across the bottom of the blank.
7. Refer to the drawing and mark the bottom side. The bottom should be a mirror image of the top.
 |
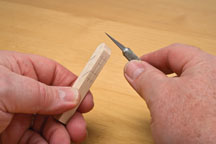 |
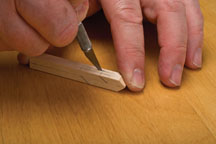
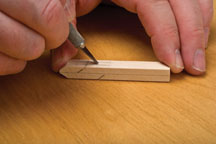
| 1: Mark the blank. Follow the instructions on the previous page. Use a sharp pencil or thin-leaded mechanical pencil. The blank pictured on the left shows how your blank should look after completing Step 4; the one on the right is ready to carve. | 2: Taper the nose end of the pliers. Shave the top and bottom of the blank to achieve the look you want. The angle can be as steep or wide as you like, and the profile should be symmetrical. Don’t carve the end to a sharp point; keep it a little blunt. |
 |
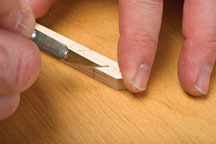 |
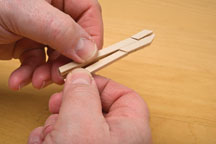
| 3: Make the parallel cuts through the blank. Make sure the blade cuts are perpendicular to the surface of the blank and not angled from side to side. The cuts you make through the top of the blank should exit on the lines drawn on the bottom. Don’t try to cut too deeply in one pass; it will take several passes to cut through the blank. Extend the cuts a little past the dotted lines on the blank or the pliers will not open. When you’re sure the cuts are true from the top side, you can finish them from the bottom of the blank. | 4: Cut the 45° lines on the sides of the blank. Again, the blade should be perpendicular to the face of the blank. Cut from the centerline to the edge of the blank. Cut only the top third of the blank, down to the first parallel line marked on the top edge. Make sure the cut is clean through to the connecting cut. You may hear or feel a little click when it is cut through. Cut both lines on one side, flip the blank over, and then repeat the process on the opposite side. |
 |
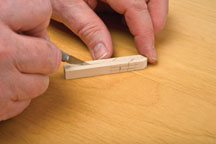 |
| 5: Make the angled cut between the parallel cuts. Cut the short line drawn last (Steps 6 and 7, Marking the Blank on page 43). Make a plunge cut at a 45° angle. Your aim is to reach and connect with the inner cuts made in the previous steps. When cutting on the top of the blank, angle the cut toward the handle end. When making this cut on the bottom side of the blank, angle the cut toward the nose of the pliers. In both cuts, run the blade into the blank and rock it back and forth. Flip the knife and re-enter the cut and rock the blade again until the middle third section is free. Take your time—these are critical cuts. | 6: Cut the handles and jaws apart. Make long, straight, even cuts along the centerline from the 45° cuts to the ends to separate the handles and the jaws. Do not cut the area between the 45° cuts. Cut all the way through the blank. Make several passes of the blade to keep from splitting the wood. |
 |
|
| 7: Carefully open the pliers. Open them with as little force as possible or the pliers will break. If it doesn’t work, extend the short angled cuts made in Step 5. If it still does not open, check all the cuts to ensure that the hidden interior cuts all meet. Eventually, the halves of the pliers will free themselves. |
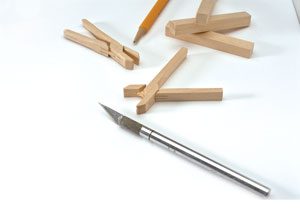
Materials & Tools
Materials:
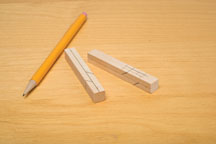
• Basswood, 3/8″ (1cm) square: 3″ (76mm) long
Tools:
• Pencil
• Small ruler
• Protractor or tri-square
• Hobby knife, such as X-Acto knife, with #11 blade