A little bird told us this is the perfect project for power carvers
By Butch Clark
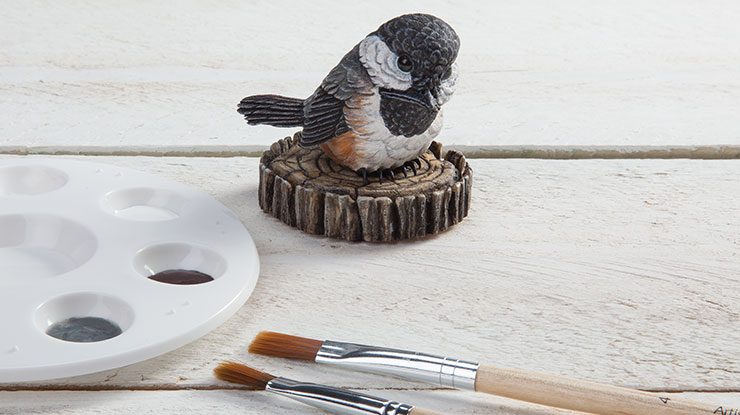
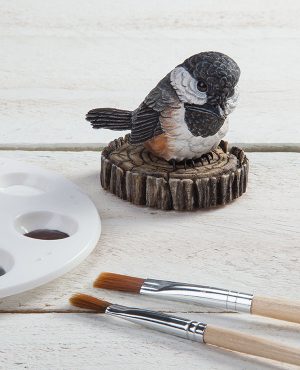
While trying to use up some scrap tupelo, I was inspired to carve a baby bird. This cute little guy is the result. Because he’s just an infant, I wanted him to have a small body and wings with a large head.
Getting StartedTransfer the patterns for the bird and base to the blanks. Use a piece of carbon or graphite paper. Cut the bird side view first using a band saw. Tape the pieces back together with clear packaging tape, and then cut out the top view. Separate and discard the scrap pieces from the cutout. Then cut the base. Sketch a centerline starting at the beak, moving up and over the crown of the head to the tip of the tail. Draw the main landmarks, such as the head, beak, wings, and feet. Refer to the pattern, using a measuring scale or calipers for accuracy. |
Roughing Out
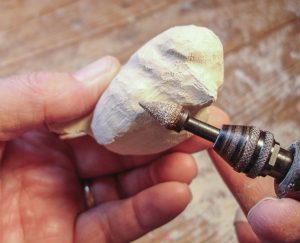 |
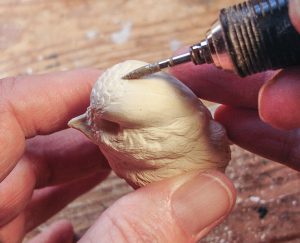
Step 1Rough-shape the bird. Using a cone-shaped carbide-point bit, follow the lines you just made, thinning the neck and back areas to distinguish the wings and head from the torso. Switch to a tapered ruby bit. Round the head, moving from the beak to the crown. The crown should be noticeably smaller in circumference than the neck area. Make a small valley on either side of the head where the eyes will go, moving back from the brows to the nape of the neck until the valleys almost meet. Thin and round the tail. |
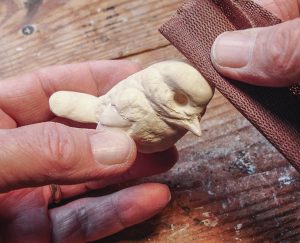 |
Step 2Separate the wing parts. Use the same bit. Contour the head, cheeks, and beak. Add round wells for the eyes. Sand the entire bird with 220-grit sandpaper or 240-grit Abranet®. |
Adding the Feather Texture
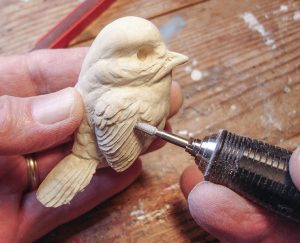 |
Step 3Draw feathers onto the wing parts and tail. Refer to the pattern. Then lay a cylinder-shaped blue ceramic stone on its side and cut individual feathers into each wing and on the top and bottom of the tail. |
 |
Step 4Fill out the feather texture. Lay a tapered cylinder-shaped white ceramic stone on its side and carve individual feathers on the cheeks, breast area, sides, and back of the bird. With the same stone, round each feather, and then carve the barbs. Add feather splits. |
 |
Step 5Draw and carve the individual head feathers. Use a narrow, pointed ruby bit. Start at the beak and increase the feather size as you work toward the back. |
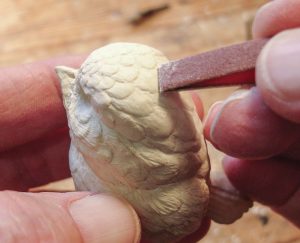 |
Step 6Round off and break the sharp corners of each feather. Use a sanding stick with a band of 220-grit sandpaper. Texture the head feathers with the tapered cylinder-shaped white ceramic stone. |
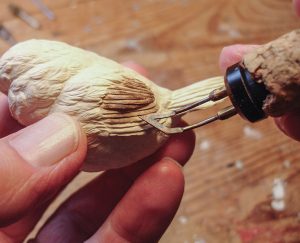 |
Step 7Burn the wing and tail feather texture. Use a bent shader tip in a woodburner. Don’t forget to add in the feather quills during this step. |
 |
Step 8Burn in the barbs. Use the point of a skew tip. Add feather splits where desired. Note: To keep the burner tip clean and sharp, lay a piece of sandpaper on a flat surface. Then lay the burner tip at a sharp angle and run it across the sandpaper to remove any grit or grime. |
Adding the Details
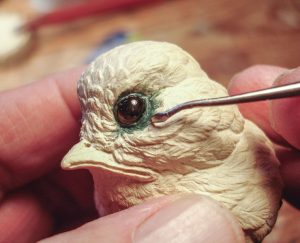 |
Step 9Set in the eyes. Make sure that the eye sockets are big enough to accommodate 3/16″ (5mm)-dia. brown eyes. The eyes should sit far enough into the socket that when looking at the bird’s head from above, you see just a bit of each one. Using a dental tool, place some epoxy putty in the eye sockets to hold the eyes in place. Then form a small ribbon of epoxy and place it around the eyes to form the eye rings. Work the epoxy around the eyes and blend it into the wood as feathers. |
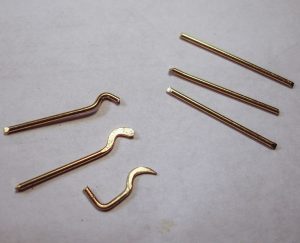 |
Step 10Shape the feet. Note: Wear eye protection when performing this step. Cut six pieces of 1/32″ (1mm)-dia. brass rod into 1″ (2.5cm) lengths. Bend a radius on one end of each piece to form a nail shape, and then pound the nail flat. Hold the straight end of the brass rod with small locking pliers. Grind the nail to shape using a ball-shaped fluted carbide cutter bit. Bend the toes to shape after grinding. |
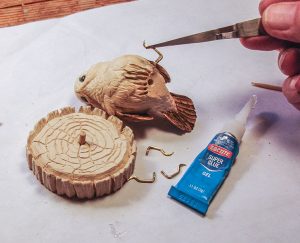 |
Step 11Attach the feet. Drill six holes 1/16″ (2mm) in diameter by 9/32″ (7mm) deep in the bottom of the bird; refer to the pattern. Cut 1/16″ (2mm)-deep grooves from the outer body to the holes. Place a small amount of cyanoacrylate (CA) glue on the toe shafts and insert the toes into the holes. Drill a 3/16″ (5mm)-deep hole in the bottom center of the bird to accommodate a 1/8″ (3mm)-dia. wood dowel. |
Carving the Base
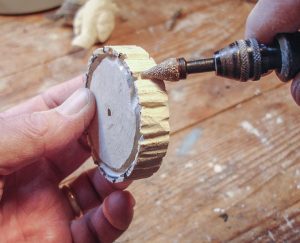 |
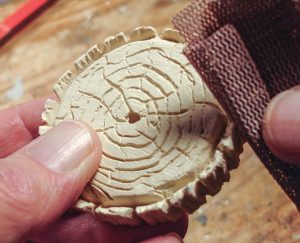
Step 12Draw the bark lines. Sketch a circle 1/4″ (6mm) in from the edge. Add spokes at regular intervals going out toward the edge, and then carve along these lines using the tapered ruby bit. Make random vertical cuts all around the outside of the base to simulate bark texture. Drill a 3/16″ (5mm)-deep hole in the center of the base for the wood dowel. |
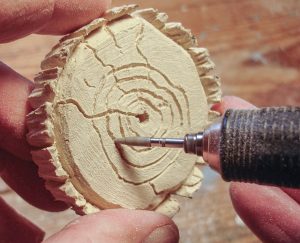 |
Step 13Define the rings. Cut around the inside and outside of each bark section with the pointed ruby bit. Add growth rings fanning out from the central dowel hole. Use the same bit. |
 |
Step 14Shape the bark pieces. Break sharp corners and remove rough edges in and around each bark section with a piece of 240-grit Abranet or 220-grit sandpaper. Slightly round the top of each bark section. |
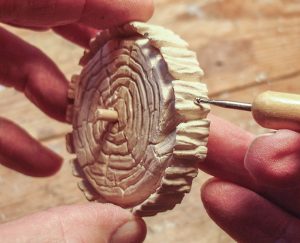 |
Step 15Add more bark details. Burnish the sections of bark using a ball stylus. The bark should look rough and bumpy. Then glue the dowel in place. |
Painting and Finishing
 |
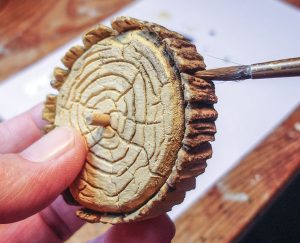 |
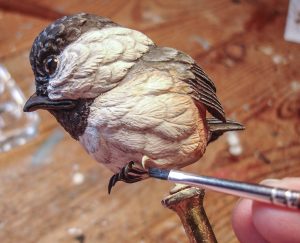
Step 16Spray the bird and base with clear satin finish. The project will be easier to finish if mounted on a paint stick. Paint the bird, referring often to the Paint Notes on page X. (I use a #6 round brush to apply base coats and a 1/8″ (3mm) angular shading brush for drybrushing and detailing.) Once done, shade all feathers and feather splits by adding just a slight touch of black to the basecoat colors and apply around the bottom of each feather. Scrape the excess paint from the glass eyes with a knife. Do not use sandpaper. Let the paint dry, and then attach the bird to the dowel with cyanoacrylate (CA) glue. |
|
Paint Notes Cap, bib, beak: Mars black Breast, cheeks, rump, highlights to feather-edges and toes: titanium white Side flanks: raw sienna, titanium white (blend into the white areas of the breast and rump with a watery brush) Back and shoulder area: raw umber, ultramarine blue, titanium white (mix to a brownish grey) Top of wings, tail: burnt umber, Payne’s gray, ultramarine blue, titanium white (mix to a dark grey) Toes: burnt umber, Payne’s gray, small amount of titanium white Base (first coat): yellow oxide, titanium white Base (second coat): watered-down Payne’s gray and burnt umber (use to darken growth rings and cracks) Base highlights: drybrush titanium white Underside of tail and wings: neutral gray |
|
|
MATERIALS • Tupelo, 1 3/4″ (4.4cm) thick: 1 3/4″ x 3 1/4″ (4.4cm x 8.3cm) • Tupelo, 1/2″ (1.3cm) thick: 2 1/2″ (6.4cm) square • Wood dowel: 1/8″ (3mm)-dia., 5/16″ (8mm) long • Glass eyes: two, 5mm-dia. brown • Brass rod: 1/32″ (1mm)-dia., 6″ (15.2cm) long • Carbon or graphite paper • Epoxy putty • Finish: clear satin, such as Deft • Acrylic paint (see Paint Notes above) • Glue: cyanoacrylate (CA) • Sandpaper: 220-grit or 240-grit Abranet • Tape: clear packaging |
TOOLS • Drill with bits: assorted small • Knife (optional) • Band saw • Graphite pencil • Measuring scale or calipers • Rotary tool • Ruby bits: tapered, pointed • Blue ceramic stone: cylinder • Fluted carbide cutter: ball-shaped • Carbide-point bit: cone-shaped • White ceramic stone: tapered cylinder • Stick with 220-grit sandpaper band • Woodburner with nibs: skew, bent shader • Ball stylus • Locking pliers • Dental tool • Paintbrushes: #6 round, 1/8″ (3mm) angular shader |
| About the Author |
|
Butch Clark lives in rural Darke County, Ohio, with his wife, Janie. He began carving in 1992, specializing in realistic songbirds, and now teaches classes on songbirds and their habitat. Butch is a member and past president of the “Brukner Nature Carvers” woodcarving club in Troy, Ohio. He has won numerous awards at woodcarving shows throughout the Midwest and East Coast. Contact Butch at butch0547@embarqmail.com. |
 |
Get the Power Carving Manual 2023 Issue Purchase the IssueFor more articles like this, subscribe to Woodcarving Illustrated magazine. Magazine SubscriptionPlus! Get digital mini magazines in your e-mail between printed issues.
|